General
About
This chapter describes some of the basic principles used in SaleSmartz. Reading this chapter will prepare you with many of the common tools for using the functionality in each part of the application.
Documents
Most new documents are created by selecting "New.." in the "File" menu. A dialogue will appear allowing you to choose the type of document you require.
Window menu
This menu contains a list of all document windows. If any document windows
are open, the current (front) window is marked with a "¯". The
abbreviated window type is also shown in brackets, after the window’s name.
If you are working with a large number of windows, you may wish to hide some
of them. The menu item "Hide Window name" performs this action. To
show a window again, select it in the Window menu or select the menu item "Show
all windows" in the Window menu.
The "Show Contacts" menu item allows you to view contact lists. "Show
all contacts" will show the Contact List window containing all Contacts
installed in the SaleSmartz application. If you are using contact groups, then
the list of contact group files will appear in the "Show Contacts"
menu. Selecting one of these groups will show the window containing the selected
contact group.
"Show Catalogue/Price List" will open the application’s default
Catalogue or Price List if it has been installed in the preferences. Other price
list and catalogue files will also appear in a sub menu to the right of the
"Show Catalogue/Price List" menu item. Selecting one of these files
from the sub menu will open each of the Price List or Catalogue files.
"Show contact properties" will show the list of contact properties
in the "Shared resources" document.
Edit menu
Addition or removal of objects (e.g. Quotes or Contacts ) contained in windows is performed with this menu. There are three main actions.
1) New object. Adds an object of the type currently being worked on.
2) Edit/Open/Select object. Allow the current object(s) to be changed. The "Return" or "Enter" keys also perform this action once an object is selected.
3) Clear object. Deletes the currently selected object. The "Delete" key also performs this action.
Other menus
Most document windows will have their own menu. These will only appear when that document window is selected and contain items relating to its window.
Access level
There are two access levels for the application, customer view and full access. The access level is changed by selecting "Full access" in the "Edit" menu. A tick, "¯", beside this menu item indicates that you are currently using the full access level.
"Full access" is used by the Salesperson to prepare and evaluate information.
The customer level could be used to show the customer your Catalogue of Products
and prepare a Quote for them.
The customer level restricts the type of information shown. Costs and supplier
etc. are hidden with the customer level. See the preferences for additional
options for the customer view level.
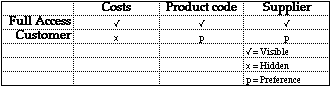
Table of user level access
A password can be used to restrict access to the "Full access" level if you wish (See section "General", chapter"Preferences").
Limits
The limit to the number of Contacts and Products used in SaleSmartz is not
fixed. A Price List can conceivably contain tens of thousands of Products. Factors
such as available memory and network speed will determine what are reasonable
limits.
Generally text fields in SaleSmartz have no length limitations. In reality fields
can contain a little more than 30000 characters. This means that text such as
product codes and names have no fixed length, allowing much more flexibility.
Date/Time
Date and time formats used by this application are taken from your computer’s
system software (See your computer’s operating manual for more information).
Date and time fields are used to change time settings. These fields can be edited
by clicking in the section of the date or time you wish to edit and typing the
new setting. The field will "add" each keystroke to the field section
to set the date. Only valid date or time settings are shown when they are being
edited.
Some date and time fields have this button to the left. This button is the "Now"
button and sets the value of the associated date/time field to the current date
or time.
Currency and numbers
The currency symbol and number format used by this application is taken from
your computer’s system software (See your computer’s operating manual
for more information). In most computers changing the numbering system is done
in the "Control Panel".
Margin
Many areas of SaleSmartz use a Margin in its calculations. Margin is used as
a percentage to indicate the profit made when selling Products and making Quotes.
The formula used to calculate margin percentage is:
Margin = (Sell price - Cost price ) / Sell price x 100
Or if you are converting from Markup
Margin = Markup% x Cost price / Sell price
The allowable limits for Margin percentage in SaleSmartz are from -1000% to
99.99%.
All choices button
In some windows you may see this icon ![]() on a button. This is the "All choices" button. Clicking this button
will set the appropriate settings to show all information available. This is
used in the To Do List window and Contact History.
on a button. This is the "All choices" button. Clicking this button
will set the appropriate settings to show all information available. This is
used in the To Do List window and Contact History.
Display columns
In some windows (e.g. Contact List, Print Template and Price List) columns
and headers are used to display information.
The type of data shown in each column is changed by clicking on the popup menus
(triangles) in the right of each column heading. A list of options will appear,
choosing one will change that column’s data type.
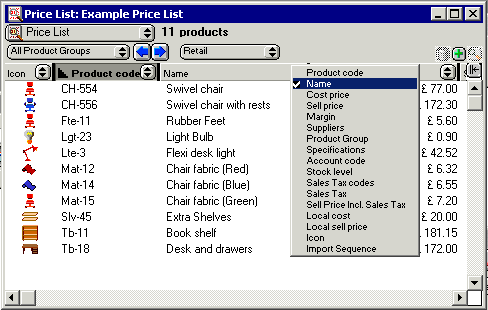
Selecting column content
Clicking on the heading text will sort the list in ascending order by that
column. Clicking again will sort in descending order, and again will stop sorting.
The current sort key column is shown underlined. In the figure above, the "Product
code" is the sort column.
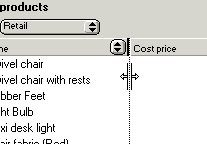
Resizing columns
Resizing the columns is performed by clicking in the grey bar at the right edge of each column popup menu. A grey line appears, showing the new column size. If the size of the column is very small, the pop up menu will be hidden, and/or the column heading text will be truncated to fit.
Resizing a column width to nothing will remove that column from display. Additional columns can be added (up to a maximum of ten columns) by clicking on the button to the right of the last column.
![]()
List buttons
Additional buttons will appear in the top right of a list. These will delete, add, or view info for an object that is selected.
Keyboard shortcuts
To speed up actions, parts of SaleSmartz have keyboard shortcuts.
The "delete" key is a short cut for "Clear" in the "Edit"
menu. First select an object and then press "delete" to remove it.
The "return" and "enter" keys are shortcuts for the Edit/Open/Choose
object menu item in the "edit" menu. Select an object in a window
and press "return" or "enter" to perform the editing action,
e.g. opening a window or showing more information. This has the same effect
as double clicking on an object.
Rows in various lists (Price List, Contact List and To Do List) can be quickly
shown by typing the letter of the first character of the content of the sort
column. For example, in the Price List, pressing "C" will scroll and
select the first Product whose name begins with "C" (assuming the
list has been sorted by product name). Pressing the "Tab" key will
jump to the next item beginning with that character. In this example, it would
select the next Product whose name begins with "C".
Dialogues also have keyboard shortcuts. Buttons and check boxes in a dialogue
have shortcuts based on the name of each item. Holding the (Mac)/Ctrl(PC) key
and a character activates these shortcuts. The character to be typed is determined
by the name of the button, e.g. typing (Mac)/Ctrl(PC)-C will activate a button
called "Cancel".
Note: If there is more than one button whose name begins with the letter you
type, then the second letter of the name is used as a shortcut, i.e. in the
example with a button called "Cancel", if there was a second button
called "Choose file", you would type (Mac)/Ctrl(PC)-H to activate
"Choose file".
Catalogue/Quote
About
Both the Catalogue and Quote documents use a similar book-like format. They consist of a Contents and one or more Sections (Pages).
Pages
Sections contain a list of items (Products or Bundles) in a graphical form.
Each section has a name, which is edited in the field next to the Page Switcher.
Adding or removing sections is performed by menu items.
Contents
The contents page shows a list of all sections.
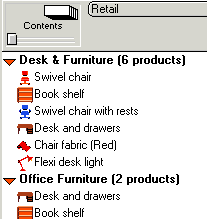
Contents page
The triangle pointing to the right, on the left of each section name can be
used to show a list of the section’s items. Click on the triangle, it will
change to a downward pointing arrow and show the section’s items. To hide
the list of items, click on the triangle again, to close it.
Items can be moved within or between sections by selecting and dragging them.
Page switcher
Switching between sections is performed by the page switcher.
![]()
Page Switcher
Click on the page symbols at the top of the page switcher to move to the next
or previous section . The label below this displays the current section number
and total number of sections.
Dragging the knob below the label scans through all of the pages. Clicking in
the drag bar will jump to the page in that position.
The name of the current section is shown and edited in the text box next to
the page switcher.
Installing items
New items are placed into Catalogues/Quotes from Price Lists and Catalogues in one of the following ways:
1) Copy/Paste items, using the "Edit" menu.
2) Selecting and dragging items from other documents.
3) Selecting "Find..." in the "Edit" menu, do a find, then "Add" items.
4) Products can also be added to Quotes by clicking on the "Add" popup menu below the page switcher. This will show a popup menu with the contents of the default Catalogue/Price List file (set in the preferences).
Locating source files
Entries in Quotes and Catalogues have links to source files such as Price Lists and Catalogues. These source files may be moved or deleted on the disk. You may also just want to change all document references to another. When this happens follow this procedure:
1) Select the "Locate source documents" menu item in the "Quote"
or "Catalogue" menus to open the dialogue.
"Locate source documents" dialogue.
2) The list of all source documents used in the Catalogue/Quote will appear on the left hand side of the field. To locate or change the file, double click on the line or select and click "Choose file".
3) The file selection dialogue will open to allow you to choose a replacement file.
4) Once chosen, the new file name will appear on the right hand side of the field.
5) Click "OK" to close the dialogue and put the changes into effect.
Dialling
About
SaleSmartz has several shortcuts to automatically dial phone numbers for you. This feature is available in Contact file windows, the Contact list window and To Do Memos. Clicking on the button in these windows will open the "Telephone" dialogue.
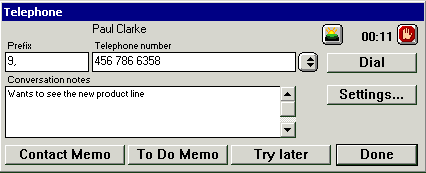
Telephone dialogue
Dial
The dial button in the telephone dialogue dials the number displayed.
Timer
The timer field will start automatically when you dial a number. You can also click on the green start button to manually start the timer. This time can then be recorded in contact memos by clicking the "Contact memo" button.
Prefix
The prefix field is set in the "Settings" dialogue and can be used for example for overseas or outside line prefix numbers.
Telephone number
This field contains the number that will be dialled when you click the "Dial"
button. The popup menu to the right of this field allows you to choose other
numbers if they are available e.g. this popup menu can contain the list of phone
numbers for a contact, gathered from a Contact file or To Do Memo.
Note: When the "Telephone" dialogue is opened from a To Do Memo, the
memo is searched for phone numbers, both in the content of the memo and in the
hotlinks on the memo.
Conversation notes
When you are talking to a person, you can write notes in this field. These notes can then be converted into a Contact Memo or a To Do Memo by clicking on the buttons below this field.
Contact Memo
If the "Telephone" dialogue was opened from a contact window, or a To Do Memo with a Contact hotlink on it, then the "Contact Memo" button is visible. Clicking on this button will take the text content of the conversation notes field and make a new Contact Memo in the associated Contact.
To Do Memo
Clicking on this button will create a new To Do Memo with the text content of the conversation notes field.
Try Later
This button creates a new To Do Memo with a "Dial" hotlink. Opening the "Dial" hotlink will open this "Telephone" dialogue again, allowing you to try ringing the number again.
Settings...
The method of dialling can be set by clicking on the settings button, which opens the "Phone" section of the preferences (See section "Phone/Fax", chapter "Preferences").
Multi-user files
About
Most of the files used in SaleSmartz can be used in a network as a multi-user system. No additional software is required to do this, just a multi user version of SaleSmatz. To use the multi-user facilities, place the required file on a networked shared disk which is available to all those who wish to use it (See chapter "Multi Users").