General
About
Custom Variables can be used to classify Contacts using your own criteria and crfeate your own custom fields.
For example you may wish to group Contacts into Supplier and Customers. This
chapter describes Custom Variables (or Classifications) for Contacts.
The Contact Profile mode in the Contact file window allows you to describe a
Contact using these Variables (See section "Variables", chapter "Contact").
Custom Variables are not required for Contacts and this chapter can be skipped
if you wish.
Hints
Setting a variable for multiple contacts
You can set a custom variable for multiple contacts by dragging a selection of contacts from a contact list window to a variable in the "e;Custom variables window"e;. This will prompt you to set a value for the new variable and them update and save the dragged contacts.
Removing a variable from all contacts
When you delete a custom variable, you will be asked if you want to delete it from all contacts.
My custom variables appear in italics in a contact
This means that the custom variable in the contact is no longer in the main custom variable list. If you click on the vairable in italics, you will be asked to add it to the main list, which will make it available for all contacts.
Custom variables
Window
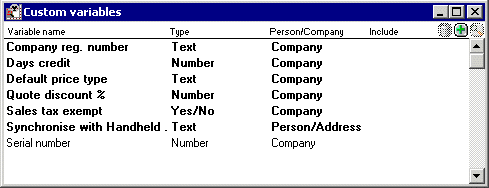
Custom variables window
Creating
Custom Variables are stored in the file "Shared resources". This file’s name and location are stored in the application preferences.
Opening
The Custom Variables window can be opened by selecting the "Show Custom
Variables" from the "Windows" menu.
Note: If you no longer have access to the original Resources file (perhaps you
have taken your computer away from a network) and you wish to use this functionality,
create a new file and drag properties from Contact windows into this new document.
Deleting
The Shared Resources Document can be deleted by removing its file from the disk.
“Standard” Custom Variables
Several Custom Variables are supplied as "standard" and are always included in the Shared Resources Document. These properties can be recognised by a being displayed in bold. These properties are used by SaleSmartz to link additional information to a Contact.
These variables can only be deleted by the administrator user.
Company reg. number
This variable is used when contact information is exported to accounting applications.
Quote discount %
If this variable is assigned to a Contact, each quote created for the Contact will automatically have a whole quote discount assigned when the quote is created.
Sales tax exempt
This variable acts as a switch to turn off sales tax for items in quotes, and
later invoices. It does not however alter the sales tax for invoices that are
already created.
Note: For Australian systems, a further variable "Quoted sales tax"
provides tax exemption and the ability to enter the quoted tax number for each
Contact.
Default price type
If you have several price types, you can choose which type to use for certain Contacts by adding this Custom Variable to each Contact e.g. you could have retail or wholesale customers.
Days credit
This variable is used to automatically assign a payment due date for invoices.
Editing
About
Once a Custom Variables window has been opened, its properties can be edited.
Adding
Properties are added to a Shared Resources Document by selecting "New
variable" in the "Edit" menu.
A dialogue will then appear allowing you to enter the details about the new
variable (See the figure in the "Editing" section below).
Click "Save" to save the new variable to the Shared Resources Document
.
Properties can also be added to a Shared Resources document by dragging Properties
from Contact File windows.
Deleting
Properties can be deleted from the variable window by choosing a variable from
the list and selecting the "Clear variable" menu item. Deletions are
only saved when the document is saved.
Note: Contact files which use deleted Properties will still show these properties,
but they will appear disabled in italic.
Editing
Properties are edited in a Custom Variable window by double clicking on a variable line. A dialogue will appear, allowing you to change the variable details. This dialogue also appears when you add a new variable.
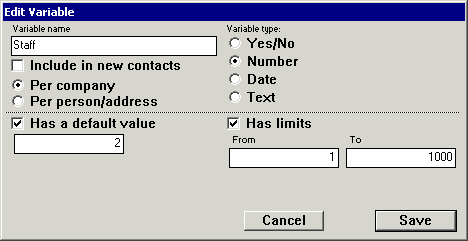
Edit Variable dialogue
Variable name
The name of the variable can be entered in this field. Changes to this name will appear in all Contact files that use the variable, with this variable’s code.
Per Company/Person
This option defines the variable as being associated with the whole company or one or more people within the company.
Include in new contacts
If you have properties that are used in all contacts then you can mark them as "Contact default" by checking this option "on". This means that all new contacts will have these properties included automatically.
Variable type
The type of value that will be attached to a variable can be changed by choosing a type button.
Yes/No
Properties with this type can only have two values, Yes and No, e.g. a variable called "Supplier" could have this type to indicate whether a Contact is a supplier or not.
Number
A number type can be used to describe items such as "Staff count". Numbers can be decimal values, either positive or negative.
Date
A date type can be used to store information about a Contact such as "First Contact" where you can record the date you first spoke to a Contact person.
Text
The text type can be used when you wish to store other information about a Contact. This can perhaps be a credit rating or a list of their interests.
Include in Calendar (Date)
For date type variables, you can choose to include the variable as a reminder in your To Do list with a link back to the contact.
Has a default value
If you want to assign an initial value to a variable, click on this check button. This will allow you to edit a default value which will be used whenever the Custom Variable is installed into a Contact file.
Has limits
If you wish to restrict the possible values for a variable, click on this check
button. You can enter the limits in the field(s) below the button.
Once you have entered the details for a variable, click on "Save"
to store the changes in the Shared Resources Document.