General
About
Price Lists and Contact Lists can be created or updated by importing data from
text files. This chapter describes importing data for both of these lists.
This feature is useful if you are converting records from an old system or another
software package you would like to exchange information with.
Contacts imported from a text file can be saved in Contact groups or as individual
files in a folder called "Imported Contacts" in the application’s
folder.
To break up the individual Contact files into smaller groups (as recommended
for Contact List speed), sub folders will be created within the "Imported
Contacts" folder, grouping the Contacts in name first letter groupings.
The "Contact nş" field is used to identify contact matches if the
import is used to update existing contacts.
Preparation
Before importing data into SaleSmartz you should prepare the import file. Open the application you would like to export the data from. Save the required information as a text format file. SaleSmartz is very flexible with the order of the columns and the field delimiter character so these are not so critical.
A good test for the exported data is to try and import it into a spreadsheet
or word processor application. This will show you what the data looks like before
you import it into SaleSmartz.
Files from other computer systems can also be used if you have the correct file
conversion software. Again test the result with a word processor to see what
the data looks like. The text below shows how an imported file could look when
loaded into a word processor.
New Interiors Ltd.=>C-223=>James Chairson=>Mr=>Purchaser
John's joinery=>S-344=>John=>Mr=>Manager
This example shows what would become two Contacts, the "=>"
represents a tab character and the two lines are separated by a normal return
character.
It is important that the file's field placement is consistent in each row in
the file, i.e. in the example above, the person’s name always has two tab
characters before it, in each row.
Process
Selecting "Import..." in the "File" menu presents you with one of these dialogues:
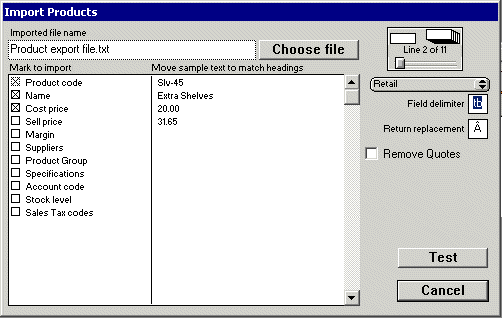
Importing Products from a text file.
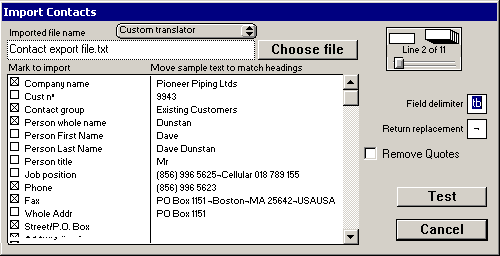
Importing Contacts from a text file.
Plug-ins
If you have translator files in the "Plug-ins" folder that are designed
for import, the popup menu "Custom translator" will appear above the
button "Choose file". This popup menu will otherwise be hidden.
If you have a compatible translator plug-in for your import file, the translator
can be chosen from the popup menu. If this is the case, you can follow the same
procedure as the next "Custom translator" section, but skip steps
1 to 7.
Importing (Custom translator)
To import data from a text file follow these steps.
1) The import file can be chosen by clicking on the button "Choose file".
A dialogue will appear to allow you to choose a text file.
Note: Only files of type text can be imported. Most spreadsheets and Word processors
allow the export of data in a text format. Files from other types of computer
systems may also be imported if the System software allows it.
When chosen, the contents of each line of the file are displayed in the sample
text field.
Note: Leading and trailing space characters will be removed from each of the
file’s fields.
2) Set the Field delimiter character. By default this is a tab. If the file
has a different delimiter, click in the "Field delimiter" field and
type the character. A Tab will appear as "tb" as in the example.
You will know when you have the correct character as the sample text will order
itself into the correct rows.
3) Some files may have more than just a field delimiter and have quotes around
each field, e.g. "Field1","Field2","Field3".
If this is the case then check the "Remove quotes" check box.
4) If some of the fields you import contain return (line end) characters, such
as addresses, then these characters must be replaced before importing. A return
character represents a new row, so fields with returns in will scramble the
data.
The character you have used to replace the return character can be entered into
the "Return replacement" field to convert the imported data fields
back to returns.
5) Drag the sample text on the right hand side of the sample field to match
the columns on the left. The text will be rearranged and show the new order
immediately.
Note: Contact import columns include two types of address. The first is called
"Whole address". This can be used if the address occurs in a single
field. The second is used if the address is split into separate fields. These
are called "Address1, Address2... Align the parts of the imported address
with these headings.
6) Different lines of the text file can then be viewed with the switcher to
the right. Check that other lines have the same format.
Note: Product Groups will be created in the Price List if there is no group
with a name matching exactly the group for the product being imported.
7) Check or uncheck the boxes on the left according to the data available.
This restricts the import of data to only those that are checked on.
This is especially useful if you don’t wish to import the names of existing
Products because you have changed them.
Note: The product code is always imported and used as a reference. New products
added to Price List will always contain Name and Retail price. Even if these
are checked as off.
The company name field is also always imported for Contacts. Be sure to uncheck
the address fields you don't wish to use, e.g. uncheck "Whole address"
if you are using "Area", "Town" etc.
8) Once you have set the import format, click on the "Test" button.
The import will be checked and a status dialogue will appear.
Import status dialogue.
The status dialogue provides a summary of the import action.
9) Errors (if any) can be viewed by clicking on the "Show errors" button. If there are a lot of errors the import order may be incorrect, click "Cancel" and rearrange the rows before trying again.
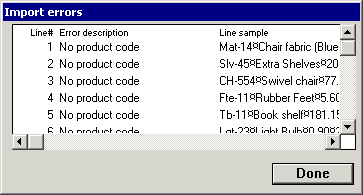
Product import errors dialogue.
Errors are shown referenced by line number in the left hand column. A description and then a sample of the text line is also shown. The highlighted part of the sample text indicates the position of the fault. Tab characters will be shown by the character "×" as in the example.
10) When you are happy with the result of the import, click on "Save"
in the Import status dialogue. The new Products or Contacts will now be changed/added
and then saved to disk.
Note: The import settings you have changed in this process will be saved in
the Price List file for Price Lists and the "Contact List" file for
Contacts. These will be kept for the next time you perform an import.
When a Price List text file is imported as an update, Products can be added
if they don’t already exist in the list.
If Products exist in the Price list and were not imported they can be obsolete.
These Products will be shown in a dialogue after saving the imported list.
They can then be deleted if you wish. Click and select the Product then click
on the "Delete" button. This Product will then be deleted and the
Price List saved.
Importing from Act!
Versions older than Act! 7.0
If your version of Act!® is older than 7.0, you need to import the old database files into a Trial version of Act! 7.0 before proceeding with the steps below.
Older Act! for Macintosh customers may need to upgrade to a more recent version before updating to Act! 7.0
Importing Act! Contacts
An import Plugin is available to import contacts from Act! 7.0.
First you will need to export your data from Act!
1) Open Act!, then select "File" menu - "Export".
2) Choose the type of file to be "Text delimited" and press the "Browse" button to Select the file destination, then click "Next".
3) Select the "All records", if you want all contact records and then proceed clicking next.
4) When you get to the screen asking "Do you want to export field names?", click on "Yes, export field names"
5) Click next with the default screen values until the file is exported.
6) Open SaleSmartz and select "File" menu - "Import Contacts" and select the "Act! 7.0 Contacts" option in the Import type popup menu.
7) Click "Next" and follow the onscreen instructions to proceed with the import.
Note:The default field mappings may vary in Act! and the fields in SaleSmartz will be in the wrong place. To avoid this, download the default mappings file here (Unzip it) and click on "Load map" to load this file after step 5) above.
Importing Act! Notes/History
An import Plugin is available to import notes and history from Act! 7.0.
You will need to create a report file from Act! to export the Notes and History entries.
1) Open Act!, then select "Reports" menu - "Notes/History".
2) In the dropdown, "Send the report output to", select "HTML File"
3) Click on the "All contacts" button
4) Click on each of the tabs (Note/History etc.) in the top of this window and select the "Date range" to "All". Also, click all option types you want to export, they are off by default.
5) Click OK and select where to save the file.
6) Open SaleSmartz and select "File" menu - "Import Contacts" and select the "Act! 7.0 Notes/History" option in the Import type popup menu.
7) Click "Next" and follow the onscreen instructions to proceed with the import.
Note:You should import Act! contacts before Notes/History. Notes/History are linked to contacts by Company name so you may have to merge contact details for duplicate entries if the contact has no company name.