| |
|
|
|
|
General
|
|
About
|
|
| |
This chapter describes various quick steps to help you perform common tasks.
It can be used as a quick and easy way to learn how the application works or
as a reminder of commonly used actions.
The chapter "Concepts", describes
most of the terms used in the following examples. Refer to the chapters listed
at the end of each section to get more detailed descriptions and also to see
the other features available in SaleSmartz.
|
|
|
|
Make a Price List
|
|
About
|
|
| |
A Price List is used to store your Product information and pricing. Several
Price Lists (perhaps for each supplier) can be used by SaleSmartz at the same
time.
|
|
|
Process
|
|
| |
1) Select "New..." in the "File" menu to show the "New
document" dialogue.
2) Choose the "Price List" option and click "OK".
3) Name and save the new Price List.
4) Install Products in a Price List by doing one of the following:
a) Selecting the "Import..." menu item to import Products from
a text file, e.g. export of your Price List from a spreadsheet program
(see chapter 17 "Importing Data").
b) Selecting "New Product" in the "Edit" menu, type
the new Product’s code in the dialogue window and click "OK".
Enter the Product's information in the fields in the new Product window
and save.
(See chapter "Price List")
|
|
|
|
Make a Catalogue
|
|
About
|
|
| |
Catalogues are used if you wish to group and show your products graphically.
Only copies of products appear in a Catalogue. Price Lists are needed to store
the original Products.
|
|
|
Process
|
|
| |
1) Select "New..." in the "File" menu to show the "New
document" dialogue.
2) Choose the "Catalogue" option and click "OK" to
open the new Catalogue window.
3) The first page of the Catalogue is the contents. Pages can be added
by selecting "New section" in the "Edit" menu and then
viewed using the page switcher in the top left of the window. If "New
section" is not visible, deselect any icons which you may have selected
first.
4) Drag (or Copy/Paste) items from a Price List on to pages in the Catalogue.
5) Name and save the new Catalogue.
(See Chapter "Catalogue")
|
|
|
|
Make a Print Template
|
|
About
|
|
| |
Print Templates are used to define the printed appearance of Quotes/Invoices
and Catalogues.
|
|
|
Process
|
|
| |
1) Select "New..." in the "File" menu to show the "New
document" dialogue.
2) Choose the "Print Template" option and click "OK"
to open the new Print Template window. A Print Template consists of one
or many "blocks". A default block is made automatically for the
Quote/Invoice or Catalogue columns near the middle of the window. The size,
border, content and font attributes can be changed for each block using
menus.
3) Add new blocks of customised text to the Print Template by selecting
"New template block" in the "Edit" menu, e.g. these
could be the address or phone number of the Contact.
Preset text (enclosed in «») will be replaced at the time of
printing with the related information from the Contact/Quote or Invoice.
4) Change the content of these new blocks by double clicking on the block
and defining it using the dialogue.
5) Resize blocks by first clicking to select them, then dragging the black
corners to the required size.
6) Name and save the new Print Template.
(See chapter "Print Template")
|
|
|
|
Make a Contact (Customer)
|
|
About
|
|
| |
Contacts are files which store information about a Company and/or People. Contact
information and history can be recorded in each file.
|
|
|
Process
|
|
| |
1) Select "New..." in the "File" menu to show the "New
document" dialogue.
2) The dialogue will open with the Contact option already chosen, so click
"OK" and the new Contact window will open.
3) Additional people can be added to a Contact by selecting "New address"
in the popup menu to the right of the "Last name" field.
4) Enter data into the Address fields, and save.
5) The new contact can be saved by selecting "Save" in the "File"
menu. You will be presented with a dialogue which will allow you to save
the new contact as a single file, or a Contact Group (many Contacts in a
single file). The latter is recommended if you have a large number of Contacts
i.e. more than 500.
(See chapter"Contact")
Contacts can also be imported from other applications (see chapter "Importing Data").
|
|
|
|
Make a Quote
|
|
About
|
|
| |
Use a Quote to provide a Customer with details of pricing for selected products.
|
|
|
Process
|
|
| |
1) To make a Quote, select a Contact and open its window by doing one of
the following:
a) Selecting "Show Contacts" in the "Windows" menu
to show the Contact List and double click on a Contact line.
b) Opening one of the Contact files on the disk.
c) Creating a Contact if necessary (See Make a Contact (Customer) section
in this chapter).
2) Once the Contact file is open, click on the "History" icon
to the left of its window to show the "History" mode.
3) If not already selected, select the Contact History field by clicking
in it. It will then appear with an extra line around it.
4) Select "New object" in the "Edit" menu.
If a dialogue appears for the new object, click on the Quote icon. A new
Quote will be created and selected in the Contact History field.
5) Products can be installed in the Quote by dragging (or Copying/Pasting)
items from a Price List or a Catalogue.
6) If there is no Print Template selected, one can be chosen (or changed
later) by selecting from the list of templates beside the "Choose template"
menu item in the "File" menu.
7) Choose "Print..." in the "File" menu to print out
the new Quote, or "Print preview" to see the quote before printing.
(See chapter "Quote", chapter "Price List" and chapter "Catalogue")
|
|
|
|
Make a To Do Memo
|
|
About
|
|
| |
A To Do Memo is a quick note which can be used simply as a reminder or for
more advanced scheduling.
|
|
|
Process
|
|
| |
1) Type -T(Mac)/Ctrl-T(PC) or select "New To Do Memo" in the
"To Do" menu.
2) Type a message into the new To Do window.
3) Click on the lever at the top right of the window to show more function
buttons.
4) Click on the info button to change the due date and other related information.
5) "Hot links" to other information such as Contacts and Products
can be created on a memo by dragging icons of these items onto the memo.
6) View To Do memos in the To Do List, Month, Week or Day windows, opened
from the "To Do" menu.
(See chapter "Time Manager (Calendar)")
|
|
| |
|
|
|
|
General
|
|
About
|
|
| |
This chapter describes some of the basic principles used in SaleSmartz. Reading
this chapter will prepare you with many of the common tools for using the functionality
in each part of the application.
|
|
|
Documents
|
|
| |
Most new documents are created by selecting "New.." in the "File"
menu. A dialogue will appear allowing you to choose the type of document you
require.
|
|
|
Window menu
|
|
| |
This menu contains a list of all document windows. If any document windows
are open, the current (front) window is marked with a "¯". The
abbreviated window type is also shown in brackets, after the window’s name.
If you are working with a large number of windows, you may wish to hide some
of them. The menu item "Hide Window name" performs this action. To
show a window again, select it in the Window menu or select the menu item "Show
all windows" in the Window menu.
The "Show Contacts" menu item allows you to view contact lists. "Show
all contacts" will show the Contact List window containing all Contacts
installed in the SaleSmartz application. If you are using contact groups, then
the list of contact group files will appear in the "Show Contacts"
menu. Selecting one of these groups will show the window containing the selected
contact group.
"Show Catalogue/Price List" will open the application’s default
Catalogue or Price List if it has been installed in the preferences. Other price
list and catalogue files will also appear in a sub menu to the right of the
"Show Catalogue/Price List" menu item. Selecting one of these files
from the sub menu will open each of the Price List or Catalogue files.
"Show contact properties" will show the list of contact properties
in the "Shared resources" document.
|
|
|
Edit menu
|
|
| |
Addition or removal of objects (e.g. Quotes or Contacts ) contained in windows
is performed with this menu. There are three main actions.
1) New object. Adds an object of the type currently being worked on.
2) Edit/Open/Select object. Allow the current object(s) to be changed. The
"Return" or "Enter" keys also perform this action once an
object is selected.
3) Clear object. Deletes the currently selected object. The "Delete"
key also performs this action.
|
|
|
Other menus
|
|
| |
Most document windows will have their own menu. These will only appear when
that document window is selected and contain items relating to its window.
|
|
|
Access level
|
|
| |
There are two access levels for the application, customer view and full access.
The access level is changed by selecting "Full access" in the "Edit"
menu. A tick, "¯", beside this menu item indicates that you are
currently using the full access level.
"Full access" is used by the Salesperson to prepare and evaluate information.
The customer level could be used to show the customer your Catalogue of Products
and prepare a Quote for them.
The customer level restricts the type of information shown. Costs and supplier
etc. are hidden with the customer level. See the preferences for additional
options for the customer view level.
|
|
|
|
|
Table of user level access
|
| |
A password can be used to restrict access to the "Full access" level
if you wish (See section "General", chapter"Preferences").
|
|
|
Limits
|
|
| |
The limit to the number of Contacts and Products used in SaleSmartz is not
fixed. A Price List can conceivably contain tens of thousands of Products. Factors
such as available memory and network speed will determine what are reasonable
limits.
Generally text fields in SaleSmartz have no length limitations. In reality fields
can contain a little more than 30000 characters. This means that text such as
product codes and names have no fixed length, allowing much more flexibility.
|
|
|
Date/Time
|
|
| |
Date and time formats used by this application are taken from your computer’s
system software (See your computer’s operating manual for more information).
Date and time fields are used to change time settings. These fields can be edited
by clicking in the section of the date or time you wish to edit and typing the
new setting. The field will "add" each keystroke to the field section
to set the date. Only valid date or time settings are shown when they are being
edited.
Some date and time fields have this button to the left. This button is the "Now"
button and sets the value of the associated date/time field to the current date
or time.
|
|
|
Currency and numbers
|
|
| |
The currency symbol and number format used by this application is taken from
your computer’s system software (See your computer’s operating manual
for more information). In most computers changing the numbering system is done
in the "Control Panel".
|
|
|
Margin
|
|
| |
Many areas of SaleSmartz use a Margin in its calculations. Margin is used as
a percentage to indicate the profit made when selling Products and making Quotes.
The formula used to calculate margin percentage is:
Margin = (Sell price - Cost price ) / Sell price x 100
Or if you are converting from Markup
Margin = Markup% x Cost price / Sell price
The allowable limits for Margin percentage in SaleSmartz are from -1000% to
99.99%.
|
|
|
All choices button
|
|
| |
In some windows you may see this icon  on a button. This is the "All choices" button. Clicking this button
will set the appropriate settings to show all information available. This is
used in the To Do List window and Contact History.
on a button. This is the "All choices" button. Clicking this button
will set the appropriate settings to show all information available. This is
used in the To Do List window and Contact History.
|
|
|
|
Display columns
|
| |
In some windows (e.g. Contact List, Print Template and Price List) columns
and headers are used to display information.
The type of data shown in each column is changed by clicking on the popup menus
(triangles) in the right of each column heading. A list of options will appear,
choosing one will change that column’s data type.
|
|
|
|
|
Selecting column content
|
| |
Clicking on the heading text will sort the list in ascending order by that
column. Clicking again will sort in descending order, and again will stop sorting.
The current sort key column is shown underlined. In the figure above, the "Product
code" is the sort column.
|
|
|
|
| |
|
|
|
Resizing columns
|
| |
Resizing the columns is performed by clicking in the grey bar at the right
edge of each column popup menu. A grey line appears, showing the new column
size. If the size of the column is very small, the pop up menu will be hidden,
and/or the column heading text will be truncated to fit.
Resizing a column width to nothing will remove that column from display. Additional
columns can be added (up to a maximum of ten columns) by clicking on the button
to the right of the last column.
|
|
|

|
|
List buttons
|
| |
Additional buttons will appear in the top right of a list. These will delete,
add, or view info for an object that is selected.
|
|
|
Keyboard shortcuts
|
|
| |
To speed up actions, parts of SaleSmartz have keyboard shortcuts.
The "delete" key is a short cut for "Clear" in the "Edit"
menu. First select an object and then press "delete" to remove it.
The "return" and "enter" keys are shortcuts for the Edit/Open/Choose
object menu item in the "edit" menu. Select an object in a window
and press "return" or "enter" to perform the editing action,
e.g. opening a window or showing more information. This has the same effect
as double clicking on an object.
Rows in various lists (Price List, Contact List and To Do List) can be quickly
shown by typing the letter of the first character of the content of the sort
column. For example, in the Price List, pressing "C" will scroll and
select the first Product whose name begins with "C" (assuming the
list has been sorted by product name). Pressing the "Tab" key will
jump to the next item beginning with that character. In this example, it would
select the next Product whose name begins with "C".
Dialogues also have keyboard shortcuts. Buttons and check boxes in a dialogue
have shortcuts based on the name of each item. Holding the (Mac)/Ctrl(PC) key
and a character activates these shortcuts. The character to be typed is determined
by the name of the button, e.g. typing (Mac)/Ctrl(PC)-C will activate a button
called "Cancel".
Note: If there is more than one button whose name begins with the letter you
type, then the second letter of the name is used as a shortcut, i.e. in the
example with a button called "Cancel", if there was a second button
called "Choose file", you would type (Mac)/Ctrl(PC)-H to activate
"Choose file".
|
|
|
|
Catalogue/Quote
|
|
About
|
|
| |
Both the Catalogue and Quote documents use a similar book-like format. They
consist of a Contents and one or more Sections (Pages).
|
|
|
Pages
|
|
| |
Sections contain a list of items (Products or Bundles) in a graphical form.
Each section has a name, which is edited in the field next to the Page Switcher.
Adding or removing sections is performed by menu items.
|
|
|
Contents
|
|
| |
The contents page shows a list of all sections.
|
|
|
|
|
Contents page
|
| |
The triangle pointing to the right, on the left of each section name can be
used to show a list of the section’s items. Click on the triangle, it will
change to a downward pointing arrow and show the section’s items. To hide
the list of items, click on the triangle again, to close it.
Items can be moved within or between sections by selecting and dragging them.
|
|
|
Page switcher
|
|
| |
Switching between sections is performed by the page switcher.
|
|
|

|
|
Page Switcher
|
| |
Click on the page symbols at the top of the page switcher to move to the next
or previous section . The label below this displays the current section number
and total number of sections.
Dragging the knob below the label scans through all of the pages. Clicking in
the drag bar will jump to the page in that position.
The name of the current section is shown and edited in the text box next to
the page switcher.
|
|
|
Installing items
|
|
| |
New items are placed into Catalogues/Quotes from Price Lists and Catalogues
in one of the following ways:
1) Copy/Paste items, using the "Edit" menu.
2) Selecting and dragging items from other documents.
3) Selecting "Find..." in the "Edit" menu, do a find, then
"Add" items.
4) Products can also be added to Quotes by clicking on the "Add"
popup menu below the page switcher. This will show a popup menu with the contents
of the default Catalogue/Price List file (set in the preferences).
|
|
|
Locating source files
|
|
| |
Entries in Quotes and Catalogues have links to source files such as Price Lists
and Catalogues. These source files may be moved or deleted on the disk. You
may also just want to change all document references to another. When this happens
follow this procedure:
1) Select the "Locate source documents" menu item in the "Quote"
or "Catalogue" menus to open the dialogue.
"Locate source documents" dialogue.
2) The list of all source documents used in the Catalogue/Quote will appear
on the left hand side of the field. To locate or change the file, double click
on the line or select and click "Choose file".
3) The file selection dialogue will open to allow you to choose a replacement
file.
4) Once chosen, the new file name will appear on the right hand side of the
field.
5) Click "OK" to close the dialogue and put the changes into effect.
|
|
|
|
Dialling
|
|
About
|
|
| |
SaleSmartz has several shortcuts to automatically dial phone numbers for you.
This feature is available in Contact file windows, the Contact list window and
To Do Memos. Clicking on the button in these windows will open the "Telephone"
dialogue.
|
|
|
|
|
Telephone dialogue
|
| |
Dial
The dial button in the telephone dialogue dials the number displayed.
Timer
The timer field will start automatically when you dial a number. You can also
click on the green start button to manually start the timer. This time can then
be recorded in contact memos by clicking the "Contact memo" button.
Prefix
The prefix field is set in the "Settings" dialogue and can be used
for example for overseas or outside line prefix numbers.
Telephone number
This field contains the number that will be dialled when you click the "Dial"
button. The popup menu to the right of this field allows you to choose other
numbers if they are available e.g. this popup menu can contain the list of phone
numbers for a contact, gathered from a Contact file or To Do Memo.
Note: When the "Telephone" dialogue is opened from a To Do Memo, the
memo is searched for phone numbers, both in the content of the memo and in the
hotlinks on the memo.
Conversation notes
When you are talking to a person, you can write notes in this field. These
notes can then be converted into a Contact Memo or a To Do Memo by clicking
on the buttons below this field.
Contact Memo
If the "Telephone" dialogue was opened from a contact window, or
a To Do Memo with a Contact hotlink on it, then the "Contact Memo"
button is visible. Clicking on this button will take the text content of the
conversation notes field and make a new Contact Memo in the associated Contact.
To Do Memo
Clicking on this button will create a new To Do Memo with the text content
of the conversation notes field.
Try Later
This button creates a new To Do Memo with a "Dial" hotlink. Opening
the "Dial" hotlink will open this "Telephone" dialogue again,
allowing you to try ringing the number again.
Settings...
The method of dialling can be set by clicking on the settings button, which
opens the "Phone" section of the preferences (See section "Phone/Fax", chapter "Preferences").
|
|
|
|
Multi-user files
|
|
About
|
|
| |
Most of the files used in SaleSmartz can be used in a network as a multi-user
system. No additional software is required to do this, just a multi user version
of SaleSmatz. To use the multi-user facilities, place the required file on a
networked shared disk which is available to all those who wish to use it (See chapter "Multi Users").
|
|
| |
|
|
|
|
General
|
|
About
|
|
| |
Contacts are people or organisations and may be customers or suppliers. Each
Contact can be stored as a separate file or in a Contact Group. The "Contact
List" collects Contact files and displays them as a single list (See chapter "Contact List Window").
Separate files have several advantages. One of which is to be able to take
some Contact files on a portable computer out in the field, edit them and replace
them back in the office once finished. Sales staff can also swap customers amongst
themselves by simply swapping files.
In order for these files to appear unique on the disk, they are renamed automatically
when the Contact company name is changed and saved.
Contact groups can also be used to store Contacts. These groups can contain
many Contacts and also be used to classify Contacts, such as a "Supplier"
group and a "Customer" group.
If you have many contacts (more than 500) then Contact groups are recommended
for Contact storage.
In the Macintosh version of SaleSmartz, each Contact is aware of its file’s
folder and label colour. The Windows version also has label colours in SaleSmartz,
but disk file colours are not available on a Windows system.
Contacts can also be classified in your own way by using the variables mode.
Contact files can be shared across a network allowing multiple user access to
the same file (See chapter "Multi Users").
|
|
|
Menu
|
|
| |
When the Contact file window is selected its menu will appear.
|
|
|
|
|
Contact file menu
|
| |
Show Person/Address
This allows you to display one of the people (addresses) within the contact
file.
Set as default
This will set the currently viewed person, as the default for the contact file.
Set as delivery
This will set the currently viewed address as the delivery address for quotes and invoices.
Don't link eMails
This setting will prevent eMails from being linked to this contact automatically.
Copy person and address
When you select the icon of the person in the contact window (above the first
name field), this item will allow tou to copy the whol person and address, and
then paste it again, or in another contact.
New Person/Address
This creates a new empty person and address.
Clone Person/Address
This creates a copy of the currently viewed person and address
Delete Person/Address
This deletes the currently viewed Person and Address
Copy all details
This menu item copies the name, address and phone numbers of a Contact person
in the address mode, to the clipboard.
Copy merge field names
The mail merge field names can be copied to the clipboard by selecting this
menu item. These fields can then be used to create mail merge templates by pasting
them into a document in a word processor application (See chapter "Mail Merging").
Move contact to...
This action will move a contact to another contact group.
Delete whole contact
This will delete this contact from the file.
Post code after town/state
The position of the post code in an address can vary for different countries.
If you have Contacts in countries where the post code position is different,
then you can change the position for this Contact by selecting this menu item.
Select it once to change, and again to change back. The position of the town
(state) and post code fields in the address mode will change accordingly.
The default post code position is set in the preferences (See section "Contact", chapter "Preferences").
Has "State"
If a contact has addresses that include a State, this menu item should be checked.
This adds a state field to the address fields. If you have purchased SaleSmartz
in a country that has states then this option will automatically be marked on
for all new contacts.
File label
The file label (colour) can be changed by selecting a colour from the "File
label" menu. On a Macintosh, each contact’s disk file can be given
a label colour. This colour is shown for each contact in the contact list and
in the contact file’s icon on disk.
|
|
|
Creating
|
|
| |
Select "New" from the "File" menu and then choose the Contact
document type. Alternatively select "New Contact" in the "Edit"
menu, from the "Contact List" window.
|
|
|
Deleting
|
|
| |
Deleting a Contact involves deleting its file on disk or from its Contact Group.
A Contact can also be deleted from the Contact List, by selecting a Contact
and then selecting "Clear Contact" in the "Edit" menu.
|
|
|
Opening
|
|
| |
Contact file windows can be opened by double clicking on a Contact file or
alternately from the Contact List by selecting a Contact, and selecting "Open
contact" in the "Edit" menu. The Contact window consists of four
different data display modes. Each of these is represented by an icon on the
left of the window. Clicking on the icon will show the appropriate mode.
Quotes/Invoices/Products and To Do Memos can also be dragged onto a Contact
in the Contact list window to open this Contact.
To Do Memo Hot Links can also open a Contact file when double clicked (See section "Hot Links", chapter "Time Manager (Calendar)").
|
|
|
View options
|
|
| |
The contact window can be viewed in several ways depending on the size of your
computer screen. To change the view settings, open the "Preferences"
from the "Windows" menu and select the "Contact" preferences
(see section "Contact", chapter "Preferences").
You can view all contact details at the same time, or only view sections at
a time by clicking on the icons in the left of the contact window.
|
|
|
|
|
Contact window, using the “show profile/history in address
mode” preferences
|
|
|
Address
|
|
About
|
|
| |
General information about a Contact is shown and edited in the address mode.
More than one person or address type (e.g. postal, street or visiting address)
can be added to a single Contact file.
One of these people or addresses can be marked as the default. This default
address will be shown in the Contact List window in the columns containing address
details. The currently shown address can be selected with the popup menu to
the right of the Person last name field. This popup can also be used to add
or remove Person/Address types. There must however be at least one Person/Address
type for each Contact file.
|
|
|
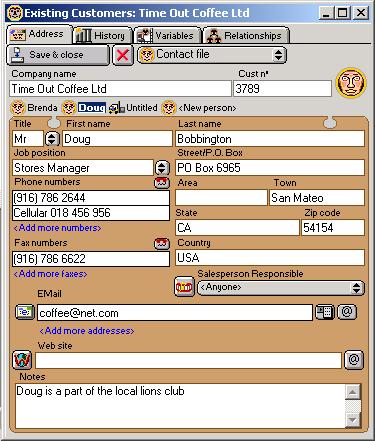
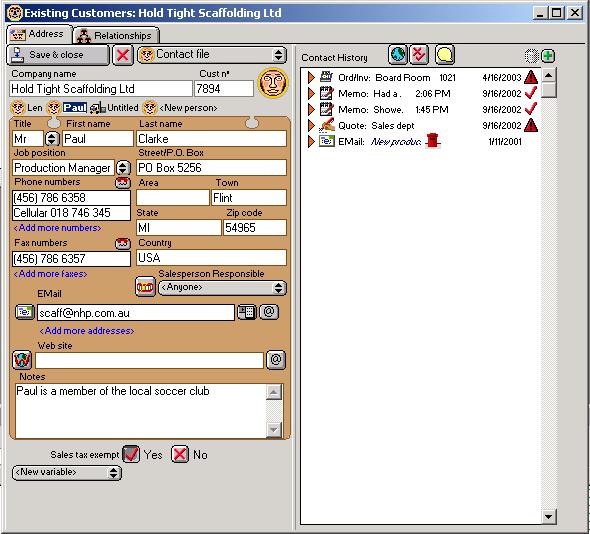
|
|
Contact address mode
|
| |
Save and close
Save changes and close the window.
X - close
Close the window without saving.
Contact file - menu
Menu containg the Contact address mode actions.
Company Name
This is the name of a Contact's company or organisation. It is used as the
Contact's file name, so must be included.
Cust no
May be used as a unique reference for the Contact, e.g. customer code or account
number. This number is used as a reference when importing contacts to check
if a imported contact already exists.
Contact Icon
This icon can be used to drag a reference to this Contact. Contacts may be
dragged on to To Do Memos to create Hot Links to the Contact (See section "Hot Links", chapter "Time Manager (Calendar)").
They can also be dragged into Product Info windows to link suppliers to a Product.
Person/Address selector
Underneath the Company name field, there is a list of the addresses included
in the contact window. You can choose to show each of these people/addresses
by clicking on each of the names.
Title
The title of the person, e.g. Mr., Mrs. or Miss.
Person first name/Person last name
The name of your Contact people at the company or a type of address.
Job Position
The job title or position of the selected contact person.
Phone numbers/Fax numbers
Contact phone and facsimile number(s). These fields will accept both number
and characters. These may consist of 1 or more numbers each.
The button to the top right of each of the phone and fax fields allows you to
quickly ring the numbers in these fields (See section "Dialling" in chapter "Basics").
Address
The address field format is flexible, if you wish to ignore fields in the address
then just leave them empty.
Street/P.O. Box
The first line of the address for the selected Contact person.
Area
The second line of the contact address, if used.
Post Code
The postal or zip code for the address. The placement of the postal code is
determined in the preferences. You can choose to have it before or after the
Town field.
Note: SaleSmartz automatically fills empty town and/or state fields while you
type into the post code field. The text for the town/state fields is taken from
other contacts with the same post code or from a database if you have an appropriate
"Plug-in" file.
Town
The town, city or district for the address can be entered in this field.
State
If the contact’s address contains State then this field can be used. Select
the menu item "Has State" in the "Contact file" menu to
show/hide this field. If you purchased SaleSmartz in a country that has states,
the State field will be automatically shown for all new contacts.
Country
This field can be used if you have multi national contacts.
Salesperson Responsible
The name of the salesperson that is responsible for this Contact may be entered
here if there are a team of salespeople. This will appear on the printed Quote
or Invoice if required and also on reminder To Do memos about Quotes or Invoices.
EMail
The EMail address(es) for this person or company can be included in this field.
You can add more addresses by clicking on the "Add more addresses" link.
Clicking on the button to the left of this field will create a new eMail message to this address.
For the 2 buttons on the right, the first will add this email address to the list of shortcut addresses
in the eMail window, beside each address.
The 2nd button is the "Own domain name" button which will specify that the domain name in this eMail
belongs to this contact so all eMails from this domain will be linked to the contact.
Website
The website for this person or company can be included in this field.
Clicking on the button to the left of this field will open the website in your broswer.
The button to the right of this field is the "Own domain name" button which will specify that the domain name in this website
belongs to this contact so all eMails from this domain will be linked to the contact.
Notes
Your comments and reminders for the selected Contact person. This field is
hidden when not using "Full access" level.
|
|
|
|
History
|
|
About
|
|
| |
The Contact history mode displays a list of correspondence and events for each
Contact. Each entry in the history mode is sorted in descending order of importance
and time.
|
|
|

|
|
Contact history mode
|
| |
When no history entries are selected, the history mode appears as a large list
of entries. The entries consist of Quotes, Invoices, Memos, EMails and Documents.
Filtering is provided by the filter button  above the list. This will show the Filter window.
|
|
|
|
|
Contact history filter dialog
|
| |
Five buttons to the left of the list provide a filtering function for the display.
Each button represents a type of history entry.
Clicking one or more of these buttons on will include that type in the history
list. Clicking on the "All" button
at the top of the list will show all types at the same time.
Each history entry has its own editing panel. This panel is shown and the size
of the history list is reduced when you select the entry you wish to work with.
|
|
|
Quote
|
|
| |
If you sell goods to a Contact, you can show them your Products and prices
using the Quote function. Quotes for customers are created and edited in the
history mode. Later they can be converted into Invoices. To Do Memos are automatically
created as reminders in the To Do List for each Quote which has been created.
These To Do Memos will appear on the due date of the Quote to remind you to
ring a Contact regarding this Quote.
Summary information about each Quote is shown in the Contact history field.
The due date is shown to the right. If the due date is overdue then a warning
symbol will appear beside the date.
|
|
|
Invoice
|
|
| |
An invoicing facility is provided for each Contact. Invoices can only be created
by converting Quotes using the "Convert to Order/Invoice" menu item.
Reminders are included in the To Do List for Invoices that have not been paid
or sent to a Contact.
An Invoice shown in the history list will appear with its name, invoice number,
and the status to the right of the line. The status will be either:
a) Whether or not it has been sent to a Contact.
b) The Payment due/made date. A warning icon will show if an Invoice is overdue.
|
|
|
Memo/Sheet
|
|
| |
Reminders and a history of communication with the Contact can be kept in the
Memos section. These can also be used as a call history. Memos that have not
been marked as "Done" have reminder To Do Memos automatically recorded
in the To Do List.
A Memo can also take the form of a call sheet by clicking on the "Call
sheet" button in the Memo editing panel. The Call sheet will then show
the word "Sheet" at the beginning of its line in the history field.
A Memo entry in the history list will display the first line of text in the
Memo. It will then display the due/completed date and a status icon.
A tick will be shown when it has been done, a phone will appear when it has
not been done and a warning icon will be shown when a Memo is overdue.
|
|
|
EMail
|
|
| |
EMails can be stored in the contact history. These can be optionally linked
to contacts when you send or receive an eMail with this contacts eMail address
in it. This optional linking is set in the Preferences (See section "EMail", chapter "Preferences").
EMails can also be stored with a contact if you send a template eMail to the
contact
|
|
|
Doc
|
|
| |
Files can be linked to contacts, these can include letters, faxes, maps, brochures
or any other file found on a disk.
|
|
|
Creating entries
|
|
| |
New Quotes, Memos and Document links are created by choosing from the "New
object" menu item in the edit menu.
They can also created by selecting "New object" in the "Edit"
menu. A dialogue will appear.
|
|
|
|
|
New Quote/Memo/Document link object dialogue
|
| |
Once created, a new history entry will appear as an untitled item and select
the correct editing panel for that item.
Invoices are created by converting a Quote to an Invoice using the menu item
"Convert to Invoice". A dialogue will appear requesting an order number.
After typing a number to confirm the order the new Invoice will be created and
selected. An option to keep the old Quote once converted is provided in the
preferences.
History objects can be dragged between Contact file windows to create new entries
in other Contact files.
History entries can be duplicated by selecting "Duplicate" in the
"Edit" menu.
|
|
|
Deleting entries
|
|
| |
History entries are deleted by selecting the entry in the history list and
then selecting the "Clear object" menu item or pressing the "Delete"
key.
|
|
|
Editing entries
|
|
| |
Click on a history entry to edit it. When selected, a panel will appear to
edit that entry. A different panel will appear for each type of entry.
|
|
|
Quote panel
|
|
| |
Quotes are editing using this panel in the Contact history mode. When a Quote
is selected in the history mode, this panel will appear to show the Quote's
information.
See chapter "Quote" for details on
editing and printing Quotes.
|
|
|

|
|
Quote editing panel
|
|
Invoice panel
|
|
| |
Once an Invoice is selected, this panel will be shown with its details.
For more information on editing and printing an Invoice, see chapter "Invoice-Order".
|
|
|
|
|
Invoice editing panel
|
|
EMail panel
|
|
| |
The EMail editing panel shows selected eMails. For more information on this
editor, see Chapter "EMail".
|
|
|
|
|
EMail editing panel
|
|
Memo panel
|
|
| |
Reminders and a history of communication with the Contact can be kept in the
Memos section. Memos are different from To Do Memos, but a To Do Memo reminder
will be created automatically for a Contact Memo if it has not been marked as
"Done".
|
|
|
|
|
Memo editing panel
|
| |
Done
If the Memo has been completed the "Done" button can be set. This
changes the status of the Memo from a reminder to a record of communication.
Call Sheet
Clicking this option on will change the memo into a "Call sheet".
A call sheet allows you to define an objective and a result for a sales call.
Memo icon
The Memo icon acts as a dragging object for a memo. Drag this icon to move
a reference to this Memo to another window.
Completed
These date and time fields indicate the date of the memo, either the due date
for memos not yet done, or the date when contact was made.
Created date
This indicates when the memo was created. This field is optional and set by
preferences (See section "Contact", Chapter "Preferences").
Optional indicators: These options areavailable
when the preference is set (See section "Contact", Chapter "Preferences").
Incoming/outgoing
The speach and ear icons indicate if this was an incoming or outgoing call.
Chargeable
This button indicates if the memo relates to a call that is chargeable to
your client. This can be used later in reports for billing.
Hours/minutes
These fields record the duration of a call.
Concerning
This popup menu allows you to relate a memo to a person in the contact file.
Dial button
This button allows you to quickly dial the number of the selected person.
Salesperson responsible
This field allows you to allocate or record the memo for another person in
your company.
Memo content
This field shows the text content of the Memo.
|
|
|
Docs panel
|
|
| |
Documents of various types can be linked to the Contact such as faxes, maps
and letters. Merged letters can also be automatically linked to contacts.
|
|
|
|
|
Contact Docs panel
|
| |
|
|
|
|
Variables
|
|
About
|
|
| |
The variables mode of a Contact contains the classifications you use to describe
your Contacts in more detail.
You can use these classifications in reports or to simply show more information
about each Contact. An example of this is to have variables called "Customer"
and "Supplier" which can be used to class Contacts into groups.
These classifications or properties are created in the default Shared resources
Document (See chapter "Custom Variables").
When you place a link to a Contact property into the Contact profile mode, the
variables code is used as a reference to the original variables in the properties
document. Any changes to properties in this document will be reflected in the
Contact variables.
Warnings will appear to notify you if properties used in this Contact's variables
mode have been deleted or changed from the variables document. You should then
check to be sure the linked variables are still valid (See chapter "Custom Variables").
|
|
|
|
|
Contact variables mode
|
|
Creating variables (classifications)
|
|
| |
As mentioned before, profile properties are created in the Custom variables
window. These properties can be linked to a Contact to create classifications
in several ways.
To add a variables to the list, choose from the "New variable" popup
menu.
New variables can also be dragged from a Custom variables document. Select "Show
Custom variables" in the "Windows" menu. Drag a variable from
this window to add it into the variables mode of a Contact.
You can also click to select the "Variable" field and select "New
variable" in the "Edit" menu. A dialogue will appear allowing
you to select the desired property and add it. The variables shown in the dialogue
are listed from the application's default Shared Resources Document.
|
|
|
Deleting variables
|
|
| |
Property links are deleted from the Contact profile mode by selecting the property
name and selecting "Clear property" in the "Edit" menu or
pressing the "Delete" key.
|
|
|
|
Relationships
|
|
About
|
|
| |
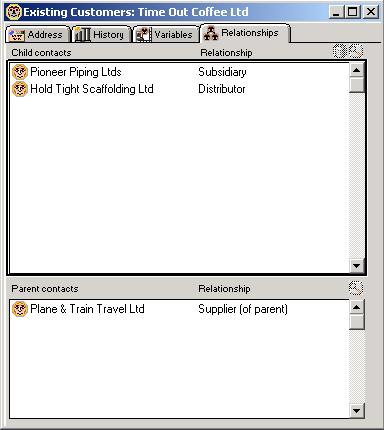
The relationships panel displays relationships between different contacts and companies.
|
|
|
|
|
Contact relationships mode
|
| |
Child contacts
This list displays all contact files that have a child relationship with this contact/company.
You can drag contacts from the contact list or other areas to this list.
Click on the relationship column of the contact to rename the relationship.
Parent contacts
This list displays all contact files that have this contact as a child relationship.
|
|
|
|
Multi-user
|
|
About
|
|
| |
Contact files can be used in multi-user system by placing its file on a shared
disk accessible to those who wish to use it (See chapter "Multi Users").
|
|
| |
|
|
|
|
General
|
|
About
|
|
| |
Quotes are linked to Contacts and stored in the Contact file. They have the
same book-like structure as Catalogues.
Quotes can contain Products from Price Lists and/or Bundles from Catalogues
in the form of Quote entries. These Quote entries are still referenced to the
source files (Price Lists or Catalogues) of each Product or Bundle.
Costs, discounts and finance can be added if required.
|
|
|
Creating
|
|
| |
Quotes are created in a Contact (See section "History", chapter "Contact").
|
|
|
Fixed quoted prices
|
|
| |
All Quote entries placed into a Quote will copy the latest price at the time
of the transfer. The quoted price will then be fixed until you wish to change
it. The same is true for the name of the entry.
If the quoted price differs from the listed price (in the Price List for Products,
or Catalogue for Bundles), an indicator will appear to the left of the quote
entry (described later).
An indicator will also appear if the listed price is unavailable, e.g. the Price
List is closed, or if the Product is no longer in the list.
|
|
|
Parts
|
|
| |
A Quote contains several parts: quote editing panel, goods, costs and profit
modes. The page switcher in the top right of the Contact file window allows
you to view each of these parts.
Each part of a quote is described in the following sections.
|
|
|
Menu
|
|
| |
A Quote has its own menu visible when the window is selected.
|
|
|
|
|
Quote menu
|
| |
Print preview
Add miscellaneous...
Selecting this menu item will allow you to create a new Quote entry which does
not exist in a Price List. For example, this can be used to add products which
you do not sell very often, or which have no real price.
Clean up
Arrange the Quote entries when in section/graphic mode.
Update all prices
Change the quoted price of each of the entries in this Quote to the current
sell price of the source object in the Price List or Catalogue. This action
requires all source documents to be open and will open these before continuing.
Set Quote finance
This item is used in the "Costs mode" and changes the finance type
for a Quote.
Quote discount
This menu item allows you to change the discount for the whole quote.
Sections as complete quotes
This menu item indicates how sections are used in a quote. You can use sections
to display several alternatives or options for a customer.
Normally all sections are totalled together in a quote. If you choose the "Sections
as complete quotes" option, each section is treated as a single quote,
and the totals are shown after each section when printed.
Convert to Order/Invoice
This menu item is used to convert a Quote to an Invoice in the history mode.
Open source info
Open the info window for a selected Quote entry's source Product or Bundle.
This is opened by the Quote entry's source file (Price List or Catalogue).
Show specifications
Shows the selected quote entry(s) specifications when printed.
Open source documents
If source documents (Price Lists/Catalogues) for any of the quote entries are
closed, this menu item will open these source documents. These documents will
be opened but hidden and can be seen in the "Windows" menu.
Set source document
Sets the source document for each of the selected entries via a file dialogue.
Locate source documents
If some of the source files have been moved or deleted from a disk, this menu
item will open a dialogue to locate the correct source file (See section "Catalogue/Quote", chapter "Basics").
Check source documents
Checks all of the Quote's source files to make sure they are open or on disk.
|
|
|
|
Quote editing panel
|
| |
Quotes are created and edited within the history mode of the Contact file window.
When selected, a Quote will display its first page which contains scheduling
and other information. Other parts of the Quote can be shown using the Page
switcher in the middle of the Contact file window.
|
|
|
|
|
Quote editing panel
|
| |
Quote - menu
This menu contains the actions for a quote
Search field
This field allows you to quickly find products or bundles in your price lists and catalogs.
Enter some text in this field and the search with bring back a list of items that match the text
with the product code or name
Add
This button will add any selected lines from the search (above) to the quote.
Add - menu
This menu contains a list of products and bundles from your price lists and catalogs
that you can add by selecting the item.
Page switcher
In the middle of the window is a page switcher. This navigates through the
Quote (See chapter 5. "Basics chapter").
Sales Reminders
As each Quote entry is added to the Quote, a reminder can appear in the "Sales
Reminders" field.
Each Product or Bundle can have a "Sales reminder" property (See chapter
7. "Product", chapter 9. "Bundle"). If this field is filled
with text such as suggestions for cables, batteries or other related components,
this text will appear in the reminders field in the Quote when the item is installed.
This field automatically scrolls to show the latest text. This text is not stored
with the Quote and is cleared each time the Quote is closed.
When a reminder includes a Product/Bundle code link, click on the link to open
the "find" dialogue. The code will be entered automatically into the
value field of this dialogue. In most cases you will then simply press the return
key three times to add the link. Once to find, once to add and lastly to close
the "Find" dialogue.
Quote name
Quote names can be changed by first clicking on the Quote in the list and then
changing the text in the name field at the bottom left of the list.
Quote address
The Contact address used in Quotes can be set by selecting an item from this
popup menu.
This address will be used in the fields in the Quote’s chosen Print Template
that are preset with the Contact address details, e.g. whole address or town.
The "Default Address" will use the address marked as "Default"
in the Address mode.
Quote Icon
The Quote icon acts as a dragging object. Dragging this icon will transfer
the details of this Quote to another window.
Dates
There are three date values for each Quote which you may use if you wish. All
of these dates can be printed using the quote’s print template.
1) Date quoted. The creation date of the quote
2) Valid until. The date that the Product prices
or offer expires.
3) Reminder date. The date you expect the customer
to purchase the Products listed in the Quote.
The expected acceptance date (due date) is shown in a date form. This information
is used to provide automatic To Do Memo warnings that a Quote is due, and
also for sorting of Quotes.
The date can be changed by clicking on a part of the date field and typing
the required number. The waiting time is shown below this field (in years,
months, weeks and days) as the date is changed.
The other method of setting the due date is to drag the slider. This will
change the date according to the position of the slider. The maximum position
of the slider can be set in the Preferences (See section "General", chapter "Preferences").
Note: It may not be possible to choose an exact date with the slider if the
maximum position is a large number, as the smallest division will be greater
than a day. Use the date field to choose an exact day.
Active
Not all Quotes are accepted by a customer, if you find that a Quote has been
rejected then you can click the "active" button off. This shows the
Quote in a deactivated state and removes any reminders from the To Do List.
The reason why you may wish to mark a Quote as inactive instead of deleting
it is for historical reasons. You may want to build a report at a later date
to evaluate how many Quotes were accepted.
Salesperson responsible
This field allows you to allocate or record the quote for another person in
your company.
Probability
The expected probability that the Quote will be accepted can be shown using
the "Probability slider". This value is used in summary reports. Dragging
the slider to the required position sets the value, from 0 to 100%.
Notes
Notes for each Quote can be entered in the "Notes" field. These can
describe the situation for the Quote, and other details.
|
|
|
|
Goods mode
|
|
About
|
|
| |
The goods mode of a quote contains the list of products which you wish to present
to your customer.
A quote can contain several sections which contain products. These sections
can act as groupings, such as when quoting for departments in a company. Sections
can also act as individual quotes when you select the "Sections as complete
quotes" option in the "Quote" menu. This option is useful if
you wish to show a customer several configurations of products in the same quote.
The goods mode contains a contents page which is in turn followed by each section
in a graphic view.
|
|
|
|
|
Quote contents view
|
|
|
|
Quote section/graphic view
|
| |
The name of each section can be changed in the section name field under the
page switcher in the top of the window or by clicking on the section name in
the "Contents" view.
|
|
|
|
Costs mode
|
|
About
|
|
| |
The costs mode of a Quote incorporates both costs and finance options.
Costs can be quoted to provide a more accurate description of the customers
purchase.
|
|
|
|
|
Costs mode
|
| |
Goods total
The Goods Total, the full total of the goods quoted.
Quote discount
If you choose to have a discount value for the whole Quote, it will appear
here.
Pre tax costs
Costs which incur sales tax can be added to a Quote.
Sales Tax
The calculated sales tax on the goods and costs.
Non-taxable costs
Costs which do not incur sales tax
Total
The total value of the Quote
Finance
Both rental and purchase finance can be added to a Quote
Total financed
The goods value to be financed. The goods total less quote discount, if any.
Deposit
The deposit a customer will pay on the goods, only applies to purchase finance.
Term (months)
The term over which the customer wishes to finance the goods.
Finance rate
The rate which applies to the term the customer has chosen. Finance rates are
stored in the preferences (See section "Finance", chapter 24. "Preferences").
Monthly payments
The payment the customer will make on a monthly basis for the financed goods.
|
|
|
Whole Discount
|
|
| |
As well as a discount per item in the Quote or Invoice, a whole discount can
be provided. The action of setting the discount is hidden so that the Customer
is not prompted to ask for one.
To set the whole discount, select "Quote discount" in the "Quote"
menu or double click anywhere in the costs mode area while holding down the
"Alt" (Mac)/"Ctrl" (PC) key down. A dialogue will appear
and the value can then be set.
|
|
|
|
|
Setting discount on the whole Quote
|
| |
To remove a discount from a Quote, repeat the procedure and set the discount
value to zero. The discount will be removed from the calculations display.
|
|
|
Editing Costs
|
|
| |
To add a cost, either Pre-Tax or Non-taxable, click on the button "Pre
tax costs"/"Non-taxable costs" and a default nil cost will be
created.
Click on the new cost or title, once to select and then a second time to edit
it. When you have finished editing the cost, type return, tab or click elsewhere
to set its value.
A cost can be removed by selecting the cost cell and selecting "Clear cost"
in the "Edit" menu or pressing the delete key.
Finance
The type of finance to be used for a Quote can be chosen by selecting "Set
Quote finance" in the "Quote" menu. This will open the finance
dialogue.
|
|
|

|
|
Choose finance dialogue
|
| |
Choose the finance you would like to use, or "None" to remove the
finance fields.
Both rental and purchase finance use the same fields, the only difference being
"Deposit". This is only used for Purchase finance.
The editable fields for finance are the Deposit and Term fields. Double click
in these fields to edit them.
Only a valid finance term can be entered into the "Term" field. The
value you enter will be checked with the stored list of finance terms in the
preferences. If there is no exact match, a default term will be used (See section "Finance", chapter "Preferences").
The monthly payments field is automatically updated when you make a change to
a finance field.
|
|
|
|
Profit mode
|
|
About
|
|
| |
The profit mode of a Quote or Invoice provides a breakdown of the profitability
of the Quote or Invoice.
Each Quote entry is listed with its associated margin value.
|
|
|
|
|
Quote Profit mode
|
| |
Goods total
The total value of the goods included in this total.
Quote discount
Edited by double clicking on the Quote discount line with the "Alt"
(Mac)/"Ctrl" (PC) key held down (See section "Costs mode"
in this chapter).
Total sale
Total gross sale value of the goods.
Goods cost
The combined cost values of the goods in the Quote.
Margin
The margin value and percentage for the Quote.
Commission
If you have defined your commission percentage in the preferences, the sales
commission value for the Quote will be shown here.
Quote entries
Each Quote entry will be listed with their own profit details. The quoted price
is the value that you have recorded for the quote entry's sell price in this
Quote. The list price is the current source Product or Bundle sell price, used
for comparison.
Double click on a line to edit these entries in the same way as the "Goods
mode". Discounts, quoted price and other information can be changed for
each Quote entry in the "Profit mode" to recalculate the whole Quote
margin value.
|
|
|
|
Quote entry object
|
|
About
|
|
| |
When installed into a Quote, a Product or Bundle is converted into a Quote
entry. In the Page (graphical) view of the Quote, it has the following graphical
appearance:
|
|
|
|
|
Quote entry (Graphical view)
|
| |
Each of the symbols shown indicates a property of the Quote entry. The Contents
(line) view abbreviates these properties. The same Quote entry appears as the
following in the Contents:
|
|
|

|
|
Quote entry (Contents view)
|
| |
The quantity, name and discount can be changed directly here by clicking on
each part and typing a new value.
Name
The name of the Quote entry.
Quantity
The number of items. This is not visible if there is only one.
Discount
The discount (in percent) associated with an object. Visible if a discount
has been applied and the "Show discount" option has been checked (See
section "Quote entry object" later in
this chapter).
Sales tax
The Sales tax code for each Quote entry is shown (for countries that have more
than one Sales tax).
Price type
The quote entry’s price type is shown if you have more than one price
type and have set the preferences to do show the type.
Has description
This indicator is present when the Quote entry will print a description. This
description can be taken from a Product specification and provides a customer
with more Product detail.
Source Icon
When the Quote entry's source document is open, the icon related to the source
Product or Bundle will appear for this Quote entry. If this document is closed
a default icon will appear, as in the figure above.
Price differs from source
A warning indicator which shows that the price stored for this Quote entry
differs from its source Product or Bundle.
Source file status
The current state of this Quote entry’s source document, Price List or
Catalogue. If visible, it will show that the source document is not open, that
it has been moved or simply can not be found.
Source file name
The name of the source document for this entry. This is optional and set in
the preferences (See section "Contact ", chapter "Preferences").
|
|
|
Creating
|
|
| |
From the "Add" popup
Products can be added to a quote by clicking on the "add" popup under
the page switcher in the upper middle of the window.
From a Price List
Products can be selected and dragged from a Price List window into a Quote.
Copying objects is done in a similar way, by selecting the product(s) and copying
and pasting into the Quote.
From a Catalogue or Quote
Products and bundles can be selected and copied or dragged from a Catalogue
window, into a Quote. This is possible from both the contents and section (graphic)
Catalogue views.
If you hold down the "Alt" (Mac)/"Ctrl" (PC) key when you
install a product in a quote, you will be shown the quote entry dialogue so
you can adjust the quantity.
Each item remembers the file that it came from, by file name and disk location.
The item’s file can be changed by selecting the "Set source document"
menu item, and then selecting the new file.
Note: Products (but not bundle objects) in Catalogues originate from Price
Lists. This means that a Product copied from a Catalogue to a Quote will remember
the Price List’s file, not the Catalogue’s.
|
|
|
Deleting
|
|
| |
Quote entries can be deleted by selecting them, and then selecting "Clear
Quote entry"/"Cut Quote entry" in the "Edit" menu or
pressing the "Delete" key.
|
|
|
Quote entry information dialogue
|
|
| |
Information about a Quote entry can be changed by selecting it and selecting
"Edit quote entry" in the "Edit" menu, or by double clicking
on it. This will show an information dialogue for that entry.
|
|
|
|
|
Quote entry info dialogue
|
| |
Quantity
The entry’s quantity value can be changed in this field. It can be a decimal
value if required, but must be a positive number.
Name
The object’s name can be changed. The default is the name of the source
Product or Bundle, when it was installed into the Quote. Changing the name only
affects this object in this Quote.
Price type
If you have more than one price type then this popup will appear and allow
you to choose a price type for the quote entry e.g. wholesale or retail.
Unit Price
This is the current price for the quote entry, after discount (if any).
Total Price
The unit price multiplied by the quantity.
Sales Tax codes
The Sales tax code will be shown if you have multiple Sales taxes or if the
Quote entry is exempt from tax.
This Sales tax can be edited by clicking on the button "Change" which
will show an editing dialogue.
Show Specifications
A description of an object can be shown in the printed Quote. This may be information
or notes about the Product, to assist the customer.
This description defaults to the specifications of the Product, but can then
be edited (See chapter 7. "Product", chapter 9. "Bundle").
Price List/Catalogue
The source file for this quote entry is shown here.
Open source info
Clicking on this button will open the source Product/Bundle information window.
|
|
|
Generous
|
|
| |
The discount value for a Quoted price can be set in the Quote entry info dialogue.
|
|
|
|
|
Quote entry discount
|
| |
Discount can be set in two ways.
1) Set a discount percentage ("Fixed %"). All later updates of
the quoted price will then be discounted by this percentage value.
2) Set a discount value ("Fixed value"). This is fixed value and
will not change if the quoted price is updated. The percentage value will
however change with updates.
Discount may be set as a negative value. This is useful for weighting prices.
It may be advisable to then uncheck the "Display discount" button.
This will hide the discount in the Quote and printed result. The unit and
calculated prices shown for the discounted Quote entry will however be the
discounted value.
|
|
|
Pricing
|
|
| |
A quote entry’s quoted price and cost can also be changed in the Quote
entry dialogue.
|
|
|
|
|
Update price and cost
|
| |
Quoted price
The quoted price and the current list price (if available from an open source
document) are shown. This price update only affects this entry in this quote
and does not affect its price list.
The update times are also shown for the source object and, the quoted price.
This time is set when the object is updated, as an indication only.
Cost
The cost of a Quote entry is normally stored in its source object in a source
document (Price List or Catalogue).
If you wish to change the cost of a Quote entry (perhaps a supplier has given
you a special buy price for this quote) you can type a new value in the cost
field.
|
|
|
Adding miscellaneous Quote entries
|
|
| |
In some cases you may not have all products you sell stored in a Price List.
This could be true for items such as small accessories and products that you
sell very rarely.
If you wish to add one of these Products to a Quote and do not wish to store
the Product in a Price List, you can select the "Add miscellaneous"
menu item in the "Quote" menu. When this menu item is selected a dialogue
for the new Quote entry's details will appear.
|
|
|
|
|
Add miscellaneous Quote Entry Dialogue
|
| |
A miscellaneous Quote entry behaves in much the same way as a normal Quote
entry but has its own icon.
|
|
|
Copying a Picture
|
|
| |
As mentioned earlier, quote entries can be copied from a Quote. When an entry
is copied in the Page or Graphic mode, a picture of the object is also copied
(as in a Catalogue). This picture can then be pasted into another application
to be used in drawing documents.
|
|
|
|
Printing
|
| |
Printing of a Quote is done by first selecting a Print Template and then double
clicking on the Quote in the History list, or selecting "Print..."
in the "File" menu (See chapter "Print Template").
|
|
|
|
Exporting
|
| |
A Quote can be exported to a file for use in other applications. This could
be used for a picking list or shipping document. Select "Export Quote"
in the "File" menu (See chapter "Exporting Data").
|
|
| |
|
|
|
|
General
|
|
About
|
|
| |
Invoices and Orders are treated as the same object in SaleSmartz, they are
fixed records of goods purchased by a customer.
Generally Quotes are used to edit orders for customers. When you have finished
a Quote, it can then be converted to an Invoice which is a fixed Order.
The information stored in an Invoice is fixed as the Invoice represents an agreement
with the customer, however, the installation notes and delivered quantities
can be changed. Notes can display your own information for each of the products
in an Invoice. For example they could contain serial numbers or warranty details.
|
|
|
Creating
|
|
| |
Invoices are created in the "Contact" window by converting Quotes
into Invoices (See section "History", chapter "Contact").
|
|
|
Parts
|
|
| |
An invoice contains several parts. The page switcher in the top right of the
Contact file window allows you to view each of these parts.
Each part of an invoice is described in the following sections.
|
|
|
|
Invoice editing panel
|
|
About
|
|
| |
Invoices are viewed in the history mode of the Contact file window. When an
invoice is first selected, the first page of the invoice will be shown.
|
|
|
|
|
Invoice editing panel
|
| |
Name
The Invoice will retain the name of the original Quote until changed in the
name field below the history field.
Address
The address popup menu acts in the same way as the Quote address type popup.
The address chosen will be shown in the printed Invoice.
Invoice icon
The Invoice icon acts as a dragging tool. Drag this icon to move information
about the Invoice to other windows.
Invoice/Order number
The Invoice can have an invoice number to act as an internal reference for
your company. This can be changed in this field, but can also be created automatically
if you wish, when you create the invoice.
If you enable the option for automatic invoice numbering in the preferences,
a new incremental invoice number will be placed in this field (See section "Contact", chapter "Preferences").
Customer’s reference
The Invoice has a customer reference which is set at the time the Quote is
converted to the Invoice. It can be changed in the number field below the list.
This can be used to store a customers order number, or other reference, but
is not required.
Created date
This date represents the time at which the Order/Invoice was converted from
a Quote.
Salesperson responsible
This field allows you to allocate or record the invoice for another person
in your company.
Order confirmation/Picking List...
If you have chosen the whole order process option in the preferences, then
you will be shown all of the parts of the process shown in the example above.
Clicking on each of these parts will select the appropriate template (stored
in the preferences). When completed, the button to the right of each part can
be clicked on to indicate when its document was printed/sent.
Payment due
The reminder date is set to remind you to check up on an Invoice, to make sure
it has been paid. The payment due date for an invoice can be set in this field.
This can be automatically defined with a set number of days, if you define the
contact property to do so (See chapter "Custom Variables").
The payment due date is the date used on the automatic To Do Memo which gets
created for an invoice, until the invoice is marked as paid.
Paid
A button is provided to indicate whether or not a Contact has paid the Invoice.
The date field to the right of this button shows the payment date, once the
payment has been made.
Notes
Additional information such as terms of payment and partial payments can be
stored in the Notes field.
|
|
|
|
Goods mode
|
|
About
|
|
|
|
|
Invoice goods mode
|
| |
The goods mode is a list of all the goods purchased by the customer. The list
of goods in an Invoice is fixed. Quantities, prices and costs of Products are
set when the Invoice is converted from a Quote.
Partial deliveries
An invoice can be broken into several delivery stages. The actual delivered
amount can be edited by clicking on each product’s quantity.
When you change the quantity, the invoice will be changed into a partial delivery.
This will add two new quantity columns and a delivery popup under the page switcher.
When you have changed all quantities for the current part delivery, you can
click on the "Done" button under the page switcher. This will complete
the current part delivery and create a new one.
New partial deliveries will be created each time you click on the "Done"
button until there is no more stock left to deliver.
You can view and print previous partial deliveries by choosing each part in
the popup menu below the page switcher.
Only the quantities in the last partial delivery can be edited, if you wish
to change previous deliveries, you will have to use the popup menu to delete
the last delivery. This will return the last delivery’s stock to the previous
delivery.
|
|
|
|
Supply
|
|
About
|
|
| |
The supply part of an invoice can be used to help you order in products for
the Customer's order. You can group products with suppliers to send orders to
them or to act as a picking list for your own use.
|
|
|
|
|
Invoice "Supply" mode
|
| |
Products can be grouped under supplier names by dragging each product to the
supplier. Suppliers are added when the Invoice is created, and collected from
the suppliers for each product. Use the "Edit" menu if you wish to
later add suppliers to or remove suppliers from the Invoice.
Once products have been grouped, you can print out orders for each supplier
by first selecting the supplier's name in the pop up menu at the top of the
window. You can then use the "Print" or "Print preview"
menu items in the "File" menu to print out the selected products.
The appearance of the print out is defined by the chosen print template.
|
|
|
|
Costs, Finance and Profit
|
| |
An Invoice has Costs and Profit modes like a Quote but these can not be changed.
The costs mode contains calculations for the final total and finance.
The profit mode contains a breakdown of the Invoice's profit.
For more information about these modes, see sections "Costs mode" and "Profit mode", chapter "Quote".
|
|
|
|
Printing
|
| |
Printing of an Invoice is done by first selecting a Print Template and then
selecting "Print..." in the "File" menu (See chapter "Print Template").
|
|
|
|
Exporting
|
| |
An Invoice can be exported to a file for use in other applications. Select
"Export Invoice" in the "File" menu (See chapter "Exporting Data").
|
|
| |
|
|
|
|
General
|
|
About
|
|
| |
SaleSmartz provides eMail integration so that you can send and receive eMails,
and keep track of customer eMails. EMails can be automatically linked to contacts
so that you can see your communication with a contact, at a glance, in the contact
history. SaleSmartz uses its own eMail plugins, or external eMail applications to send and receive mail.
You can also use templates to send eMails to one or more contacts. Quotes and
invoices can also be emailed to contacts using SZ Templates. (For more information
on these, See chapter "SZ Template")
|
|
|
|
Hints
|
|
EMail templates
|
|
| |
You can save an eMail as a template by selecting the "File" menu - "Save as" option. Save it into your "Merge templates" folder to use
it as a merge template for contact merges.
You can also add default cc/bcc email addresses and even attachment files or embedded images.
|
|
|
EMail quote/invoice templates
|
|
| |
Create a new SZ template and edit the template text. Then copy the template text and paste into an eMail.
Save the eMail as a file in your "Templates" folder and it will appear in your quote/invoices template menu.
|
|
|
Private eMail accounts
|
|
| |
You can set up personal eMail accounts in the Preferences - eMail accounts, and mark the option "Private account".
All incoming and sent eMails for this account will appear in the "Private" folder which no other user can see. (See Section "EMail accounts", chapter "Preferences")
|
|
|
Auto address completion
|
|
| |
Type a few letters of someones name or eMail address, click out of the address field and SaleSmartz will search for a matching address.
It will insert the found address, or ask you to choose from a list of matching addresses when you click the send button
|
|
|
Out of office reply
|
|
| |
Create an out of office eMail template, then you can set up an eMail rule to reply to all eMails with the template when you are on vacation. (See Section "EMail rules", chapter "Preferences")
|
|
|
|
EMail
|
|
Creating
|
|
| |
New eMail is created by selecting "New" from the "File"
menu, clicking on the new eMail button in the Tool Bar or a Contact Info window,
or by mail merging with an eMail template
|
|
|
New eMail window
|
|
|
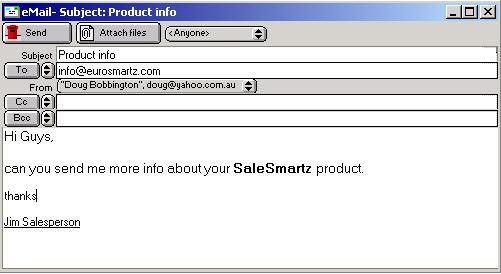
|
|
Basic new EMail window
|
| |
The eMail window allows you to create and edit eMails and then send them to
your contacts.
Send
This button will send (or queue) eMails after you have completed them. You
can save your eMails at any time and they will appear in the "Drafts"
folder in the Mail Centre, until they are sent. If you have chosen the preference
not to send immediately, this button will have the text "Queue" on
it (See section "EMail", chapter "Preferences").
Clicking on "Queue" will save the eMail in the Mail Centre Outbox
until the "Send & Receive" action is processed.
Attach files
With this button, you can attach one or more files to an eMail, so that they
are sent with the mail. The list of attached files will appear in the bottom
of the eMail window.
Subject
This field is used to enter the subject of the eMail
To/Cc/Bcc
These buttons/fields can be used to enter the address of the recipients. The
arrow icons to the right of these buttons allow you to choose an address from
your shortlist. This shortlist can be the most commonly used eMail addresses
and is changed by clicking on the button  to the right of the eMail field in a contact window.
|
|
|
|
|
EMail destination address field
|
| |
When you edit an address, the address editor window will appear over the eMail
window. Several addresses can be added to an eMail, by clicking on the "Add
more addresses" link, or by pasting from the clipboard.
Note: You can type names of contacts or partial addresses and SaleSmartz will find matches and automatically fill in the address.
From
The "From" popup menu allows you to choose the "From" address
for your eMail. The list of these addresses is stored in the preferences (See Section "EMail accounts", chapter "Preferences")
Message
The large field in the bottom of the eMail window is used to enter the text
of the message. You can have a default signature appear here by default by setting
the eMail accounts in the preferences (See Section "EMail accounts", chapter "Preferences")
Use the Font and Style menus at the top of your screen to format the text message.
|
|
|
Spell checker
|
|
| |
You can use the built in spell checker for your emails. Windows users may need to install some extra software.
Click here for more info.
Spell checking is automatic and any text that may be a spelling error will be hilighted in red.
Right click on any text that is in error and you will be shown a menu of options to
correct the text.
|
|
|
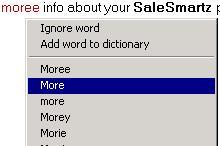
|
|
Spell checker menu
|
|
Incoming eMail
|
|
|
|
|
Received eMail window
|
| |
When you receive an eMail, it will have additional buttons in the eMail window.
Reply
This button will copy the text of the message and create a new eMail to the
sender. Each line of the copied message can have a prefix (e.g. > ) so that
you can see the original text. This prefix is set in the preferences (See section "EMail", chapter "Preferences")
If you have set several eMail accounts in the preferences, the reply message
will automatically have your "From" address set to the matching eMail
account, and also any signtaure will be attached below the message.
Reply to all
this button functions in a similar way to the "Reply" button, but
includes the addresses of all recipients in the new eMail.
Forward
This button will create a new eMail with the contents of the received mail,
to allow you te send it to another recipient.
Make new contact
If the received eMail is not linked to a contact (i.e. the sender's address
is not stored for any contact in your contact list), you can make a new contact
from this eMail, by clicking on the "Make new contact" button. The
address and any other name information stored in the eMail will be used to create
the new contact.
Once you save the new contact, all eMails relating to this contact will be
attached to the contact if you have the preference set to do so (See section "EMail", chapter "Preferences")
|
|
|
EMail menu
|
|
| |
The eMail menu will appear in the top of your screen when you have an eMail selected or an email window open.
|
|
|
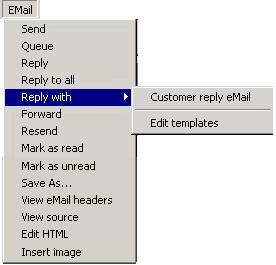
|
|
EMail Menu
|
| |
Send
Send or queue this eMail, depending on your preference settings (See section "EMail", chapter "Preferences")
Queue
Queue this eMail in the Outbox for the next "Send & receive"
Reply
Create a new email in reply to this eMail
Reply to All
Create a new email in reply to this eMail, but to all addresses listed in the eMail
Reply with <template>
Create a new email in reply to this eMail using the selected template. See section "EMail templates", chapter "EMail"
Forward
Forward the email and any attachments to one or more eMail recipients.
Resend
Forward the email and any attachments in its original format, to one or more eMail recipients.
This can be useful if you want to forward emails with HTML content to somone.
Mark as read
Change the "read" status of this email for you, to "Read" without opening it.
This won't affect the read status for other users.
Mark as unread
Change the "read" status of this email for you, to "Unread".
This won't affect the read status for other users.
Save as..
Saves the current eMail as a file. This is useful for converting incoming eMails into templates.
View eMail headers
Show the hidden transmission information for an eMail.
View source
Show the content of the eMail message. This is really only useful for HTML messages.
Edit HTML
If you choose to resend an HTML formatted email, this menu item will allow you to edit the raw HTML before sending it.
Insert image
This will allow you to select an image file and then attach it to the eMail and insert an image tag placeholder in the email text.
This placeholder text will then be replaced with the image when the eMail is sent with the SaleSmartz eMail Plugin.
|
|
|
|
EMail templates
|
|
About
|
|
| |
EMail templates can be used as standard replies to emails, or even to email quotes and invoices.
Correspondence eMail templates are stored in the "Merge templates" folder and can be edited using the "File" menu - "Merge with" - "Edit merge templates".
Quote and invoice eMail templates are stored in the "Templates" folder inside your SaleSmartz folder.
New eMail templates can be saved by using the "File" menu - "Save as" menu item when you have an email open.
To create more advanced eMail templates, paste the text from an "SZ Template"
(Chapter "SZ Template")
This will allow you to merge contact and quote/invoice fields with your template.
|
|
|
|
Mail Centre
|
|
About
|
|
| |
The Mail Centre stores and organises all eMails. It has several folders which
store different types of eMail.
|
|
|
Opening
|
|
| |
The Mail Centre window can be opened by choose "Show Mail Centre"
from the "Windows" menu. You can also set a preference to open it
when starting SaleSmartz (See section "General", chapter "Preferences")
|
|
|
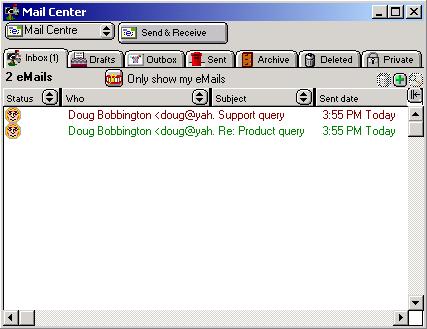
|
|
Mail Centre Window
|
| |
Mail Centre menu
This button shows the menu for the Mail Centre. Details below
Send & Receive
This button will synchronise the Mail Centre with your eMail application. Queued
mails in the Outbox will be sent and new mail will be added to the Mail Centre
Inbox.
Inbox...Deleted
These folders store different types of eMails. You can move eMails between
folders by selecting and then dragging eMails onto the name of the folder.
The number of unread emails for each folder is displayed in the folder name tab, inside brackets.
Additional eMail folders can be added in the preferences (See section "EMail", chapter "Preferences")
Private
This folder stores your own private eMails so that no others on the network can see or access them.
Reply etc.
Other buttons will appear once you have selected one or more eMails. These
are the same buttons that appear in the eMail window and have the same function
(See section "EMail")
Only show my eMails
This button will filter eMails so that you will see only those that were sent
to or from you, or that don't match any of the user's personal eMail addresses
if you have a network system. You will need to make sure you have set your personal
eMail address in the preferences for this (See section "Myself", chapter "Preferences").
|
|
|
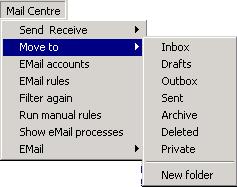
|
|
Mail Centre Menu
|
| |
Send & Receive
You can manually synchronize eMail accounts using this menuitem. EMail accounts are synchronized in the background.
Move to
Use this menuitem to move selected eMails to other folders.
EMail accounts
Edit all eMail accounts in the preferences.
EMail rules
Edit all eMail rules in the preferences.
Filter again
This will filter all eMails in all folders and check to link them to
contacts with matching eMail addresses.
Run manual rules
Run any rules marked with the option "Manual".
Show eMail processes
Show any background eMail account plugin processes.
EMail
Displays the eMail menu (see above) for selected eMails.
|
|
|
Attachments
|
|
| |
Any attachments for incoming eMails will be stored in a folder called "EMail
attachments" on your server, or in your SaleSmartz folder. These attachments
can be set to be removed if you delete the associated eMail, by setting a preference
(See section "EMail" chapter "Preferences").
Private eMail attachments are stored locally on your own computer.
|
|
|
|
EMail Rules
|
|
About
|
|
| |
EMail rules are powerful filters which can be used to perform actions on eMails.
For example, you can move all eMails with a particular subject to a special folder.
You could also create a rule to reply to all emails sent to a support email address.
This reply could send and eMail template displaying the status of a support contract by comparing a contact's custom variable with the current date.
(See section "EMail rules" chapter "Preferences")
|
|
| |
|
|
|
|
General
|
|
About
|
|
| |
Price Lists are the reference documents for all Products. The structure of
a Price List allows sharing a single file between many users, such as in a team
network situation. Updates made by a user will be shown in the Price List on
the other users computers (See chapter "Multi Users").
Links are formed from Price Lists to Catalogues and Quotes in order to obtain
Product information. Product information such as code, name and price are stored
in Price Lists. All references by other documents to Products in a Price List
are by product code only.
Product Groups are also stored in a Price List. Icons can be attached to both
Products and Product Groups. Icons can also be edited within the Price List
(See section "Product Icons").
|
|
|
Window
|
|
|

|
|
Price List window
|
| |
The price type popup menu (which appears in the middle of the window under
the title) allows you to show different price types e.g. Retail and Wholesale.
This popup menu is only visible if there is more than one price type (See section "Price List", chapter "Preferences").
|
|
|
Creating
|
|
| |
Select "New..." in the "File" menu and then choose the
"Price List" document type in the "New document" dialogue.
|
|
|
Deleting
|
|
| |
A Price List file can be deleted by removing its file from disk.
|
|
|
Opening
|
|
| |
A Price List can be opened by opening the file on disk or from the "Show
a Catalogue/Price List" menu in the "Windows" menu. It can also
be opened from a Quote or Catalogue by selecting the menu item "Open reference
documents" or when an object requests Price List information (such as double
clicking on an object in a Catalogue).
|
|
|
Menu
|
|
| |
The Price List has a main list window for viewing all Products, Icons and Product
Groups. It has its own menu called "Price List". When the Price List
window is active, this menu will appear and contains these items.
|
|
|
|
|
Price List menu
|
| |
Show Products
Shows the view containing the list of Products.
Show Product Groups
This shows the Product Group view of the Price List window to show all installed
groups and allow editing of them (See section "Product Groups" ).
Show Icons
This shows the Icon view of the Price List window to allow icon editing (See section "Product Icons").
Show Stock adjustments
The stock adjustments view of a price list can be show by selecting this menu
item.
New delivery...
If you wish to use the stock level features of SaleSmartz, this menu item allows
you to enter a new delivery into the price list to change the stock levels for
the selected products.
Use default "Retail" price settings
This menu item changes the selected product(s) to the default price and sales
tax settings. These settings are taken from the selected Product’s Product
group or the Price List. This action only affects the currently shown price
type (if you have more than one).
Set as default Catalogue/Price List
This will make this Price List the default, so it will be opened, optionally
at startup, or from the Windows menu.
Set defaults...
You can set the Price List's defaults with this menu item.
|
|
|
Set defaults
|
|
|
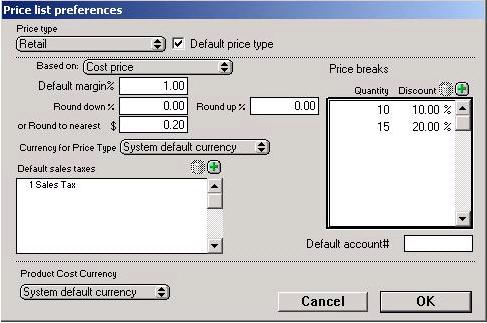
|
|
Setting the defaults for a Price List.
|
| |
Price type
A popup menu at the top of the defaults window can be used to edit the defaults
for each price type in the Price List, if there is more than one price type.
Default price type
The most commonly used price type can be marked with this check box. This price
type will be shown when the price list is first opened.
Note: The price type popup and checkbox will not be visible if you have only
one price type (See section "Price List", chapter "Preferences").
Based on
Here you can select if this price type is based on cost price, or another price type.
Then the margin will set your sell price.
Default margin
The margin will be used for Products which use a default Price List margin
(See section "Pricing", chapter "Product").
Round up/down
Rounding of prices can be determined in the two rounding fields. Products that
use a margin to calculate their retail price will be affected by these fields.
Rounding can be used to prevent retail values containing decimal or odd values.
Or to nearest
You can specify the minimum price rounding here. eg. round to the nearest $
Currency for price type
The currency for this price type can be set here. This will convert all prices
in the price type using the exchange rates set in the Preferences (See section "Price List", chapter "Preferences").
Default sales taxes
Sales tax can also be defined in this window. The sales tax field in the
right of the dialogue is used to display all sales tax values used in this price
list.
The field in the bottom of the window is used to define which tax(es) will be
the default for the selected price type. Taxes can be added by first selecting
the Tax field and then choosing "New Sales tax" in the "Edit"
menu for Macintosh, or for Windows, by choosing "New Sales tax" in
the menu provided by clicking the right mouse button.
Clicking on each line will allow you to choose a tax from the applications list
of taxes stored in the "Shared Resources" file (See section "Price List" in chapter "Preferences").
Price breaks
You can specify price breaks that apply to the whole price list here.
You can also set price breaks per product group and per product.
Default account
The account code is only used when exporting products to an accounting system.
Product Cost Currency
This poup menu defines the currency that is used when you purhcase your products.
By default it is your own currecny, specified by "System default currency"
|
|
|
|
Product Icons
|
|
About
|
|
| |
Picture icons can be added to a Price List to enhance the appearance and descriptions
of Products. These icons are stored in the Price List file and linked to Products
and Product groups.
Both large and small icons are used in SaleSmartz. Be sure to edit both the
large and small versions of an icon, as they are used in different views. Small
icons are usually used in lists, while large icons are used in Catalogues, Quotes
and Price Information Windows.
|
|
|
Creating
|
|
| |
Icons can be added by using the "Icons" view of the Price List window.
Select the menu item "Edit icons..." in a Price List menu when viewing
any of the Price List windows. The "Icons" view will appear with a
list of all of the Icons in the current Price List.
To add a new icon, select the menu item "New icon" in the "Edit"
menu and the Edit Icon dialogue will appear with a new default icon. Edit the
new icon as described later (See Editing section). To add the new icon to the
list, click on the "Save" button. It will then be saved and included
in the list.
Icons can be pasted into a Product Information window or the into the Price
List window from the clipboard (See section "Product Info window", chapter "Product").
Disk file icons (Macintosh version only)
If you wish to copy an icon from a disk file for example, switch into the "Finder",
select the file, and show the information window for that file by selecting
"Get info..." in the "File" menu. Click on the file's icon
at the top left of this window and copy it. Switch back into the SaleSmartz
application and paste the icon into the Price List window.
|
|
|
Pictures
|
|
| |
Pictures can be pasted as icons. If you have a graphics viewing application,
select a picture and copy it. Switch into the SaleSmartz application and paste
the picture into the price list window. A new Icon should be created using the
picture.
Icons can also be dragged from another Price List’s window.
|
|
|
Deleting
|
|
| |
Icons can be deleted by selecting an icon in the Icon's view and selecting
"Clear icon", "Cut icon" in the "Edit" menu or
pressing the "Delete" key.
|
|
|
Editing
|
|
| |
Icons can be edited within the Price List. Double click on an Icon in the List
window, or select it and choose the menu item "Edit icon". You will
be presented with this editing dialogue.
|
|
|
|
|
Icon editing dialogue
|
| |
Both large (Product information window) and small (Products in the Price List
window) icon views can also be edited.
256 Cols, 16 Cols, B & W.
An Icon consists of four different view modes, the three colour depths and
shadow. The mode(s) you choose to edit will depend on your computer’s screen
colour capabilities, i.e. if you only work with a black and white screen then
you will only need to edit the "B & W" icon view.
Shadow
The shadow mode is used to provide the background for the icon, it acts as
the screen. If you draw an icon and notice that not all the parts of the icon
are visible, then you will probably have to change the shadow mode icon.
A simple way to edit the shadow mode is to drag an icon from another mode on
to it for conversion.
Expert icon editing
If you have this option selected then you will be able to edit all possible
view modes, as seen in the figure shown above. Normally you would have this
option disabled and only edit the icons mode which matches your screen.
|
|
|
Making changes
|
|
| |
1) To select an icon view, click on the sample icons at the top right of the
window. Both large and small versions are available. Small versions will be
used in line views, such as the Price List and Catalogue/Quote contents. Large
Icons are used in Graphic views, such as the Catalogue and Product Information
window. When selected, the chosen view will appear in the large editing field
on the left.
2) Choose the tool you wish to use to draw from the tool palette.
3) Choose a colour from the palette on the bottom right of the window.
4) Use the cursor as a pencil to fill in dots of the Icon with the chosen colour.
Straight lines can be drawn by first holding the shift-key down and then clicking
in the sample. The first direction you move the cursor in will be the direction
of the line you draw.
5) Borrowing a colour from a part of the sample icon can be done by holding
the "Alt" (Mac)/"Ctrl" (PC) key down or choosing the eye
dropper tool. The cursor will change to an eye-dropper symbol . The tip of the
eye-dropper picks up colours when clicked on a dot in the sample. The selected
colour will then appear in the colour palette.
6) Icons can be dragged to other icons in the top right of the window to convert
them to different modes and sizes, e.g. the large 256 colour icon can be dragged
onto the small 256 colour icon to convert the image to a small size without
having to redraw it.
7) When editing is completed, click on the "Save" button at the bottom
of the dialogue to store the changes into the Price List file.
|
|
|
|
Product Groups
|
|
About
|
|
| |
Product Groups provide a means of collecting Products into groups. A Group
has a name and optionally an icon. The group's icon will be used by Products
in the group if a Product has no icon of its own. "<None>" will
be shown as the default group name for Products. Even "<None>"
can have an icon attached.
A Product Group can also have a sell price margin assigned to it. This margin
will be used if a Product in this group uses the "Default margin"
mode (See section "Pricing", chapter "Product").
|
|
|
|
|
Product Groups.
|
|
Creating
|
|
| |
Groups are created when Products are imported from a file and the "Product
Group" column has been checked "on" (see chapter 17. "Importing
Data").
They can also be added by using the "Product Groups" view of the "Price
List" window. Select "Show Product Groups" in a price list menu
when viewing any of the Price List windows. The "Product Groups" view
will appear with a list of all of the Product Groups in the current Price List.
To add a new Product Group, select "New Product Group" in the "Edit"
menu and the Edit Product Group dialogue will appear with a new default group.
Edit the new group as described later (See section "Editing" below).
To add this new group to the list, click on the "Save" button. It
will then be saved and included in the list.
|
|
|
Deleting
|
|
| |
Product Groups can be deleted by selecting a group in the "Product Groups"
view of the "Price List" window and selecting the menu item "Clear
Product Group" or pressing the "Delete" key. The default group
"<None>" is protected and can not be deleted.
|
|
|
Editing
|
|
| |
Product Groups can be changed if desired. Double click on a group in the Product
Groups view or select and select "Edit Product Group" in the "Edit"
menu. You will be presented with this dialogue.
|
|
|
|
|
Edit Product Group dialogue
|
| |
Icon
An Icon can be linked to a Product group by pasting from the clipboard or selecting
from the Icon list, in the same way as in the Product Information window.
Select the icon in the "Edit Product Group" window, and paste a new
icon. Double click on the icon to choose from the list of icons in the Price
List.
Group name
The name of the group can be edited in the "Group name " field.
Note: The "<None>" group name cannot be changed.
Price type
This popup menu allows you to define the following defaults for each of the
price types.
Note: The Price type popup menu will not be visible if you only have one price
type (See section "Price List" in chapter "Preferences").
Group Margin
If you wish, a group's sell price margin can be set in this field. Click the
button "Group margin" and then type a value into the field. This value
will be used for Products in this group using the "Default margin"
mode (See section "Pricing", chapter "Product").
Group account #
A default account code can be set for products groups. This account code will
be used when exporting products to an accounting application. This account code
will only apply to products without their own account code.
Sales tax
If you wish to assign a sales tax to all products in this product group, use
this field.
Taxes can be added by first selecting the Tax field and then choosing "New
Sales tax" in the "Edit" menu for Macintosh, or for Windows,
by choosing "New Sales tax" in the menu provided by clicking the right
mouse button. Only sales taxes listed in the Preferences can be used (See section "Price List",chapter "Preferences").
|
|
|
|
Stock adjustments
|
|
About
|
|
| |
Product stock adjustments is an optional feature of Price Lists that can be
used to keep control of stock levels.
The Stock adjustments view can be shown by selecting "Show Stock adjustments"
in the "Price list" menu.
|
|
|
|
|
Price List stock adjustments
|
| |
Stock adjustments are stored in each Product, and can be edited in the Product
Info window (See section "Supply", chapter "Product").
If you wish to use this feature, you can mark a preference in the "Invoice"
section of the Preferences to automatically change stock levels to account for
products used in Invoices. These changes will be made when you mark an Invoice/Order
confirmation as "Sent".
|
|
|
|
Importing
|
|
About
|
|
| |
The easiest way to build or update a Price List is to import data from another
file. Selecting the "Import..." menu item in the "File"
menu presents you with the import dialogue.
Importing of Products and Contacts is described in the chapter "Importing Data".
|
|
| |
|
|
|
|
General
|
|
About
|
|
| |
Products are stored in Price List files. The main window of the Price List
is a list of all of the Products contained in the list. This list can be viewed
and sorted according to each column (See section "Display columns", chapter. "Basics" ). The list shows an abbreviated
form of each Product.
|
|
|
Creating
|
|
| |
A Product can be created by either importing data from a text file or by selecting
"New product" in the "Edit" menu while viewing the Price
List window. "New product" will provide a dialogue to enter the new
Product code".
A unique product code will be provided as a default, you may change it if you
wish. This product code will remain fixed for the Product and act as the reference
for all other documents using the Price List.
Products from other Price List windows can be dragged or Copied/Pasted into
another Price List. If the Product being moved has the same product code as
a product already in the Price List, you will be warned. This ensures that only
one Product in a list has a particular product code.
|
|
|
Deleting
|
|
| |
A Product can be deleted from a list by selecting one or more Products in the
Price List, selecting the menu item "Clear product", "Cut product"
or pressing the "Delete" key.
This will delete the Product from the Price List window. The Product then will
be deleted from the Price List file when its list document is saved.
Note: When a Product is deleted, its product code is reserved until the Price
List is saved. This means that you can not add a Product with a deleted Product's
code until the Price List has been saved.
|
|
|
Editing
|
|
| |
Once created, a Product can be edited by opening its information window. Double
click on the Product or click on it and select the menu item "Open product".
The information window will appear to allow editing.
|
|
|
|
Product Info window
|
|
About
|
|
| |
The Product Info window is used to display and edit information for a Product.
It has a top panel and five other modes to display information.
|
|
|
Menu
|
|
| |
The Product Info window has a menu which is only visible when this window is
active.
|
|
|
|
|
Product Info window's menu
|
| |
Show Products
Selecting this menu item will show the Product's Price List's main window containing
a list of Products included in this Price List.
Show Product Groups
The Product Group mode of the Product's Price List can be shown by selecting
this menu item.
Show Icons
The Icons mode of the Product's Price List can be shown by selecting this menu
item.
Insert Quick Link
This menu item can be used to insert the characters used to define a Quick
Link for reminder text (See the Sale Reminders field description later in this
chapter).
Use default "Retail" settings
This menu item reverts the Product’s pricing and sales tax to the Product’s
Price List or Product groups default sales settings. Available in the "Pricing"
mode.
|
|
|
|
|
Product Info window
|
| |
The top panel of the Product Info window displays the basic information for
a Product.
Name
The name of the Product can be changed in this field.
Sell Price
The sell price of the Product is shown in this field. Editing of the retail
price is done in the "Pricing" mode of the Product Info window.
Product code
The Product code cannot be changed for a Product. It acts as the unique reference
to this Product.
Icon
The picture icon for the Product can be changed. Until changed, all Products
will have a default icon like this.
|
|
|

|
|
Default Product icon
|
| |
Note: A Product without an icon will use its Product Group’s icon if the
group has one. This is why a Product in a list may appear with an icon, but
in the information window it will appear without.
This icon acts as a dragging tool. Dragging the icon has the same effect as
dragging the Product in the Price List and allows you to install the Product
into another document.
To select an icon that is already installed in the Price List, double click
on the icon in the Price Info window or click on the icon and select the "Choose
icon" menu item. The choose icon dialogue will then appear with a list
of all the icons installed in the Price List.
|
|
|
|
|
Icon selection dialogue
|
| |
Double click on one of the icons displayed to select it or click on "Default".
The default icon will deselect any icon that was associated with the Product.
Pasting Icons
An icon can also be linked to a Product by selecting the Product's icon in
the Info window and pasting an icon or picture from the clipboard.
Disk file icons (Macintosh only)
Icons can be copied from the "Finder". Select a file and then select
"Get Info" in the "Edit" menu. Select the icon in the top
left of the information window and copy it. Show the Product's information window
and Paste the copied Icon into the selected Product icon.
|
|
|
Pictures
|
|
| |
Pictures can be pasted as icons. If you have a graphics viewing application,
select a picture and copy it. Switch into the SaleSmartz application and paste
the picture into the selected Product's icon. A new Icon will be created.
Pasting an icon will perform three actions. First the icon will be added to
the Price List, saved and then linked to the Product. If the pasted icon is
already in the Price List then only the product link will be set (See section "Product Icons", chapter "Price List").
|
|
|
|
Pricing
|
|
About
|
|
| |
The "Pricing" mode shows information about the origin and pricing
structure of the Product. When the user level is not "Full access level",
this mode is hidden from view. This is to prevent a customer from possibly seeing
this information.
|
|
|
|
|
Product Pricing mode
|
| |
Price type popup
If you have more than one price type, this popup menu will be visible and enable
you to edit each price type within a product (See section "Price List", chapter "Preferences").
Sell Price
This field contains the Product's current sell price value. This field can
be edited only if the "Fixed sell price" mode is selected. If a margin
mode is used this field will indicate the Product's sell price for the margin.
Sell Price Modes
The sell price for a Product can be set in three different ways. The simplest
way is to type in the Product's price into the "Sell price" field
(Fixed sell price).
The sell price can also be calculated by using a margin value (See section "Margin",
chapter "Basics"). The Product's margin can be set for each Product
(Fixed Margin) or in the Product's Product Group/Price List (Default Margin).
Fixed sell price
This check box will select the "Fixed sell price" mode, where the
Product's sell price is entered into the "Sell price" field.
Fixed margin
Selecting this check box will activate the "Fixed margin" mode for
a Product. In this mode the Products sell price is determined by the margin
value you enter in the "Margin" field. The "Sell price"
field will be inactive, but will indicate the calculated sell price.
Default margin
If you click in the check box to activate this mode, a Product's sell price
will be determined by the default margin for that Product.
This default margin is first taken from the Product's Product Group margin if
it has one. If no margin is available for a Product's group then the Price List's
default margin will be used. This allows you to change a margin value for a
whole range of Products at the same time (See chapter "Price List").
Based on:
If you have more than one price type, you can base one type on another by selecting
another type in this popup menu e.g. Retail price = Wholesale + 30% margin.
The default is to use the cost price for margin calculations.
Cost price
This describes the cost value of purchasing this Product. This is only used
as a reference for yourself and for calculations used in the "Profit"
mode of Quotes and Invoices. The cost price is used as the basis for margin
calculations.
Own account#
If you export information from SaleSmartz to an accounting system, you can
set this product’s account code in this field. If no number is entered
here then the default account number will be used, from the Product’s Product
group, or Price list.
Sales tax codes
If a Product uses a Sales tax that differs from its Product group or Price
List then you can edit the Sales Tax in this field. New Sales tax values can
be added by selecting "New tax rate" in the "Edit" menu
whenever the Sales tax field is selected. The choice of different Sales tax
rates is defined in the preferences (See section "Price List", chapter "Preferences").
The menu item "Use default Sales tax" reverts the product’s Sales
tax to its Product group, or Price List’s default Sales Tax.
|
|
|
|
Specs
|
|
About
|
|
| |
The "Specs" mode shows the general information about a Product.
|
|
|
|
|
Product Specs mode
|
| |
Product Group
This field contains the Product Group that this Product belongs to. Product
Groups are properties of a Price List (See section "Product Groups", chapter "Price List").
The Product Group pop up contains a list of all Product Groups contained in
the Product's Price List. Select an item from this pop up menu to change the
Product’s group. This menu also acts as a shortcut to adding and editing
Product Groups with the "Add group..." and "Show product groups..."
menu items.
Specifications
This is a free text field. It can contain information about a Product such
as size and colour. This information is used for example, in the Catalogue to
describe a Product being displayed.
Sales Reminders
When a Product is moved into a Quote, a reminder can appear to remind the Salesperson
of certain issues. This text will appear in the Quote to allow you to quickly
add other related Products into the same Quote by clicking on the underlined
quick links.
|
|
|

|
|
Quote Sales reminders field
|
| |
The Sales Reminders field can contain information such as accessories or vital
components required when selling this Product, e.g. batteries or cables. The
field can simply contain text, or even links to other Products.
If you wish to use the quick link facility to link Products as a reminder, then
enclose product codes for these links in "{ }" characters. This is
a way to tell SaleSmartz to treat the text within these characters as links,
e.g. "{CH-554} Swivel chair" will include the product code "CH-554"
as a quick link for a Swivel Chair. You can optionally include a number and
a "*" character in front of the product code to automatically add
a preset quantity of the linked product e.g. "{2*CH-554} would add two
Swivel chairs.
Select "Insert Quick Link" in the "Product Info" menu to
add a new Quick Link text block and allow you to type text between the bracket
characters.
Note: A closing character "}" must be present to match every opening
character "{" when editing this field. If there are an unevenly matched
pairs of these brackets then a dialogue will appear to warn you of this.
Another way to link Products as Quick Link reminders is to drag a Product from
another window into the reminder field. This will automatically add the product
code and name, of the dragged Product, and format the text accordingly.
(See chapter "Quote")
|
|
|
|
Price breaks
|
|
About
|
|
| |
The "Qty Disc" (Price breaks) mode allows editing of the price break
discounts for this product.
|
|
|
|
|
Qty Disc mode
|
| |
Use the buttons at the top of the list to add and remove price breaks. Click
in the list on the numbers, to edit the price breaks.
Quantity
The quantity field determines the minimum quantity required to get the discount.
Discount
The discount percentage is the discount applied to the price once the quantity
is reached.
Unit price
This field shows the discounted default price. This is an example and other
price types will have the same discount percentage applied to provide a different
price.
Price breaks are calculated when a product is placed in a quote.
|
|
|
|
Supply
|
|
About
|
|
| |
The "Supply" mode displays the suppliers and stock levels for a Product.
|
|
|
|
|
Product Supply mode
|
| |
Suppliers
The supplier field can contain free text or links to Contact files. This field
is used to record the supplier(s) of a Product for your own reference.
Contacts can be dragged from Contact icons in other windows to link them to
a Product. Double clicking on a Contact in this field will open the Contact
(Supplier) file window.
If you delete all Contact (supplier) links from the Suppliers field, you will
be able to type text into this field. You can use this feature if you don't
have all of your suppliers in your Contact database.
Stock adjustments
This field is an optional feature for products. You can maintain a record of
stock changes for each product. These changes can be deliveries received or
orders sent out. A preference setting can be made to automatically take in to
account stock used in invoices/orders (See chapter "Preferences").
New stock adjustments can be added by clicking in the stock field and then selecting
"New stock adjustment" in the "Edit" menu.
|
|
|
|
Extras
|
|
About
|
|
| |
The "Extras" mode allows you to edit Contact properties and an optional
feature for products which may have several variations e.g. colour, texture,
material.
|
|
|
|
|
Product Extras mode
|
| |
Properties
Contact properties can be linked to a product. These properties will be installed
into a contact when a Quote containing this product is converted to an Order/Invoice
e.g. installation dates or service contracts.
New properties are added by clicking in the properties field and selecting "New
property" from the "Edit" menu.
Product variations
New variation groups are added by clicking in the variation field and then
selecting "New variation" in the "Edit" menu. Click on "Variation
group" and then "OK". Variation groups can contain several variations.
The Matrix button allows variations to be defined in a matrix, useful for configuring
multiple quantities for different variations of a product.
Variations can be added in two ways:
1) Select "New variation" in the "Edit" menu, then enter
the variation name and click "OK". This type of variation may also
have a price component.
2) Products can be dragged from a Price List and added after each variation
group to define the products variations. This means that for a variation group
such as colour, products of "Red" and "Blue" can be created
in a Price List and then dragged to the product shown above.
The advantage of having variations in the form of other products is that each
variation can have its own price if necessary e.g. a plastic finish for a table
is cheaper than a wood finish.
Before this Product is installed in a Quote, a dialogue will appear to let you
define which variation of this product you want to install.
|
|
|
|
|
Defining product variations in a quote
|
|

|
|
Defining a product variation matrix in a quote
|
| |
Once installed in a Quote, a Product with variations behaves almost exactly
like a normal Product.
|
|
|
|
Docs
|
|
About
|
|
| |
Documents can be linked to Contacts, Products and Product bundles. The documents
can be of any type available on a disk.
|
|
|
|
|
Document link mode
|
|
Creating
|
|
| |
A link is created by first clicking on the list field to activate it, then
selecting "New document link" in the "Edit" menu. A dialogue
will appear allowing a file to be selected. When selected this file will appear
in the document list.
|
|
|
Deleting
|
|
| |
Links are deleted by selecting the Document link in the Document list, then
selecting "Clear document link" in the "Edit" menu or pressing
the "Delete" key.
|
|
|
Opening
|
|
| |
To open the document, double click on it or select it and choose the "Open
document link". The application that created the document (if available)
will then be launched with the document to be opened. Be sure to have enough
memory available to open this other application, if memory is not available
then a warning dialogue will appear to tell you.
|
|
| |
|
|
|
|
General
|
|
About
|
|
| |
Catalogues store references to Products in Price Lists and bundles of Products.
Catalogues are used to display Products in a graphical, organised and more descriptive
way than Price Lists. The structure of a Catalogue is Book-like as in a Quote.
Bundles can be built in Catalogues as groups of Products. These can be used
for "special deals" or set configurations. These bundles are stored
in the Catalogue file whereas the Products are not.
"Source documents" is the term given to files used to store the source
objects for entries in a Catalogue or Quote.
|
|
|
Window
|
|
|
|
|
Catalogue window
|
| |
Price type popup
If you have more than one price type, this popup menu will be visible and enable
you to view each price type for the products (See section "Price List", chapter "Preferences").
Page switcher
To the left of the Catalogue window is a Page switcher. This navigates through
the Catalogue (See section "Catalogue/Quote", chapter"Basics").
Section name
The section name field is used to edit the name of a section when it is viewed
in the section (graphic) view.
|
|
|
Menu
|
|
| |
The Catalogue has its own menu which appears when the Catalogue window is selected.
|
|
|
|
|
Catalogue menu
|
| |
Clean up
Align the Catalogue entries when in section (Graphic) view.
New Bundle
Create a new empty Bundle object.
Bundle items
Group the selected Products into a new Bundle object.
Unbundle
Break up the selected bundle(s) into source Products.
Open source documents
If source documents (Price Lists) for any of the Catalogue entries are closed,
this menu item will open the source files. These files will be opened but hidden
and can be seen in the "Window" menu.
Set source document
Sets the source document for each of the selected entries via a file select
dialogue.
Locate source documents
If some of the source files have been moved or deleted from a disk, this menu
item will open a dialogue to locate the correct source file (See section "Catalogue/Quote", chapter "Basics").
Check source documents
Quickly check all source files to make sure they are open or located on the
disk.
Set as default Catalogue/Price List
This will set this catalogue as the preference for the default Catalogue. The
windows menu will then open this catalogue as the default, or when SaleSmartz
starts up, if you have set the preferences to do so (See section "General", chapter "Preferences").
|
|
|
Creating
|
|
| |
Select "New document" from the "File" menu and then choose
the "Catalogue" document type.
|
|
|
Deleting
|
|
| |
A Catalogue can be deleted by removing its file from disk.
|
|
|
Opening
|
|
| |
A Catalogue can be opened by opening the file on disk.
The application's Catalogue can be opened by selecting "Open Catalogue"
in the "Windows" menu. This will open the default Catalogue file,
the location of which is stored in the preferences. If no Catalogue is currently
set as the application default, then you will be asked to locate it with the
preferences dialogue (See section "Catalogue", chapter 24. "Preferences").
A Catalogue can also be opened from a Quote by selecting the menu item "Open
source documents" or when an object requests Bundle information (such as
double clicking on an object in a Quote). Opening Quotes can also automatically
open related source Catalogues if the preferences are set to do this (See chapter "Preferences").
|
|
|
|
Catalogue entry
|
|
About
|
|
| |
A Product installed into a Catalogue creates a catalogue entry object. Each
catalogue entry remembers the file that it came from. The item’s file can
be changed by selecting the item, selecting the "Set source document"
menu item, and then choosing the new file. Products are represented by reference
in Catalogues, they are not stored there. This means that a Catalogue always
requires a Price List to display Product prices and icons.
Catalogue entries can appear in different forms. In the section (or graphic)
mode catalogue entries will appear as in the example below if the preferences
option for large catalogue entries is on (See section "Catalogue", chapter. "Preferences").
|
|
|
|
|
Large Catalogue entry
|
| |
If the preferences option is set to small Catalogue entries then the catalogue
entry will appear as in the figure below.
|
|
|

|
|
Small Catalogue entry
|
| |
The same Catalogue entry will appear in a simplified form in the contents mode
of the Catalogue.
|
|
|
|
|
Contents Catalogue entry
|
| |
Source icon
The Product’s icon is shown here, when the Product's Price List is open.
Source name
The last updated name of the Product is shown here.
Product code
This is the reference code of the Product, the link to the Product in the Price
List. This is hidden when the user level is not "Full access level".
Sell price
This is the current price of a Product, only available when the source Price
List is open.
Specification
A sample of the specification stored for the Product in the Price List.
Source file name
The name of the Product’s source file. This is optional and can be set
as a preference (See section "Catalogue", chapter "Preferences").
Source file status
The state of the Product’s source file. This is hidden when the list file
is open. It will show if the entry's Price List file is closed or has been moved/deleted.
|
|
|
Creating
|
|
| |
Products can be selected and dragged from a Price List window into a Catalogue
window. Copying objects is done in a similar way, by selecting Product(s), copying
and then pasting into the Catalogue window.
Catalogue entries can also be dragged or copied from one Catalogue to another.
A Product can be placed into a Catalogue by using the "Find" dialogue
(See chapter "Finding").
|
|
|
Deleting
|
|
| |
To delete a Catalogue entry, select it, and select "Clear catalogue entry"
or "Cut catalogue entry" in the "Edit" menu, or press the
"delete" key.
|
|
|
Copying a Picture
|
|
| |
As mentioned earlier, Catalogue entries can be copied from a Catalogue window.
When an entry is copied in the section (graphic) mode, a picture of the object
is also copied (as in a Quote). This picture can then be pasted into another
application to be used in drawing documents.
This picture can also be used in the printing of a Catalogue.
|
|
|
|
Printing
|
|
About
|
|
| |
A Catalogue is printed by first choosing a "Print Template" file,
then selecting "Print" or "Print preview" in the "File"
menu (See chapter "Print Template").
|
|
| |
|
|
|
|
General
|
|
About
|
|
| |
Bundles generally consist of collections of Products. They have a unique code,
name, and a sell price, and are similar in function to Products. Bundles can
be used too as standard configurations or special price deals.
Bundles can only be stored in Catalogues, but can appear as entries in Quotes.
|
|
|

|
|
Bundle icon
|
| |
Bundles can be quickly recognised by their icon outline as in the figure above.
The icon content can be changed, but it will always have the same surround.
In the contents mode, bundles will always have this small icon .
|
|
|
Creating
|
|
| |
Bundles can be created by selecting "New bundle" in the "Catalogue"
menu. A unique code is required to create the Bundle. A dialogue to enter the
code will be shown with a default code.
Use this code or type a new one. Click "OK" and the new Bundle will
be created with default values.
Bundles can also be created by selecting a group of catalogue entries and selecting
"Bundle items" in the "Catalogue" menu. After entering the
code, the selected catalogue entries will be included in a new Bundle.
The new Bundle’s initial sell price will be the sum of all the Bundle's
Products’ sell prices. Specifications and sales reminders will be collected
from all included Products to provide these properties for the Bundle.
Products can be added to a Bundle by dragging or pasting them into the Items
mode of a Bundle info window.
As with other Catalogue entries, Bundles can also be dragged or pasted from
other Catalogues.
|
|
|
Deleting
|
|
| |
Bundles can be removed by first selecting the Bundle in a Catalogue, and selecting
"Clear catalogue entry" or "Cut catalogue entry" in the
"Edit" menu, or by pressing the "Delete" key.
Bundles can also be "dismantled" by selecting the bundle and choosing
the "Unbundle" menu item. It will then be broken into its Product
components.
|
|
|
Editing
|
|
| |
Bundles are edited in the Bundle information window. This is opened by double
clicking on a bundle or selecting it and selecting "Edit catalogue entry"
in the "Edit" menu.
|
|
|
|
Bundle Info window
|
|
About
|
|
| |
The Bundle Info window is used to edit information about bundles.
|
|
|

|
|
Bundle information window
|
| |
Name
The name of the Bundle can be edited in this field.
Icon
The icon representing the Bundle is shown here, it is changed in the "Items"
mode. This icon acts as a dragging tool. Dragging this icon can install this
bundle in another document in the same way as dragging from the Catalogue.
Expires on
This option can be set to display the expiry date for bundles. A warning will
appear if you try to use this bundle after this date.
Bundle code
The unique reference for other documents using this bundle.
List price
The saved sell price of the Bundle is fixed or uses the total of its Products
sell price values. It is edited in the "Items" mode, later in this
chapter.
|
|
|
|
Menu
|
|
|
|
Bundle window menu
|
| |
Insert Quick Link
When editing the "Sales reminders" field, selecting this menu item
will insert a new Quick Link character code (See section "Specs", chapter "Product").
Rebuild specifications
When first created, a Bundle takes the specifications and sales reminders from
the Products used to create the Bundle. If you wish to rebuild these specifications
at a later time, select this menu item.
|
|
|
|
Items
|
|
About
|
|
| |
The "Items" mode of a Bundle info window shows the list of all Products
included in the Bundle. It is not essential to have Products as components of
a Bundle, but their attributes can be included and viewed from within the Bundle.
|
|
|
|
|
Bundle Items mode
|
| |
Components
The list of included Products is shown in the "Components" field.
The check box to the left of each line in this field sets the appearance of
the Bundle's icon. Clicking the check box "on" will include this Product's
icon in the Bundle’s icon. A maximum of four icons can be shown and they
will appear in order of inclusion, from top-left to bottom-right.
|
|
|
|
|
Position of different quantities of bundle icons.
|
| |
To the right of the check box, is the Product’s icon, if its source Price
List is open. The Product's code is visible if the user level is set to "Full
access".
The name of the Product is the next item in each line of the components field,
and then the sell price. This price is also only available if the Product's
Price List is open.
Price type popup
If you have more than one price type, this popup menu will be visible and enable
you to view each price type for the bundle (See section "Price List",chapter "Preferences").
Total
When all Products have open Price Lists and therefore sell prices listed, a
total will appear at the bottom of the window. This is the retail total of all
of the Products. It can be used to determine the Bundle’s price.
Fixed sell price
The sell price of the Bundle is shown in this field. This can be fixed and
entered into this field, or it can be automatically calculated from the sell
prices of its component Products. The "Fixed sell price" button sets
the price mode to use.
Note: When the "Fixed sell price" mode is off, the retail field may
not contain a value if one or more of the component Products has a closed source
Price List. This is because Products in a Bundle require their source Price
List file open to read price information. Double click on a Product will first
open its source Price List, and then its info window.
|
|
|
|
Specs
|
| |
About
The "Specs" mode of a bundle shows a description of the Bundle.
|
|
|
|
|
Bundle Specs mode
|
| |
Catalogue file name
A reminder of the name of the file that the Bundle belongs to.
Specifications
This is a free text field. It can contain descriptive information about the
items in a Bundle.
Sales reminders
When a Bundle is moved into a Quote, a reminder can appear to remind the salesperson
of certain issues (See section "Specs", chapter "Product" for a description of Sales reminders). These
reminders can be edited in this field, or taken from the bundled Products.
|
|
|
|
Pricing
|
|
About
|
|
| |
The "Pricing" mode of a Bundle info window contains the account code
and Sales Tax fields.
|
|
|
|
|
Bundle Pricing mode
|
| |
Account code
This account code is used only for exporting to accounting systems.
The bundle’s own sales tax can also be edited in this mode. If you don’t
set a sales tax for a bundle it will use its product component’s, or the
application’s default sales tax.
Own tax rate
By default, a bundle will inherit the tax rates from it's components. You can
override these tax rates by clicking on "Own tax rate" end editying
the taxes in the fields below.
|
|
|
|
Docs
|
|
About
|
|
| |
Documents of various types can be linked to the Bundles such as pictures and
data sheets (See section "Docs", chapter "Product").
|
|
| |
|
|
|
|
General
|
|
About
|
|
| |
A Print Template provides a format for printing a Quote/Invoice or Catalogue.
These templates can be used for Printing and Faxing. If you want to use templates
for EMailing and saving to disk files, use SZ Templates instead (See Chapter "SZ Template").
The position and text appearance for each of the components of these printed
documents can be customised. These components are represented by "Template
blocks". These blocks are manipulated to provide the desired layout of
the template. Additional text and picture blocks can be added to enhance the
printed result.
The template consists of five sub layouts. These may differ from each other
if required.
1) Preceeding page (optional). This page can contain fields such as Fax header
information. If this part contains no blocks, it won't be printed.
2) First product page. This is always part of a printout. This will probably
contain customer address details in a Quote or Invoice.
3) Middle product page. If the total number of pages in a printout exceeds
two, then this sub layout is used for all the pages between the first and last,
i.e. in a 5 page printout, pages 2,3,4 will use this sub layout.
This layout could contain simple information, such as the page number or the
date.
4) Last product page. This layout is also always part of the printout. When
printing, the Application will check to see if the information fits on to the
first page. If it does, it then checks if the data will still fit when the blocks
from the last page are added. If not, another page will be added to show the
last page's blocks.
Switching between the three layouts is done by selecting the sub layout from
the "Display as" pop up menu at the top of the Print Template window.
Note: Not all information will be available for printing from a Catalogue. Some
options will be ignored, such as totals, finance, discount and customer details.
5) Following page (optional). This page can contain information to be appended
after the product information pages. It woln't be printed if it contains no
blocks.
|
|
|
|
Hints
|
|
EMail quotes/invoices
|
|
| |
You can print SaleSmartz quote/invoice templates to PDF files and eMail attachments.
Create a Quote/Invoice cover eMail in the merge templates folder ("File" menu - "Merge with" - "Edit merge templates").
When you print preview a Quote/Invoice, select "EMail attachment" from the print preview plugin menu (bottom right) and
it will merge the cover email with the customer name etc. fields, and also attach the template as a PDF file.
|
|
|
|
Print templates
|
|
Creating
|
|
| |
To create a new Print Template, select "New" from the "File"
menu and then choose the "Print Template" document type.
|
|
|
Opening
|
|
| |
A Print Template can be opened by opening its file on disk.
|
|
|
Editing
|
|
| |
A template consists of three types of blocks. By default, a "Columns"
block is created. This is essential for printing, and can not be removed. Text
and picture blocks can be added as well.
|
|
|
Creating Blocks
|
|
| |
Template blocks are created in different ways depending on the type of block
you wish.
Text blocks can be created by dragging the "Drag new block" button
in the top of the window, to the template layout area.
Text blocks can also be created by selecting the "New template block".
A default block is created and placed at the top left of the window.
Picture blocks are created automatically by pasting a picture from the clipboard.
|
|
|
Deleting blocks
|
|
| |
Template blocks can be deleted by first clicking on them to select them and
choosing the menu item "Clear template block" or pressing the "Delete"
key.
|
|
|
“Block info” dialogue
|
|
| |
Double clicking, or selecting a block and selecting "Edit template block"
in the "Edit" menu, will display an information dialogue. Each block’s
attributes are set in this dialogue.
Each block type will display a different block info dialogue but the lower part
of each dialogue will remain the same. This part applies to both text and picture
blocks (See the following sections for more information on block editing).
|
|
|
|
|
General block attributes part of a Block info dialogue
|
| |
Preceeding page, First page, Middle pages, Last page, Following
page
The sub layout(s) that a block will appear on are selected using the three
check boxes at the bottom left of the dialogue. Column blocks are always visible
on all sub layouts.
Auto placement
Check the "Auto placement" option on when you wish to automatically
place a block which lies below the columns block.
The columns block will change in vertical size depending on the quantity of
Products being printed. As a result of this, blocks below the columns block
may appear to have a large white space between them, and the columns block.
Checking the Auto placement option on will cause a block below the columns block
to shift to compensate for the size change. Its vertical position is adjusted
to be the same distance below the columns block, even when the columns are shorter
than in the template.
|
|
|
Appearance
|
|
| |
The block’s font, style, alignment and size can be changed using menus.
The type and width of border can also be set for a block using the "Border"
menu.
Border clearance relates to the gap between a template blocks content and its
edges. This is especially useful in the Column block when you wish to increase
the gap between various lines of text.
Select a text block or a part of a columns block and then choose the attribute
from the menus.
|
|
|
|
Column block
|
| |
Column blocks display the content of the Quote/Invoice or Catalogue. Print
preferences can be set, to customise the appearance of the printed result.
A column block is divided into different parts and font information can be set
individually for each part.
|
|
|
|
|
Sample printed columns
|
| |
The columns block has more attributes than the other two block types. The order
and content of each column can be set. The font and border settings can also
be set for individual cells in the block.
|
|
|
|
|
Columns block
|
| |
To the right of the columns block are buttons with ticks or crosses. These
buttons define which rows will be included in the final print out. Click these
buttons on or off to change the printed result.
Note: You will have to select the columns block by clicking in it in order to
see the buttons and scroll bar in the right of the columns block.
Header
The header is the name of the content of each column. The text appearance is
set for all of the headers together.
Section name
This is the name of each section of Products in the Quote/Invoice or Catalogue.
This cell will always remain visible in the template edit window, even if the
"Print section name" option has been turned off.
Section picture
The graphical (Icon) view of each section of Products can be included and printed.
This view is created in the source Quote/Invoice or Catalogue and appears the
same as a section (graphical) view in these documents.
The alignment and border for this picture can be defined in this cell of the
columns block.
Content
As well as for the whole block, the size, font and border for each cell in
the column block can be set individually. The size and content of each column
can be changed at the top of the block (See section "Display columns", chapter "Basics").
The Product specifications are shown under any columns defined as "Description".
This is shown on the printout only for a Catalogue Product or if the "Show
description" option is checked for a Quote entry object (See chapter "Quote").
Totals
The total cells can each be set to individual text appearances. They will always
be placed on the right hand side of the columns block.
The costs/tax and finance reflect the costs mode of a Quote or Invoice.
If total cells are not used, such as finance and costs, they will not be printed.
Note: The header titles used in the column block can be changed if you wish.
Double click on the block to show the "Block info" dialogue, choose
one of the headings modes with the pop up menu in the top left of the dialogue
and then change the text in the appropriate field(s).
|
|
|
Column Block Info
|
|
| |
Double clicking on the Column block will show the Column Block Infor Dialogue
|
|
|
|
|
Column block info dialogue
|
| |
Common page size
The column block in each sub-layout has the same height. The width of the column
block on each sub-layout is always the same.
Ignore nil cost totals
If the pre-tax costs total or the non-taxable costs total are nil then this
total will not be printed.
Ignore nil quantity items
When you break orders/invoices into part deliveries, some entries may have
a nil value for quantity. These items can be removed from the printout by checking
this option..
One section per page
Each section in the Quote/Invoice or Catalogue will be started on a new page
in the printed result. Sections that will not fit on to a single page in the
print out will be carried across to the next one.
Print quote discount % value
When the overall quote discount is printed, you can choose to print the discount
as a percent value as well as the money value, by using this option.
Split Sales taxes
If you have multiple tax components in a Invoice/Quote, this option will split
them and show the total for each.
Variation quantity matrix
This option will show products which have variation matrix, as a grid of quantities
(See section "Extras", chapter "Product").
Product icons
Icons can be printed for each product line by choosing "Icon" from
the column's content pop up. The placement of these icons is determined by the
column definitions in the columns block.
Small
With this option, icons will be printed in small form instead of the normal
large form. Use this option to reduce the line height of each row if you don't
use a larger font size, i.e. a font smaller than 14 point.
Not default icons
Products which have no icon assigned to them normally appear with a default
icon. When you chose this option, these icons will not appear in the printed
result.
|
|
|
|
|
Columns block info, Column headings mode
|
| |
The pop up menu at the top of the columns block dialogue allows you to change
other information for a block.
The text headings which appear in a print out can be changed if you wish. Each
text heading has a field in which you can type. Any text entered in a heading
field will be used to replace the associated heading text in the print out.
The totals headings option in the pop up allows you to change headings associated
with totals.
Note: These changed headings will not appear in the Print template window, but
will appear in when a document is printed using this template.
|
|
|
|
Text block
|
| |
Text blocks can contain information about the Quote/Invoice, Customer (only
for Quotes and Invoices) or other sources.
Text blocks are created by selecting the "New template block". A default
block is created and placed at the top left of the window.
|
|
|
|
|
New text block
|
| |
The text content of each block can be taken from one of six sources and is
selected in the text block info dialogue. This dialogue is opened by double
clicking on a text block.
|
|
|
|
|
Text block info dialogue
|
| |
The sources of the content of a text block are:
1) Preset text. Preset labels can be added to the template. The text content
of these blocks can be chosen from the pop up in the Block info dialogue. Labels,
such as Contact name and address are set from the attributes of each Quote/Invoice.
Other labels, such as date, time and page number are calculated when printing.
2) Editable text. You can define your own "Standard text", which
will appear on all printing, such as headings or greetings. This text can be
changed for each Quote/Invoice/Catalogue just before printing, in the "Print
preview" dialogue.
Single line
If you only wish to use a single line of preset text, check this option on.
This could be used for example for the Contact phone numbers field, if you only
wanted to show the first phone number from several in this field. The number
to the right of the check box represents which line you wish to use.
Suffix text
If you wish to place any text after the preset text, enter it in this field.
This can be useful for example if you wished to place a comma after a person's
name, but could not always be sure how long the name was.
|
|
|
|
Picture block
|
| |
Picture blocks can contain such items as company logos or maps.
Picture blocks are created by pasting pictures (type "PICT"(Mac)/"Bitmap"(PC))
from the clipboard. A new block with the picture will be created. The picture
content of this block can be changed in the "Block info" dialogue
by pasting a new picture from the clipboard into the "Picture" field.
To get the best quality picture printing, paste a large or high resolution picture
into the template. Resize the new picture to make it smaller which increases
the quality.
Most printers have a higher resolution than a screen and thus pictures of a
normal size will appear with jagged edges. Reducing the size of a picture will
scale it and increase the resolution and hence the quality of the printed result.
You can reduce the size of a picture with a %-scale by double clicking on the
picture and typing in the vertical and horizontal scale values in the "Block
info" dialogue.
|
|
|
|
Printing a Quote/Invoice or Catalogue
|
| |
When ready, a Quote/Invoice or Catalogue can be printed using a template. The
printed appearance will be determined by the chosen "Print Template".
When you have a Quote/Invoice or Catalogue open, you can choose a template file
from the list beside the menu item "Choose template" in the "File"
menu.
A scan of the disk can be made to search for template files by selecting "Look
for templates" beside the "Choose template" menu item. Templates
are installed by simply saving them into SaleSmartz’s folder, or a sub
folder of this. File aliases/shortcuts can be used to link file servers to your
application's folder. Place an alias/shortcut to a shared disk inside the home
folder for SaleSmartz. SaleSmartz will then use this alias/shortcut when searching.
This scanning process is done once, automatically when the files are first needed.
This template choice will then be stored and saved with the other Quote/Invoice
or Catalogue information.
Selecting "Print preview" in the "File" menu when viewing
a Quote/Invoice or Catalogue will show the printed format before it is sent
to the printer. The page format shown includes the selected template’s
latest changes. This means that changes can be made to an open template, without
saving, and these will be reflected in the printout.
Text labels in the template can be edited in the "Print Preview" mode.
This allows last minute changes to a printout.
|
|
|
|
|
"Print preview" dialogue
|
| |
Reset titles
To change all the fields back to their original values, click on "Reset
titles".
Note: The columns block field can not be edited in this manner.
It is better to store these changes in the Print Template window if you modify
these text fields regularly.
Template chooser popup menu
You can choose another template by selecting from the popup menu in the bottom
of the window. This will update the window with the new template
Edit selected template
This button will close the print preview window and open the selected templates
source file for editing.
Plug-in menu
This menu will allow you to choose the plug-in to use to print/fax/email or
save the document. Documents can be emailed using Text, HTML or PDF file format. For SZ Templates
(See chapter "SZ Template")
To fax a document, be sure to install your fax software first. Choose the fax
option as the current printer (consult your fax software manual) and print in
the same way as you would to a normal printer.
|
|
| |
|
|
|
|
General
|
|
About
|
|
| |
The Time Manager section of SaleSmartz has many functions. It is a Contact
manager, day planner, organiser and reminder system. It is designed with simplicity
in mind, but has the support of a very sophisticated system.
The central component of the Time Manager is the To Do Memo. It appears as a
simple window where text can be entered, but can be expanded to include much
more detail if required.
The term "To Do List" is used to describe the Time Manager in SaleSmartz.
The To Do List contains and organises all To Do Memos.
|
|
|
Menu
|
|
| |
The Calendar menu is always visible.
|
|
|
|
|
Calendar menu
|
| |
New To Do
Creates a new empty To Do Memo and opens its window. This can be done at any
time (when there is no dialogue open) without closing documents.
New banner
A new banner can be created by selecting menu item. See the section on banners
later in this chapter.
Read out today's To Dos
If you have a compaitble sound synthesizer installed, this menuitem will read
out the dail to dos. This option can also be set at startup (See section "General", chapter "Preferences")
To Do List
Show the To Do List window, the list of all To Do Memos.
Monthly planner
Show a monthly view of To Do Memos.
Weekly planner
Shows the window with the To Dos for a whole week.
Daily planner
Shows the window with the To Dos for a particular day.
Access...
Define the access you will allow for other users connecting remotely to your
To Do List. Connecting remotely to your To Do List is only allowed if you place
your To Do List on a networked shared disk.
New Message Centre...
Selecting this menu item will create a Message Centre file. A Message Centre
is effectively the same as a To Do List file but can be opened separately. This
can be placed on a networked shared disk and is used to receive memos from other
users, if you turn off or take your computer away from the network (See section "Remote access" below).
Open Message Centre...
Open the application's default Message Centre to view received memos.
|
|
|
Remote access
|
|
| |
Additional menus appear for a To Do List if you open a Message Centre or another
user's To Do List. As mentioned before, a Message Centre operates in the same
manner as a To Do List.
When you open a Message Centre or another user's To Do List another To Do menu
will appear. This operates in the same way as the application's To Do menu but
only applies to the opened file.
|
|
|
Creating
|
|
| |
The "To Do List" is created if necessary when the application is
launched. A file called "To Do List" will appear on disk. This file
can then be placed elsewhere if you wish but is always required to run SaleSmartz.
|
|
|
Deleting
|
|
| |
The To Do List file can be removed, but will be recreated when SaleSmartz is
launched again. Do not remove the To Do List file while the application is running.
|
|
|
Opening
|
|
| |
The three To Do view windows can be opened in the "To Do" menu or
the To Do List window can be opened by opening its disk file.
Saving
The "To Do List" file is automatically saved when the application
quits or when one of its view windows is closed. To Do Memo windows are saved
when they are closed.
|
|
|
|
To Do Memo (manual)
|
| |
About
The To Do Memo acts as the central component of the To Do List. In its simplest
form it appears as in the figure below. There are two forms of memo. One is
the manual version as described here and the second is an automatically created
by the application (See section "To Do Memo (automatic)"
later in this chapter ).
|
|
|
|
|
Basic To Do Memo
|
| |
The colour of the window can be set as a preference (See section "To Do", chapter "Preferences"). The default
colour for a manual To Do is yellow.
|
|
|
Creating
|
|
| |
The To Do Memo can be created in many ways.
Selecting the "New To Do" menu item will create a simple memo window
as in the figure above.
Many objects can be dragged into one of the three To Do windows (List, Month,
Week and Day windows) to create a new memo.
Objects such as Contacts from Contact Lists, Products from Catalogues and
Price Lists, Quotes/Invoices and Memos from Contact windows can be dragged
into the windows to create a new memo. When created, the memo will include
an icon of the object being dragged, this is called a Hot link and acts as
reference to the source object (See section "Hot Links" later in this chapter).
|
|
|
Deleting
|
|
| |
Manual To Do memos are deleted by selecting the memo in any of the three main
windows, selecting "Clear To Do" in the "Edit" menu or pressing
the delete key.
They can also be deleted when a memo’s window is open by clicking the delete
memo button.
This button is visible when you display the information panel at the top of
the To Do Memo window.
|
|
|
Editing
|
|
| |
When a memo is first created, its window will appear and immediately allow
text to be typed into it. This text will automatically be saved when you close
the window.
This allows you to quickly open a new memo with the keyboard shortcut -T(Mac)/Ctrl-T(PC),
type a reminder and close the memo, knowing it has been saved. Later when you
have more time can the memo be opened, viewed and changed.
|
|
|
|
|
Memo window (Date dependent)
|
| |
The function of each of these buttons is listed here.
 More More
Show the detailed information dialogue for this memo.
Types.
The following buttons set the type of the memo. Clicking on one or more of
these buttons will add this type to the memo.
 Phone
Phone
A phone call was received or should be made.
 Appointment
An appointment to do something.
 Meeting
A meeting to be attended.
 Quote
Quote
This memo relates to a Quote.
 Invoice
This memo relates to an Invoice.
 Done Done
A personal reminder whether or not a memo has been actioned.
 Send To Do
Click this button to send a To Do Memo to another user across the network.
 Dial Dial
Automatically dial phone numbers (See section "Dialling", chapter "Basics")
 Delete memo
Delete this To Do Memo from the To Do List
 Warning
Shown when this memo is overdue
 Drag handle
Drag this icon to move this memo's information to another window.
Due date
If "Date dependent" has been checked "on" in the information
dialogue, then a "Due date" field will appear to show this date. It
can be edited by clicking in the date or time fields and editing them (See section "General", chapter "Basics").
 Now Now
Set the due date of this memo to the current date and time.
|
|
|
Detailed information
|
|
| |
Clicking on the "Info" button in a memo window will open the information
dialogue.
|
|
|
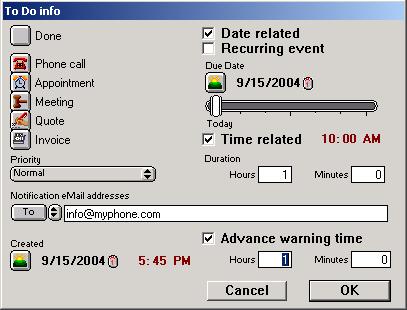
|
|
To Do Memo information window
|
| |
This window allows editing of the data stored in the memo.
Done
As in the memo window, "Done" is a reminder to you that the memo
has been actioned or not.
Type
"Type" buttons appear again down the left side of the dialogue. These
have the same action as the buttons on the memo window top panel.
Priority
The priority of the memo can be set in this pop up menu. The setting can be
one of "<None>", "Normal" or "High". This
setting will affect the memos text appearance in the main windows, as a reminder.
Notification eMail addresses
You can enter one or more eMail addresses in this field to have this To Do memo sent
to the recipients when it is due, or for advance warnings.
Created
This date can be edited and acts as personal reminder of when the memo was
created.
Date related
This option enablesl date and time fields. It means that the To Do Memo has
a specific time.
Recurring event
If you have an event that repeats e.g. a birthday or paying monthly wages,
you can choose this event type.
The "Start date" sets the date for the first occurrence of this event
e.g. a birthday would have the birth date, with the year of birth, or simply
last year.
"Every period" defines how often the event occurs e.g. a birthday
would be "Every Year".
"On period number" chooses when the event occurs e.g. a birthday would
have "On day 0" as the "Start date" defines the actual date.
Other events could be monthly wages e.g. "Start date" of last month,
"Every 1 month", "On Tuesday 1", if you wanted to remind
you of wages on the first Tuesday of each month.
Time related
If you can enter a specific time for this memo, use the "Time related"
option. Type the time value into the field to the right of this button.
Advance warning time
Each To Do Memo can have an warning to remind you about the memo in advance.
This warning can be enabled and the period set with the fields at the bottom
right of the dialogue. A default warning will be set for each new To Do Memo
according to the setting in the preferences (See section "Notify", chapter "Preferences").
|
|
|
Notification
|
|
| |
When a To Do memo becomes due, actions can be taken to warn you. These actions
are set in the preferences (See chapter "Preferences").
An alert icon will appear in the To Do Memo window and in the "Names"
column of the To Do List window.
Other applications
To Do due warnings can also be made to appear in other applications while you
are using them.
|
|
|
|
To Do Memo (automatic)
|
|
About
|
|
| |
As seen in the Contact window, many items are time dependent. Quotes and Invoices
have due dates, Contact memos also have dates. When a Contact file is opened,
To Do Memos are created for each of these. These To Do memos are automatic and
have a different colour to differentiate them from the normal To Do Memos. The
content of Automatic To Do Memos cannot be changed
A Quote for example has a due date, which becomes the To Do Memo’s due
date. A Hot link is also placed on the To Do Memo window to open the Quote concerned
(See Hot link section later in this chapter).
|
|
|
Creating
|
|
| |
Automatic To Do memos are created or updated when a Contact file is opened
or saved.
The "Contact List" also updates these memos when scanning for Contact
files. The latest automatic memos can be read at start-up by setting the "Show
Contact window" Preference (See section "General mode", chapter
24. "Preferences"). This is recommended for a network based system,
as other users can change Contact files without updating your own To Do List.
|
|
|
Deleting
|
|
| |
Automatic To Do Memos are managed by the To Do List. These memos will be deleted
when they have are no longer required, e.g. a Quote has been deleted or deactivated.
Automatic To Do memos can also be deleted by selecting the memo in any of the
three main windows, selecting "Clear To Do" in the "Edit"
menu, or pressing the delete key.
Although they have been deleted, they will appear again if the Contact file
they are linked to is opened or saved.
|
|
|
|
Hot Links
|
|
About
|
|
| |
A Hot Link is an object which can be placed on to a To Do Memo. It is a link
to another part of the application.
|
|
|
Creating
|
|
| |
Hot links are created by dragging objects onto a To Do Memo. It can be any
one of these.
 Contact
Dragged from a Contact address mode or the Contact List window.
 Dial
Dial
Created by the "Telephone" dialogue.
 Quote
Quote
Dragged from the history mode in the Contact window.
 Invoice
Dragged from the history mode in the Contact window.
 Memo
Memo
Dragged from the history mode in the Contact window.
 EMail
EMail
An email dragged from the Mail Centre or a contact History.
 Catalogue
Dragged from a Catalogue window.
 Report builder
Dragged from Report builder window.
 Report
Dragged from a Report window.
A hot link appears as an icon and name (in italic text style) on a To Do memo.
|
|
|

|
|
Contact Hot link
|
| |
It can also be created by dragging a Hot link from another To Do memo.
Another form of Hot Link is provided for Products. This link stores lists of
Products and acts as a very simple calculation area and is called a Quick Quote,
described later in this section.
|
|
|
Deleting
|
|
| |
A Hot link is deleted by selecting it, and then selecting "Clear Hot link"
in the "Edit" menu, or pressing the "Delete" key.
|
|
|
Opening
|
|
| |
A hot link is opened by double clicking on it or selecting, and selecting "Open
Hot link" in the "Edit" menu.
A Contact Hot link will open the Contact file. Quote/Invoice and Memo Hot links
open the Contact file first and then select the original object in the history
mode.
Note: Quick Quotes can not be opened but the Products and Bundles contained
in them can.
|
|
|
Quick Quote
|
|
| |
Quick Quotes are lists of Products and Bundles on a To Do Memo. A Quick Quote
is created when you drag Products or Bundles from a Price List or Catalogue
on to a To Do Memo.
|
|
|
|
|
Quick Quote Hot Link
|
| |
Each line in the Quick Quote lists the quote entry's details. The Icon is taken
from the source object. The quantity is displayed and used in calculations.
The product code is shown if the user level and preferences allow it. The name
of the entry and price are taken from the source Product or Bundle.
If no source document is open, the sell price will not appear for an entry.
The price is not fixed like a normal Quote but linked directly to the source
object.
The Goods total is shown as a sum of all Quote entries in the Quick Quote. This
is also only available when all source Price Lists or Catalogues are open and
each source object can be found in these files.
Dragging a whole Quick Quote is done by clicking in the region outside the
entry list but still inside the outer border.
Quick Quotes can be dragged on to Contacts to create a new Quote. This means
that a Quick Quote can be used as an easy calculation area and then be transferred
to a Contact file for additional options and printing.
A To Do Memo containing a Quick Quote can also be dragged onto a Contact to
create a new Quote. The text in the To Do Memo will be moved to the "Notes"
field of the new Quote.
|
|
|
Adding Entries
|
|
| |
Additional Products or Bundles can be installed after the Quick Quote has been
created, by dragging them on to the To Do Memo.
|
|
|
Deleting Entries
|
|
| |
Quote entries can be deleted from a Quick Quote by selecting the entry in the
list, selecting "Clear quote entry" in the "Edit" menu or
pressing the "Delete" key.
|
|
|
Editing Entries
|
|
| |
Editing Quote entries can be done by choosing an entry and selecting "Open
quote entry" in the "Edit" menu or double clicking on a line.
|
|
|
|
|
Quick Quote entry info dialogue
|
| |
Icon
The icon is displayed from the source Product or Bundle object.
Quantity
The quantity value associated with each Quote Entry is changed in this field.
Name
The name of the Quote Entry is taken from the source Product or Bundle.
Product code/Bundle code
The code that links this Quote Entry to the Product or Bundle.
Discount
A discount percentage for the selected quick quote entry can be set in this
field.
Price List file name/Catalogue File name
The name of the source document that contains the Product or Bundle
Choose file
Click this button if you wish to change the source document of the selected
quote entry, i.e. Price List or Catalogue file.
Open source info
Click this button to open the information window for the source Product or
Bundle.
|
|
|
|
Banner
|
|
About
|
|
| |
Banners can be used to mark periods of several days with a message or theme,
e.g. expos and training courses.
|
|
|
Creating
|
|
| |
Banners are created by select "new banner" in the To Do menu. You
will then be presented with the banner information dialogue.
|
|
|
|
|
Banner information dialogue
|
|
Deleting
|
|
| |
A banner can be deleted by selecting it in the To Do Month window and pressing
the "delete" key or selecting "Clear banner" in the "Edit"
menu.
|
|
|
Editing
|
|
| |
Changes to banners are made using the banner information dialogue. This dialogue
is opened by double clicking on a banner in the To Do Month window, or by selecting
a banner and selecting "Edit banner" in the "Edit" menu.
|
|
|
|
To Do List window
|
|
About
|
|
| |
The complete list of To Do memos can be viewed in this window.
|
|
|
|
|
To Do List window
|
| |
The top panel contains filters for the memos. If you only wish to see some
of the memos, selections in this panel can remove the others.
Time filter
The period of time for the selection of memos can be chosen here. Those memos
without a due date can be viewed with the "No due time" menu item.
Priority
The priority can be chosen here to show only those memos that match.
Types
The type of memos viewed can be selected here, by clicking buttons "on"
or "off".
All choices
The "All choices" button
shows all To Do Memos stored in the To Do List.
List
The list of To Do Memos included in this application are listed here. The contents
and sorting of the list can be changed with the headings at the top of the list
(See section "Display columns", chapter"Basics").
|
|
|
|
To Do Month window
|
|
About
|
|
| |
To Do memos can be viewed in periods of single months using the Month window.
|
|
|
|
|
To Do Month window
|
| |
The month being viewed is shown in the top panel. A pop up of months and also
arrows allow selection of the month. The year can be changed by typing the desired
year in the year field, or clicking on the arrows. The current month can always
be shown by clicking on the "Now" button on the top left of the window.
The days of the week are displayed on the top. The starting day of each week
can be changed in the preferences (See section "To Do", chapter "Preferences").
Days before and after the month being viewed are shown in a darker colour.
The memos displayed in the To Do Month window can have times displayed if you
wish. This is a preference.
|
|
|
Scheduling
|
|
| |
To Do Memos can be moved between days inside the month window by clicking and
dragging them. This changes the due date of each memo as it is shifted. Auto
To Do Memos can not be shifted in this manner.
An item such as a Contact or Quote dragged on to a day in this window will create
a To Do Memo. This new memo will have the due date as the destination day. The
default time of day for this new memo is set from the preferences.
|
|
|
Days
|
|
| |
Double clicking on a day in the calendar, or selecting a day and selecting
"Open day" in the "Edit" menu , will open the "To Do
Day window".
Note: When selecting the day, be sure not to click on any of the To Do Memos
in that day. The best way to do this is to click on the day number to select
it.
|
|
|
Weeks
|
|
| |
Week numbers are shown to the left of the month. Double clicking on these numbers
will open the "To Do Week window".
|
|
|
|
To Do Week window
|
|
About
|
|
| |
The To Do Week window acts in a similar way to the Month window.
|
|
|
|
|
To Do Week window
|
| |
The week being viewed is chosen in the top panel. A date can be chosen in the
date field. The week including this date will then be shown.
The button to the left of the window, the "now" button will reset
the selection to show the current week.
Hours of the day are shown as guidelines for scheduling. The start, end, interval
times and week start day can be set as preferences (See section "To Do", chapter "Preferences").
You can double click on a day name to open the To Do Day window.
|
|
|
Scheduling
|
|
| |
To Do Memos can be shifted within this window to reschedule them. As they are
moved to different times of the day, or different days, the due date of the
memo will change to match the time.
|
|
|
|
To Do Day window
|
|
About
|
|
| |
The To Do Day window acts in a similar way to the Month window.
|
|
|
|
|
To Do Day window
|
| |
The day being viewed is chosen in the top panel. The date field can be changed
or the arrows can be used to select a different day.
The button to the left of the window, the "now" button will reset
the selection to show today.
Hours of the day are shown as guidelines for scheduling. The start, end and
interval times can be set as preferences (See section "To Do", chapter "Preferences").
|
|
|
Scheduling
|
|
| |
To Do Memos can be shifted within this window to reschedule them. As they are
moved to different times of the day, the due date of the memo will change to
match the time.
The duration of each memo can be adjusted by dragging the tab at the bottom
of each to do memo’s rectangle.
Objects such as Contacts and Quotes dragged on to times in this window will
create To Do Memos, with due dates set to the destination time.
|
|
|
|
Remote access
|
|
About
|
|
| |
To Do Lists can be accessed by other users across a network. You can allow
these users to view information in your To Do List. This feature is useful for
example, if several people wish to organise a meeting together.
|
|
|
Access
|
|
| |
The access privileges you allow other users for your To Do List file is set
in the "Access" dialogue. This dialogue is opened by selecting "Access"
in any of the "To Do" menus. You can only edit the access privileges
for your own To Do List or Message Centre.
|
|
|
|
|
To Do List access dialogue
|
| |
Use the check boxes to determine what a remote user connecting to your To Do
List can do.
If you do not any access at all for other users then be sure to place your To
Do List file on your own disk and do not share its folder across the network.
When "View memos" is off, other users can only see the time placement
of To Do memos, not the actual content.
When you open another user's To Do List, you can view the access you have by
selecting "Access (R)..." in the "To Do (Remote)" menu.
The access dialogue will appear but you can't edit another user's access privileges.
|
|
|
Opening remote To Do Lists
|
|
| |
To open another user's To Do List or Message Centre, select "Open..."
in the "File" menu in the normal manner. Locate the file on the network
and click "Open". Be sure that the other user has placed their To
Do List or Message Centre on a network shared disk.
Note: The other user does not need to close their To Do List file for you to
access it.
Once opened, the remote To Do List file's List window will be shown. The "To
Do (Remote)" menu will appear to help you open other windows.
You can drag To Do Memos between your own To Do List and a remote To Do List.
These changes will appear for the other user if they are currently running SaleSmartz
or when they next start the application.
|
|
|
Sending To Do Memos
|
|
| |
You can send To Do Memos to other users on the network. This could be to relay
ideas or simply to record phone messages taken for another person.
To send a To Do Memo, first open its memo window, then click on the "Send
To Do" button .
The "Send To Do memo" window will then appear. You can select a recipient
and then click "Send". Only those users that use the same "Shared
resources" file are available to send memos to in this way i.e. all SaleSmartz
users must use the same "Shared resources" file in a shared folder
or server in a network.
Alternatively you can click on the button "Send to file...". When
you click on this button you can choose the To Do file or message centre belonging
to another user and click "Save". This file must be accessible in
a shared disk in the network.
A message will be automatically appended to the To Do Memo to confirm that
it has been sent. The receiver of the memo will automatically receive an appended
message to say who sent the memo and when.
|
|
|
Message Centres
|
|
| |
Message Centres can be used to collect message if you are away from the office
or do not wish other users to see your To Do List file. It has the same functionality
and format as a To Do List file but its main function is to receive memos.
If you place your Message Centre on a file server or other shared disk, users
can send messages to you and even check your schedule in this file.
As with your own To Do List file, you can set the access privileges in the Message
Centre with the "Access (Centre)..." menu item in the "To Do
(Msg Centre)" menu.
It is possible to have more than one Message Centre but only one is listed
as the default. Others can be opened with the "Open" menu item in
the "File" menu.
A preference can be set to automatically open your default Message Centre when
you first start SaleSmartz. This can be used as a quick check to see if you
have received messages while you weren't using your system.
|
|
| |
|
|
|
|
General
|
|
About
|
|
| |
Custom Variables can be used to classify Contacts using your own criteria and crfeate your own custom fields.
For example you may wish to group Contacts into Supplier and Customers. This
chapter describes Custom Variables (or Classifications) for Contacts.
The Contact Profile mode in the Contact file window allows you to describe a
Contact using these Variables (See section "Variables", chapter "Contact").
Custom Variables are not required for Contacts and this chapter can be skipped
if you wish.
|
|
|
|
Hints
|
|
Setting a variable for multiple contacts
|
|
| |
You can set a custom variable for multiple contacts by dragging a selection of contacts from a contact list window to a variable in the "e;Custom variables window"e;.
This will prompt you to set a value for the new variable and them update and save the dragged contacts.
|
|
|
Removing a variable from all contacts
|
|
| |
When you delete a custom variable, you will be asked if you want to delete it from all contacts.
|
|
|
My custom variables appear in italics in a contact
|
|
| |
This means that the custom variable in the contact is no longer in the main custom variable list.
If you click on the vairable in italics, you will be asked to add it to the main list, which will make it available for all contacts.
|
|
|
|
Custom variables
|
|
Window
|
|
|
|
|
Custom variables window
|
|
Creating
|
|
| |
Custom Variables are stored in the file "Shared resources". This
file’s name and location are stored in the application preferences.
|
|
|
Opening
|
|
| |
The Custom Variables window can be opened by selecting the "Show Custom
Variables" from the "Windows" menu.
Note: If you no longer have access to the original Resources file (perhaps you
have taken your computer away from a network) and you wish to use this functionality,
create a new file and drag properties from Contact windows into this new document.
|
|
|
Deleting
|
|
| |
The Shared Resources Document can be deleted by removing its file from the
disk.
|
|
|
“Standard” Custom Variables
|
|
| |
Several Custom Variables are supplied as "standard" and are always
included in the Shared Resources Document. These properties can be recognised
by a being displayed in bold. These properties are used by SaleSmartz to link
additional information to a Contact.
These variables can only be deleted by the administrator user.
Company reg. number
This variable is used when contact information is exported to accounting applications.
Quote discount %
If this variable is assigned to a Contact, each quote created for the Contact
will automatically have a whole quote discount assigned when the quote is created.
Sales tax exempt
This variable acts as a switch to turn off sales tax for items in quotes, and
later invoices. It does not however alter the sales tax for invoices that are
already created.
Note: For Australian systems, a further variable "Quoted sales tax"
provides tax exemption and the ability to enter the quoted tax number for each
Contact.
Default price type
If you have several price types, you can choose which type to use for certain
Contacts by adding this Custom Variable to each Contact e.g. you could have
retail or wholesale customers.
Days credit
This variable is used to automatically assign a payment due date for invoices.
|
|
|
|
Editing
|
|
About
|
|
| |
Once a Custom Variables window has been opened, its properties can be edited.
|
|
|
Adding
|
|
| |
Properties are added to a Shared Resources Document by selecting "New
variable" in the "Edit" menu.
A dialogue will then appear allowing you to enter the details about the new
variable (See the figure in the "Editing" section below).
Click "Save" to save the new variable to the Shared Resources Document
.
Properties can also be added to a Shared Resources document by dragging Properties
from Contact File windows.
|
|
|
Deleting
|
|
| |
Properties can be deleted from the variable window by choosing a variable from
the list and selecting the "Clear variable" menu item. Deletions are
only saved when the document is saved.
Note: Contact files which use deleted Properties will still show these properties,
but they will appear disabled in italic.
|
|
|
Editing
|
|
| |
Properties are edited in a Custom Variable window by double clicking on a
variable line. A dialogue will appear, allowing you to change the variable details.
This dialogue also appears when you add a new variable.
|
|
|
|
|
Edit Variable dialogue
|
| |
Variable name
The name of the variable can be entered in this field. Changes to this name
will appear in all Contact files that use the variable, with this variable’s
code.
Per Company/Person
This option defines the variable as being associated with the whole company
or one or more people within the company.
Include in new contacts
If you have properties that are used in all contacts then you can mark them
as "Contact default" by checking this option "on". This
means that all new contacts will have these properties included automatically.
Variable type
The type of value that will be attached to a variable can be changed by choosing
a type button.
Yes/No
Properties with this type can only have two values, Yes and No, e.g. a variable
called "Supplier" could have this type to indicate whether a Contact
is a supplier or not.
Number
A number type can be used to describe items such as "Staff count".
Numbers can be decimal values, either positive or negative.
Date
A date type can be used to store information about a Contact such as "First
Contact" where you can record the date you first spoke to a Contact person.
Text
The text type can be used when you wish to store other information about a
Contact. This can perhaps be a credit rating or a list of their interests.
Include in Calendar (Date)
For date type variables, you can choose to include the variable as a reminder in
your To Do list with a link back to the contact.
Has a default value
If you want to assign an initial value to a variable, click on this check button.
This will allow you to edit a default value which will be used whenever the
Custom Variable is installed into a Contact file.
Has limits
If you wish to restrict the possible values for a variable, click on this check
button. You can enter the limits in the field(s) below the button.
Once you have entered the details for a variable, click on "Save"
to store the changes in the Shared Resources Document.
|
|
| |
|
|
|
|
General
|
|
About
|
|
| |
Price Lists and Contact Lists can be created or updated by importing data from
text files. This chapter describes importing data for both of these lists.
This feature is useful if you are converting records from an old system or another
software package you would like to exchange information with.
Contacts imported from a text file can be saved in Contact groups or as individual
files in a folder called "Imported Contacts" in the application’s
folder.
To break up the individual Contact files into smaller groups (as recommended
for Contact List speed), sub folders will be created within the "Imported
Contacts" folder, grouping the Contacts in name first letter groupings.
The "Contact n�" field is used to identify contact matches if the
import is used to update existing contacts.
|
|
|
Preparation
|
|
| |
Before importing data into SaleSmartz you should prepare the import file. Open
the application you would like to export the data from. Save the required information
as a text format file. SaleSmartz is very flexible with the order of the columns
and the field delimiter character so these are not so critical.
A good test for the exported data is to try and import it into a spreadsheet
or word processor application. This will show you what the data looks like before
you import it into SaleSmartz.
Files from other computer systems can also be used if you have the correct file
conversion software. Again test the result with a word processor to see what
the data looks like. The text below shows how an imported file could look when
loaded into a word processor.
New Interiors Ltd.=>C-223=>James Chairson=>Mr=>Purchaser
John's joinery=>S-344=>John=>Mr=>Manager
This example shows what would become two Contacts, the "=>"
represents a tab character and the two lines are separated by a normal return
character.
It is important that the file's field placement is consistent in each row in
the file, i.e. in the example above, the person’s name always has two tab
characters before it, in each row.
|
|
|
Process
|
|
| |
Selecting "Import..." in the "File" menu presents you with
one of these dialogues:
|
|
|
|
|
Importing Products from a text file.
|
|
|
|
Importing Contacts from a text file.
|
| |
Plug-ins
If you have translator files in the "Plug-ins" folder that are designed
for import, the popup menu "Custom translator" will appear above the
button "Choose file". This popup menu will otherwise be hidden.
If you have a compatible translator plug-in for your import file, the translator
can be chosen from the popup menu. If this is the case, you can follow the same
procedure as the next "Custom translator" section, but skip steps
1 to 7.
|
|
|
Importing (Custom translator)
|
|
| |
To import data from a text file follow these steps.
1) The import file can be chosen by clicking on the button "Choose file".
A dialogue will appear to allow you to choose a text file.
Note: Only files of type text can be imported. Most spreadsheets and Word processors
allow the export of data in a text format. Files from other types of computer
systems may also be imported if the System software allows it.
When chosen, the contents of each line of the file are displayed in the sample
text field.
Note: Leading and trailing space characters will be removed from each of the
file’s fields.
2) Set the Field delimiter character. By default this is a tab. If the file
has a different delimiter, click in the "Field delimiter" field and
type the character. A Tab will appear as "tb" as in the example.
You will know when you have the correct character as the sample text will order
itself into the correct rows.
3) Some files may have more than just a field delimiter and have quotes around
each field, e.g. "Field1","Field2","Field3".
If this is the case then check the "Remove quotes" check box.
4) If some of the fields you import contain return (line end) characters, such
as addresses, then these characters must be replaced before importing. A return
character represents a new row, so fields with returns in will scramble the
data.
The character you have used to replace the return character can be entered into
the "Return replacement" field to convert the imported data fields
back to returns.
5) Drag the sample text on the right hand side of the sample field to match
the columns on the left. The text will be rearranged and show the new order
immediately.
Note: Contact import columns include two types of address. The first is called
"Whole address". This can be used if the address occurs in a single
field. The second is used if the address is split into separate fields. These
are called "Address1, Address2... Align the parts of the imported address
with these headings.
6) Different lines of the text file can then be viewed with the switcher to
the right. Check that other lines have the same format.
Note: Product Groups will be created in the Price List if there is no group
with a name matching exactly the group for the product being imported.
7) Check or uncheck the boxes on the left according to the data available.
This restricts the import of data to only those that are checked on.
This is especially useful if you don’t wish to import the names of existing
Products because you have changed them.
Note: The product code is always imported and used as a reference. New products
added to Price List will always contain Name and Retail price. Even if these
are checked as off.
The company name field is also always imported for Contacts. Be sure to uncheck
the address fields you don't wish to use, e.g. uncheck "Whole address"
if you are using "Area", "Town" etc.
8) Once you have set the import format, click on the "Test" button.
The import will be checked and a status dialogue will appear.
Import status dialogue.
The status dialogue provides a summary of the import action.
9) Errors (if any) can be viewed by clicking on the "Show errors"
button. If there are a lot of errors the import order may be incorrect, click
"Cancel" and rearrange the rows before trying again.
|
|
|
|
|
Product import errors dialogue.
|
| |
Errors are shown referenced by line number in the left hand column. A description
and then a sample of the text line is also shown. The highlighted part of the
sample text indicates the position of the fault. Tab characters will be shown
by the character "�" as in the example.
10) When you are happy with the result of the import, click on "Save"
in the Import status dialogue. The new Products or Contacts will now be changed/added
and then saved to disk.
Note: The import settings you have changed in this process will be saved in
the Price List file for Price Lists and the "Contact List" file for
Contacts. These will be kept for the next time you perform an import.
When a Price List text file is imported as an update, Products can be added
if they don’t already exist in the list.
If Products exist in the Price list and were not imported they can be obsolete.
These Products will be shown in a dialogue after saving the imported list.
They can then be deleted if you wish. Click and select the Product then click
on the "Delete" button. This Product will then be deleted and the
Price List saved.
|
|
|
|
Importing from Act!
|
|
Versions older than Act! 7.0
|
|
| |
If your version of Act!® is older than 7.0, you need to import the old database files into a Trial version of Act! 7.0 before proceeding with the steps below.
Older Act! for Macintosh customers may need to upgrade to a more recent version before updating to Act! 7.0
|
|
|
Importing Act! Contacts
|
|
| |
An import Plugin is available to import contacts from Act! 7.0.
First you will need to export your data from Act!
1) Open Act!, then select "File" menu - "Export".
2) Choose the type of file to be "Text delimited" and press the "Browse" button to Select the file destination, then click "Next".
3) Select the "All records", if you want all contact records and then proceed clicking next.
4) When you get to the screen asking "Do you want to export field names?", click on "Yes, export field names"
5) Click next with the default screen values until the file is exported.
6) Open SaleSmartz and select "File" menu - "Import Contacts" and select the "Act! 7.0 Contacts" option in the Import type popup menu.
7) Click "Next" and follow the onscreen instructions to proceed with the import.
Note:The default field mappings may vary in Act! and the fields in SaleSmartz will be in the wrong place.
To avoid this, download the default mappings file here
(Unzip it) and click on "Load map" to load this file after step 5) above.
|
|
|
Importing Act! Notes/History
|
|
| |
An import Plugin is available to import notes and history from Act! 7.0.
You will need to create a report file from Act! to export the Notes and History entries.
1) Open Act!, then select "Reports" menu - "Notes/History".
2) In the dropdown, "Send the report output to", select "HTML File"
3) Click on the "All contacts" button
4) Click on each of the tabs (Note/History etc.) in the top of this window and select the "Date range" to "All".
Also, click all option types you want to export, they are off by default.
5) Click OK and select where to save the file.
6) Open SaleSmartz and select "File" menu - "Import Contacts" and select the "Act! 7.0 Notes/History" option in the Import type popup menu.
7) Click "Next" and follow the onscreen instructions to proceed with the import.
Note:You should import Act! contacts before Notes/History. Notes/History are linked to contacts by Company name so you may have to merge contact details for duplicate entries if the contact has no company name.
|
|
| |
|
|
|
|
General
|
|
About
|
|
| |
The report module can be used to gather and analyse detailed information about
Contacts.
It can be used to select Contacts with a particular interest or who live in
a certain area. Entries in Quotes and Invoices are also accessible, e.g. a list
of Contacts that have bought a particular Product in the last 6 months, can
also be made.
Once this information is selected, it can then be viewed and/or exported as
a file for use with other applications.
A Report is built from information relating to a Contact, their profile and
history.
|
|
|
Window
|
|
|
|
|
Report Builder window
|
| |
Search for
This field contains a list of information you wish to see.
...find where
The search criteria for the Report. Each line helps to define exactly what
you are looking for.
Icon
The icon at the top right of the window acts as a drag handle, dragging this
icon will drag a reference to this report, e.g. to a To Do Memo.
Other fields in the Report builder window are described later.
|
|
|
Creating
|
|
| |
Select "New document" from the "File" menu and then choose
the "Report Builder" document type.
|
|
|
Deleting
|
|
| |
A Report builder file can be deleted by removing its file from disk.
|
|
|
Opening
|
|
| |
A Report builder can be opened by opening its file on disk or from the "Show
report" menu in the "Windows" menu.
|
|
|
Editing
|
|
| |
Once created or opened, a Report Builder can be edited.
|
|
|
Search for
|
|
| |
When building a report you should choose the information you are seeking in
the "Search for" field. The order of the lines in this field is not
critical, this can be changed in the finished report. Columns can also be removed
later.
1) Click on "New line" in the "Search for" field and a
new line will appear in this field.
2) Choose a calculation type in the "Calculation type " popup menu
below this field. "Single" is the default and will allow all types
of information to be gathered.
Other calculations such as "Total", "Average" etc. can only
be used with numeric value information, such as "Goods total". All
other information types will not be available for selection in the Sub-topic
field.
These other calculations will provide a result for a summary of all of the
selected sub topics, e.g. "Total Quotes-Goods total" will return a
total of all Goods Totals from all Quotes that match the search criteria for
each Contact .
3) Select a line in the "Topic" field. This selection will then allow
sub topics to be selected.
Note: Default address will only return a single row for each Contact file, the
Default address. On the other hand, if you use the "Addresses" topic,
a new entry for each address you have stored in each Contact will be created.
This can mean that several rows of information will be returned for each Contact
file.
4) Select a line from the "Sub topic" field to the right of the main
topics field. This will complete this line for the search.
Note: Estimated. The sub topics which have "Estimated" in front of
their name, such as quote "Estimated goods total", are combinations
of the Probability and the Goods total for a Quote. The result is the probability
multiplied by the goods total, an estimate.
|
|
|
...find where
|
|
| |
The "find where" field contains the criteria to isolate the information
you are looking for.
To edit this field, first click on it and follow the steps as per the "Search
for" field, then follow these additional steps.
5) Once the sub topic is chosen, the comparison type can be chosen in the popup
menu to the right of the window. This will define how the collected information
is compared to the value you enter.
6) Enter a comparison value in the area below this popup menu. The type of
selected information will determine how the value will be entered, e.g. a date
sub topic will show a date entry field for the value.
Repeat these steps until you have all the report information entered, then
save this Report Builder if you wish.
|
|
|
Build
|
|
| |
Once you have created a Report Builder file, you can build a report by clicking
on the "Build" button. A Quick check is made to be sure all information
is entered correctly and then the report is started.
The first step in this process is to read the Contact List. It will be loaded
if necessary in order to continue. The Report Builder uses all of the Contacts
in the Contact List to search for information.
Contact files are loaded if necessary and scanned for the information needed.
A Report window will then appear and show the information that has been gathered
by this search.
The Report Builder can be saved and used again to create another report at a
later time if you wish.
|
|
|
|
Report
|
|
About
|
|
| |
A Report is generated from a Report Builder. It will contain the rows of information
gathered by the Report Builder. The information in each Report is fixed at the
time it is created. Changes to other files, even the Report Builder will not
affect the information shown in the Report.
|
|
|
|
|
Report Window
|
| |
Find items where...
This field contains the search criteria used in the original Report Builder.
Report Created
These fields show the date and time when the Report was created. These fields
are fixed and act as a reference only.
Icon
The icon at the top right of the window acts as a drag handle, dragging this
icon drags a reference to the Report.
Dial
The dial button allows you to use the telephone dialogue to automatically dial
the phone number(s) for the Contacts belonging to the selected rows.
Columns
Each column can show any of the "Search for" topics selected in the
Report Builder. The order and content of the columns can be changed in the same
manner as other lists (See section "Display columns", chapter "Basics").
Rows
Each row of returned information is also a link to its source contact file.
To show the original item, double click on a row in the list. The Contact file
window will be opened and if the row represents a Quote/Invoice or Contact Memo,
this object will be selected in the Contact history mode.
Totals
Totals are automatically calculated for each numerical column. As mentioned
before the values in each row are taken at the time the Report is generated.
Later changes to files will not change row values in the Report.
|
|
|
Editing
|
|
| |
Rows can be removed from a report if required. Select the row you would like
to remove and select "Clear line" in the "Edit" menu.
|
|
|
Exporting
|
|
| |
A Report can be exported as a text file. The export format is defined by the
order and contents of each of the columns in the Report window.
Follow these steps to export a Report file.
1) Prepare the columns and order you wish to export. Add and remove columns
if necessary (See section "Display Columns" in Chapter 5. "Basics").
2) Select "Export..." from the "File" menu.
3) You will then be presented with a dialogue to define the export format.
|
|
|
|
|
Export Report format dialogue
|
| |
Select the options you wish to use. The Export delimiter will be used between
each column of information. This will usually be a comma or tab character.
4) Click on the "Export" button, name and place the new file and
click "Save".
The resulting file will be in a text format (See chapter "Exporting Data" for more information about text format files).
|
|
| |
|
|
|
|
General
|
|
About
|
|
| |
A Label Template can be used to design and print labels on self adhesive label
sheets. A Label Template consists of two viewing modes, one to design the layout
of the label and page, and the other to show the list of text to be printed.
Envelopes can also be printed using Label templates. You can treat an envelope
as a single label, setting the "Labels across" and "Labels down"
fields to 1.
Switching between the two viewing modes is done by clicking on one of the two
buttons to the top left of the Label Template window.
Each label can contain one or more fields. These fields are defined in the layout
mode. Labels can be created manually by typing in text, or by dragging or merging
a Contact to the Label
|
|
|
Template
|
|
| |
You can also print standard labels that have fixed text (no Contact fields)
e.g. Disk labels.
|
|
|
Creating
|
|
| |
To create a new Label Template, select "New" from the "File"
menu and then choose the "Label Template" document type.
|
|
|
Opening
|
|
| |
A Label Template can be opened by either opening the file on disk or merging
Contacts with a Label Template stored in the "Merge templates" folder
(See chapter 21. "Mail merging"). Label Templates placed in the "Merge
templates" folder will be visible in the "Merge with..." menu
item in the "File" menu when a Contact is selected.
|
|
|
|
Layout mode
|
|
About
|
|
| |
Once opened, a Label Template can be edited. As mentioned earlier, a Label
Template consists of two viewing modes. The Layout mode is used to define the
printed appearance of each label. Each label can contain text or pictures, such
as logos etc.
|
|
|
|
|
Label Template window, layout mode
|
| |
Mode buttons
The two buttons to the upper left of the window allow you to switch between
the two modes.
Labels across/Labels down
After you have chosen a sheet of labels to use, you can set the dimensions
of this sheet in the fields at the top of the template window. The number of
labels used, across and down can be entered into the fields of the same names.
Top margin/Left margin
These fields will define the distance between the top left corner of a sheet
of labels and the top left corner of the first label. The actual measurement
may vary depending on the printer you are using.
Note: Most printers will not print right to the very edge of a sheet of paper.
If you have problems with a the edge labels being truncated, adjust the template
layout blocks or set the left/top margins to start on the next label down/across
so as to avoid using the edge labels.
Label width/Label height
These two fields define the dimension of each label. This dimension should
actually be the distance from the left/top of a label to the left/top of the
next label. This will account for any gaps between labels on the sheet.
|
|
|
Editing
|
|
| |
The layout of each label is defined in the lower section of the layout mode.
The size of this area represents a single label, defined by the width and height
fields mentioned above.
Click on the label layout area, then choose "New template block" in
the "Edit" menu to create a new block. Double click on a block to
edit the content of it. The editing of template blocks is mentioned in detail
in chapter 10. "Print Template", sections "Text block" and
"Picture block".
Each field placed on the layout defined as "Preset" text (shown with
«» characters around the text content), will appear as a field in
the labels mode.
|
|
|
|
Labels mode
|
|
About
|
|
| |
The labels mode of a Label template contains the text used as the content of
the printed labels.
The two buttons in the upper left of the window will switch between the two
modes of the Label Template.
|
|
|
Reuse labels
|
|
| |
The grid at the top of the window is used to reuse label sheets. If you have
already printed a few labels on a sheet, you can print more labels on the same
sheet later by marking the labels which you have used.
Click on the grid in the places where labels have been used/removed and these
positions will not be used when printing new labels. A grey rectangle indicates
that a position will not be used. All of the labels will still be printed, but
shifted down to account for the label stickers already used.
Click on the button to re-select all labels for printing.
|
|
|
|
|
Label Template, labels mode
|
| |
As mentioned in the layout mode section, label field names are defined in the
layout. The template blocks which are defined as "Preset" text, will
appear here in the labels mode.
If you want to print identical labels (no Contact fields) then the text "no
template blocks in layout" will appear instead of field names.
Creating
Labels can be created by:
1) selecting "New label" in the "Edit" menu. A new empty
label will be created and selected. You can click and edit label text fields
to the right of each field heading.
2) dragging a Contact from another window, e.g. from the Contact List window,
from the Contact file window or from a Hot Link in a To Do Memo.
|
|
|
Deleting
|
|
| |
Labels can be deleted by selecting one or more labels and typing "delete"
or by selecting "Clear label" in the "Edit" menu.
|
|
|
Editing
|
|
| |
The content of each field within a label can be changed by clicking on the
field text area, to the right of the field name. Click once to highlight the
field, and then again to edit the text. Multiple lines of text can be entered
into each field, but be sure to allow for the height of these extra lines in
the template block in the layout mode.
When you have finished editing a field, type tab, type enter or click elsewhere
in the window to store the new text into the label's field.
|
|
|
|
Printing
|
|
About
|
|
| |
Once completed, a Label Template can be printed by selecting "Print..."
or "Print preview..." in the "File" menu. Selecting "Print
preview" will show a preview window so you can see how the printed result
will appear on paper.
If some labels are truncated in the preview or on paper, then adjust the margins
to skip the labels which are not printed completely.
|
|
| |
|
|
|
|
General
|
|
About
|
|
| |
SZ Templates are files used for printing or sending EMails, Faxes, Quotes,
Invoices, Letters and exporting data.
They are very flexible but are also a little more advanced. For a less complex
solution, you could use the Mail Merge features. (See chapter "Mail Merging").
In their simplest form, SZ templates are text files. Additonal fields can be
added in the text of these files to insert text, such as a contact name or address.
Using this process you can create an EMail template to respond to user requests
or orders.
|
|
|
Window
|
|
|
|
|
SZ Template Window
|
| |
Insert field tag
This Popup menu inserts the preset fields into your text. Click on this Popup
and you can choose the category and type of field you want.
Check Syntax
This button checks the text in the SZ template to make sure it has no errors.
|
|
|
Creating
|
|
| |
SZ templates are created by selecting "New..." from the "File"
menu. Click on the SZ template icon and then click "OK".
|
|
|
Opening
|
|
| |
SZ templates can be opened by choosing "Open..." from the "File"
menu. They can also be opened from the "Merge with" window, if they
have been placed inside the "Merge templates" folder. The Quote/Invoice
"Print preview" window also offers an option to edit these templates.
|
|
|
Editing
|
|
| |
Once the SZ template window has been opened, you can edit the text contained
within. Preset fields can be added vie the "Insert field tag" popup
menu. If the SZ template is being used for quotes or invoices, you don't need
to same changes to the template in order to see the changes in the Print preview
window.
|
|
|
|
Using
|
|
Mail/EMail/Fax merging
|
|
| |
SZ templates can be merged with Contacts, Quotes or Invoices. You can save
SZ templates in the "Merge templates" folder inside your SaleSmartz
folder. This will add them the "Merge with" menu and then you can
choose the new template to merge with contacts.
If you choose to merge to an EMail, choose "Merge with..." from the
"File" menu when you have a contact selected or open. Then you can
choose the EMail plug-in when you see the "Merge with..." window.
Here you can also choose to leave the document open so that you can make any
final changes before you send it.
|
|
|
Quote/Invoice/Order templates
|
|
| |
SZ Templates will appear in the "Choose template" menu near the bottom
of the "File" menu. This menu will appear when you have a quote or
Invoice selected. You can then choose the SZ template and use "Print preview"
as you would normally. You can save the quote as a file, or send as an email
by choosing the option from the "Plug-in" menu in the "Print
preview" window.
|
|
|
|
Structure
|
|
Attributes
|
|
| |
The text contained in the template uses special "tags" starting with
"<sz". These tags can be in several forms. Each tag generaly contains
the words "type" and "id". These define the behavoir of
the tag.
Type:
1) Field
The basic tag in an SZ template is the field tag. This is represented by
the type "field". e.g. <sz type="field" id="Contact.Name">.
2) Loop
Loops are lines of text that repeat for object such as Quotes. You can
list all of the items in a quote using loops. Thes is represented by the
type "loopStart" or "loopEnd". e.g. <sz type="loopStart"
id="Quote.Section">. Any text inside the loop will be repeated
for each item.
IDs
The id part of a tag will determine what text replaces the tag when the template
is processed. The ID will be in the form Object.Property, e.g. id="Contact.Name".
Width
The width attribute can be set for fields. This will set the width in characaters
for the field. If the field text is less than the width value, extra spaces
will be added to the field. The spaces will be added to left or right, or
both, depending on the Align atrribute.
Align
The align attribute can be set for fields.This will determine which side
of the field additonal spaces will be added to when setting the field width.
This has no effect unless the Width attribute is used. The align value
can be "left", "right", or "center". (Sorry
about the spelling to our non-US customers, this is the same as HTML)
|
|
|
Output formats
|
|
| |
The output format of a SZ template is very flexible. You can create text, html,
rtf, xml and many other output files. SaleSmartz does not interpret the text
around the tags, so this text can be in any format.
Quotes can be saved as HTML, TEXT or other formats, using the "Print to
file..." option in the "Plug-in" popup menu, in the "Print
preview" window. This allows you to save any quote that uses a SZ template
to a file. This also allows you to send the quote as an EMail.
|
|
|
Quotes/Invoices
|
|
| |
Quotes and invoices are more complex than Contacts because of their structure.
Quotes can have many sections and many quote entries within each section. Because
of this, quote fields are accessed using loops.
Properties relating to the quote iteself, such as description are accessed
using the id="Quote.x" where x is the name of the property.
Within each quote, there can be one or more sections, just as it appears in
the contact window. These sections must be placed inside a "Quote.Section"
loop. Within each section there can be many quote entries. These must be placed
inside a "Quote.Section.Quote Entry" loop.
e.g.
<sz type="loopStart" id="Quote.Section">
<sz type="field" id="Quote.Section.Name">
<sz type="loopStart" id="Quote.Section.Quote entry">
<sz type="field" id="Quote.Section.Quote entry.Product
code"> <sz id="Quote.Section.Quote entry.Description">
<sz type="loopEnd" id="Quote.Section.Quote entry">
Total: <sz type="field" id="Quote.Section.Goods total">
<sz type="loopEnd" id="Quote.Section">
This sample will produce a list of sections with all of the quote entries inside
them. Each quote entry will display the product code and description.
i.e.
Section 1 (Dining Room)
PROD-1 Chair
PROD-2 Table
Section 2 (Lounge)
PROD-1 Chair
PROD-3 Sofa
Total: 100.00
|
|
|
Examples
|
|
| |
Examples of templates are available for download. You can download a Quote
EMail template or a Quote HTML template.
If a file save dialog doesn't open, choose "Save target as" when you
click on these files (right mouse click on a PC) to save these links as files.
Note: You must save the resulting Quote merged HTML template with the
.htm or .html suffix in order for it to be recognised by your computer.
|
|
| |
|
|
|
|
General
|
|
About
|
|
| |
When users are connected to a network they automatically receive updates and
make changes to files they open from a central server.
If a user travels away from the main network (e.g. a salesperson visiting clients),
they will have to take any required files with them. For example these files
could be price lists and the contacts that he/she will visit.
If any changes are made to files while the user is away from the network, then
these changes will have to be transferred back to the main server at a later
stage.
The file synchronization section of SaleSmartz allows the transfer of changes
(in both directions) between files that originated from the same source file.
For example, if a Salesperson visiting a client makes a quote for the client,
while at the same time a person in the main office adds a contact memo to the
server's copy of the same client file, then the two copies of the client file
need to be synchronised.
Note: If you take files from a server and you intend to synchronise them at
a later date, it is recommended that you perform an initial synchronization
after they are copied to your own computer. This prepares files and so they
"remember" the current state of the server files and helps to resolve
changes better later.
|
|
|
Leaving the office/ Back in the office/ Update remotely
with office
|
|
| |
These menu options are used to simplify disconnecting and reconnecting to a
network of computers.
Leaving the office
This option copies any files that you may need from the file server to your
own computer so you can view and change them while you are away from the network.
Back in the office
This option will update the server files with the files you have changed while
you are away from the network. Changes are updated both ways.
Update remotely
This option can allow you to update files while you are away from the network.
|
|
|
Advanced
|
|
| |
The advanced option allows you to manually synchronise files
|
|
|
Direct synchronization
|
|
| |
The simplest form of file synchronization is "Direct synchronization".
This allows a user to choose two files and synchronise them together automatically.
|
|
|

|
|
"Direct " file synchronization
|
| |
The process of "Direct synchronization" is described here:
1) Open the local file you wish to synchronise, e.g. a contact file. This step
can be skipped if you wish to choose the file after you open the "File
synchronization" window.
2) Select "Synchronise" in the "File" menu.
3) The local file is already placed in the fields representing the local file
in the "File synchronization" window. If you wish to choose another
local file, click on the "Choose file" button beside the "Local
file" label.
4) If the local file has been synchronised with a remote file before, then
this remote file will be shown in the fields in the right of the window. If
no remote file is shown or you wish to change it then click on the "Choose
file" button beside the "Remote file" button. Generally the remote
file will be the file on the file server.
If you wish to use TCP synchronization, click on the "TCP" button.
TCP synchronization is described later in this chapter.
5) Click on the "Synchronise" button. The process of synchronization
will be started and you will see a description of each action as the file is
synchronised.
|
|
|
Unresolved actions
|
|
| |
In some cases, an object may be changed in both the remote and local files.
For example if a quote was updated in the office, while a salesperson updated
the same quote in the field. When this happens a dialogue will appear to explain
the situation and allow you to make the appropriate correction.
|
|
|
|
|
"Unresolved synchronization actions" dialogue.
|
|
Auto synchronization
|
|
| |
Auto synchronization allows you to synchronise groups of several files with
remote files. For example if a salesperson travelled out of the office often,
then they could keep a folder on their own hard disk containing the server's
files they use, ready for auto synchronization. When they return to the office,
they can use auto synchronization to update both their own, and the server's
files.
"Auto" file synchronization
The process of auto file synchronization is similar to direct file synchronization:
1) Each group of synchronised files is contained in a folder within the folder
"Synchronization". The "Synchronization" is placed inside
the main SaleSmartz folder. If this folder is not already there, a button called
"Create" will appear in the top of the window. Clicking on this button
will create the folder "Synchronization" and allow you to drag folders
with files into the folder.
You may have many different folders for auto synchronization, each of which
can represent a different network or location.
2) Once a folder is selected in the Auto synchronization panel, you can select
the remote folder to synchronise files with. This remote folder would normally
be on a file server, and contain copies of all of the files you wish to synchronise.
You can also choose TCP or Modem as the synchronization method, see the section
later in this chapter.
3) Click on the "Synchronise" button and the process will be started.
A record of actions will be shown, as in the "Direct synchronization"
section.
|
|
|
Modem synchronization
|
|
| |
You can use a modem to link two computers and synchronise via a phone line.
Modem synchronization requires that a machine running SaleSmartz acts as a remote
server, generally in the office network. Clicking on the "Start server"
button in the "Server" section of the advanced "File synchronization"
window starts the Modem server.
|
|
|

|
|
Modem setup panel
|
| |
Once you have started the server, a user can connect remotely by entering the
number to the server in the phone number field, changing the other settings
to match those of the server and then clicking on the "Connect" button.
The remote computer will then connect and synchronise files with the server.
|
|
|
TCP synchronization
|
|
| |
SaleSmartz allows users to synchronise files using TCP. This will generally
be using Internet, although other networks such as Localtalk and Ethernet can
be used.
Note: Some Windows computers may not support SaleSmartz TCP synchronization,
please contact EuroSmartz customer services for more information.
TCP synchronization allows users who are travelling, to connect to the main
server in an office and synchronise files in much the same way as when they
are connected to the office network.
TCP synchronization requires that a machine running SaleSmartz acts as a remote
server, generally in the office network. Clicking on the "Start server"
button in the "Server" section of the advanced "File synchronization"
window starts the TCP server.
Both Direct and Auto synchronization have an option for TCP. To choose this
option click on the "TCP" button in the right of the window. The TCP
address fields will be shown.
|
|
|
|
|
TCP address panel
|
| |
You can fill in either the text, or the dot address of the remote server.
When a SaleSmartz TCP server is started, it will show its dot address and, if
available its text address in the "Server" panel.
Note: On some internet connections, both the server dot and text address change
each time the computer connects to internet. Please contact your internet provider
for more information. If the address changes for each connection, the person
connecting to the server will have to be told the current server address, shown
in the "server" panel.
This is the process for TCP synchronization:
Server
1) Connect the server computer (usually in the office) to the TCP network (e.g.
for internet, you could use SLIP or PPP).
2) Open the "File synchronization" window, click on the server icon
to the left of the window. Click "Start server" to start the SaleSmartz
server.
Note: Although the synchronization process is automatic, a user should be near
the server, to answer possible queries from the remote users computer e.g. if
the server can't find a file.
Remote user
3) The remote user also connects to the TCP network in the same way as the
server.
4) Choose Direct or Auto synchronization in the same way as for a normal direct
file synchronization. Click on the "TCP" button to show the TCP address
fields.
5) Type in the server's text or dot address (contacting the user running the
server to get the address if necessary), and click "Synchronise".
Both the server and the remote computer will disconnect from TCP when finished.
The connection to Internet or other network will not be affected, you will have
to disconnect this link yourself.
|
|
|
|
Palm Sync
|
|
About
|
|
| |
Palm synchronization is an add-in module which provides synchronization between
SaleSmartz Contacts/Date Events, and a Palm Pilot database.
This synchronization is a Full 2 way synchronization and updates/adds/deletes records 2 ways, with
confirmation if required.
You will need to download and install the SaleSmartz Palm Conduit
|
|
|
Installation
|
|
| |
Windows
1) Download and run the SaleSmartz Conduit Installer for Windows here: v5.0 or v4.3.
This will install the Palm conduit "SaleSmartz Conduit.dll" in your Palm directory.
If you have any problems, make sure you have downloaded and installed the latest Palm Desktop software here
Macintosh
1) Download the SaleSmartz Conduit for Macintosh: v5.0, v4.3 or v4.3 Classic
2) Unstuff the downloaded file, and place the "SaleSmartz Conduit" file in your
"Conduits" folder inside your Palm application folder.
For OS8-9, the conduits folder is in your Palm application folder, eg. Macintosh HD/Palm/Conduits
For OSX, the conduits folder is generally in /Library/Application Support/Palm HotSync/Conduits
3) Use the Palm software "HotSync Manager" to set up the SaleSmartz Conduit
|
|
|
Synchronization
|
|
| |
The SaleSmartz conduit synchronizes like the other standard conduits, except
you will need to have SaleSmartz running and in Sync server mode.
Make sure you have set the Palm preferences in the menu Windows - Preferences.
Note: If a record has changed on both the SaleSmartz and the Palm database, then a
duplicate will be made on each database. This does not relate to non Palm items such as Quotes etc.
It is recommended that you back up both your Palm and SaleSmartz before your initial synchronization.
1) Start SaleSmartz, choose menu "File" - "Synchronization" - "Advanced"
2) Click on the "Server" tab and click "Start Server"
3) Press the sync button on your Palm Pilot to start the synchronization.
You should see the connection being made to the synchronization server, and the events being logged.
|
|
|
Contacts
|
|
| |
The SaleSmartz Conduit will synchronize Contacts and their fields with the Palm database.
As there can be several addresses per SaleSmartz contact, these will be split
to fit on the Palm, and reassembled back to SaleSmartz for updates.
Each category on the Palm relates to a Contact group in SaleSmartz.
If there are no contact group files matching the Categories on the Palm, new ones will be made.
This section will be enhanced so that specific Contacts can be "tagged" inside a larger group so that
you can specify the records to be synchronized with a custom variable.
|
|
|
Date Events
|
|
| |
The SaleSmartz Conduit will synchronize Date Dependant To Dos with the Palm database.
You can choose to synchronize Auto To Dos (blue) with the Menu Window - Preferences - Palm preferences.
|
|
|
|
iCal Sync
|
|
About
|
|
| |
The iCal sync module in SaleSmartz will allow you to share your Calendar events with the OS X iCal application.
You can either use the SaleSmartz iCal server to publish your Calendar, or use the export file format to save
your SaleSmartz Calendar to a file for importing into iCal.
|
|
|
iCal Server
|
|
| |
The SaleSmartz iCal server will allow you to publish the SaleSmartz Calendar for your iCal application.
This can allow a PC or Mac OS X user to publish their SaleSmartz Calendar and access it over the internet, or simply on the same OS X computer.
To activate the server, select the "File" menu - "Synchronization" - "iCal synchronization".
|
|
|
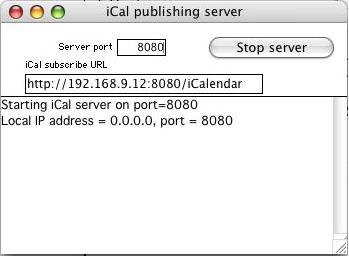
|
|
iCal synchronization server window
|
| |
You may have to change the port number if your computer is already using the port for another process and you receive an error.
You could try a number greater than 10000 to have a better chance of not conflicting. Check with your network administrator for more info.
Click on the "Start server" button and you will see the status in the log field below. You will see any errors there.
Once successfully started, the iCal URL field will be displayed. You can copy this URL and use it in your iCal application.
Check with the documentation in iCal to see how you can subscribe to an iCal server.
|
|
|
iCal export file
|
|
| |
You can export your Calendar to an iCal export file.
When viewing a To Do window, (Monthly, Daily, Single To Do etc.) you can select from the menu "File" - "Export To Do" - "iCal".
You will then be asked to save the file and it will then be exported.
Check with yout iCal documentation to see how to import this file.
|
|
| |
|
|
|
|
General
|
|
About
|
|
| |
The functionality in SaleSmartz can be customised to better suit your requirements
by using these preferences.
To activate the Preferences dialogue, select "Preferences" in the
"Windows" menu. There are different modes for this dialogue. If the
current window is related to a mode then the preferences will show this mode
by default, e.g. opening the preferences while a Contact file window is selected
will switch to "Contact" mode of the dialogue.
Preferences are stored in a file called "SaleSmartz preferences" and
stored in the computer's "Preferences" folder on a Macintosh or in
the SaleSmartz folder on Windows systems.
The following descriptions of each mode in the preferences also show the "default"
settings in each mode.
|
|
|
|
General mode
|
| |
The general mode contains settings for the whole application.
|
|
|
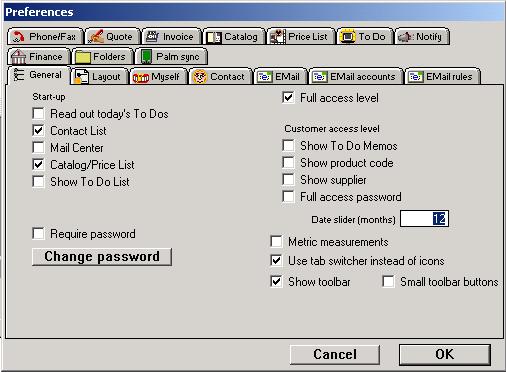
|
|
General mode
|
| |
Start-up
The actions taken when SaleSmartz is launched are listed here.
Read out today's To Dos
This option is only for computers with a supported voice/speech synthesizer. This
will read out the To Do memos for the day when you start SaleSmartz.
Contact List
Choosing this option will open the Contact List window every time SaleSmartz
is launched.
This option also scans the disk(s) for Contact files and Automatic To Do Memos.
Your To Do List will then contain the latest Quote/Invoice and Memo warning
memos. This is setting is recommended for a network based system, as other
users can change Contact files without updating your own To Do List.
Mail Centre
Choosing this option will automatically open your default Mail Centre.
Catalogue/Price List
This option will open the default Catalogue or Price List window if you have
set one.
Full access level
Without this option the user level at start-up will be the Customer level,
with the appropriate restrictions (See Access level in chapter 5. "Basics").
Require password/Change password
If you choose this option, access to SaleSmartz and your data will be denied
at start-up until you type in a password, for added security.
Note: When SaleSmartz is first installed, your password will be empty. If
you are asked for your password before you have changed it, simply leave the
password field empty.
Click on "Change password" to enter a new password. You will be
asked to enter the old password followed by the new one and then a confirmation
of the new password. There is no password installed in SaleSmartz after you
install it so leave the "Old password" field empty.
Customer access level
The customer access level is used when you wish to show a customer your Product
Catalogue in SaleSmartz. Information viewing is restricted in this level. The
options here can determine which additional features are disabled.
Show To Do Memos
Warnings for To Do memos can be suspended while the user level is set to
Customer level. The content of To Do Memos is also hidden as is are all open
To Do Memo windows.
Show Product codes
When the customer user level is chosen (not Full access), Product codes can
be hidden if this check box is not selected.
Require password for full access
When you wish to switch back to full access level, you will be asked for a
password first. This is to prevent a customer from viewing data while you
are not in front of the computer.
Show supplier
As with the Product codes, Suppliers can also be hidden from the customers
by unchecking this check box.
Metric measurements
Check this option if you wish to use metric units (millimetres etc.), otherwise
inches will be used. This preference is used in the Label Template window.
Date slider (months)
Throughout SaleSmartz, dates can be changed with a slider as seen below. The
maximum range of this slider can be set by changing this field.
|
|
|

|
|
Date slider
|
| |
Show utilities bar
This option shows the tool bar with shortcut buttons.
|
|
|
|
Layout mode
|
| |
The layout mode contains layout settings for the whole application.
|
|
|
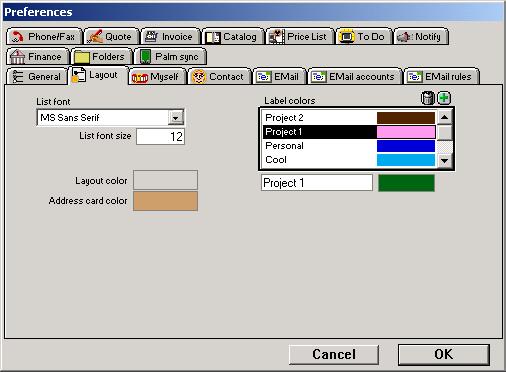
|
|
Layout mode
|
| |
List font, List font size
The default font and size used for most lists is defined in this popup and
field.
Layout color
This is the color that gets used for most windows.
Address card color
This is the color that is used to display contact address cards.
Label colors
You can specify category names and colors for contacts and eMails here.
|
|
|
|
Myself
|
| |
The information describing the user of the Application is stored here.
|
|
|
|
|
Myself mode
|
| |
This information is used in Quotes and Invoices when printing and is selected
from a Print Template (See chapter "Print Template").
Each of these fields is free text and can be filled with information that you
need.
My Code
The code field can contain a reference for the customer, such as tax or salesperson
number.
Sales Commission
The sales commission figure defines the revenue you gain as a salesperson.
This figure is used in the "Profit mode" of Quotes and Invoices to
indicate the revenue on these items. A figure of "0" will mean that
this value is ignored.
|
|
|
|
Contact
|
| |
The Contact mode shows the settings for Contacts and mail merging.
|
|
|
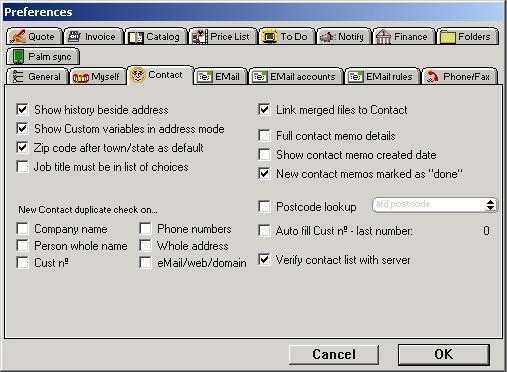
|
|
Contact mode
|
| |
Show history beside address
This option will display the contact history for a contact beside the address
details in the address mode, so that you don’t have to click on the "History"
mode icon in the left of the window to view contact history.
Show Custom variables in address mode
This option will display contact properties for a contact in the first (address)
mode of a contact window, so that you don’t have to click on the "Profile"
mode icon in the left of the window to view properties.
Post code after town/state as default
The post code in a Contact's address can be placed either before or after the
town/state. This is useful for international Contacts. The position of the post
code for new and imported Contacts can be set here. Once a Contact is opened,
an individual preference can be set in the "Contact file" menu.
The post code field is not required for a Contact's address.
Job title must be in list of choices
This option relates to the job title field of a contact window. With this option
"on", the text must be in the list, or be added to the list.
New Contact duplicate check on...
These options will check all new contacts to see if any of these fields match
existing contacts. This avoids duplicattion in your database.
Link merged files to Contact
After the new merged file has been saved it can be automatically linked to
the "Docs" section of the Contact, by checking this button.
Full contact memo details
This option displays more options when viewing a contact memo, such as memo
type, incoming, outgoing etc.
Show contact memo created date
This option will display a date field for a contact memo to show the date the
memo was created.
New contact memos marked as done
This option will set the "Done" button for new contact memos so that
they are either reminders or history records, by default.
Postcode lookup
This option is available if you have postcode Plug-in software for doing searches
on postcodes ad filling in the address fields accordingly.
Auto fill Cust No
This option will create a new customer number for all new contacts.
Verify contact list with server
Unchecking this option will stop checking the server for contact group file changes.
You can use this if you have a very slow network connection
|
|
|
|
EMail
|
| |
The eMail mode shows the settings for eMails and the Mail Centre.
|
|
|
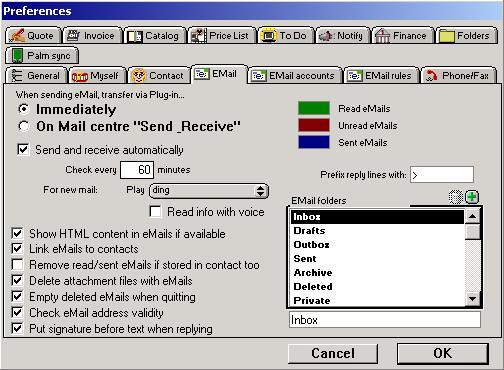
|
|
eMail mode
|
| |
When sending eMail, transfer via plug-in...
This sets the option when to send your eMails to your eMail application. You
can queue your mails by choosing On "Mail centre" Send & receive.This
will store mails in your Mail Centre "Outbox" until you synchronise
with your mail application.
Send and Receive automatically
This option will automatically synchronise your eMails with your external eMail
application when you are not using your computer. This ensures your Mail Centre
is up to date.
Check every
Enter the minutes delay between each check
For new mail:
You can also choose to notify you if an eMail arrives when you are not using
your computer. This can be in two possible ways:
Play
This will play a sound for any new messages
Read info with voice
If you have a compatible voice synthesizer, this option will make SaleSmartz
read out the "From" address and the Subject of any new mails.
Show HTML content in eMails if available.
This option will show formatted HTML text in any eMails if they have any, and your computer supports this display.
Link eMails to contacts.
This option will link all incoming and outgoing eMails to any contact that
matches the to or from eMail address. This helps to keep track of contact eMails
by showing them in the contact history.
Remove read/sent eMails if stored in contact too
This option will remove any eMails that you have read, which have been linked
to a contact. This clears out your inbox of read mails as the mails can always
be found in the contact hsitory.
Delete attached files with eMails
This option will delete attachments from the "eMail attachments"
folder when you delete the associated eMail, removing unlinked files.
Empty deleted eMails when quitting
This option will delete any eMails in the "Trash" folder of the Mail
Centre, when the Mail Centre window is closed.
Check eMail address validity
Override the validity check for eMail addresses.
Put signature before text when replying
Determines if the signature for an eMail account will go before or after the reply message.
eMail colours
These colour panels allow you to choose the colours of different eMail types.
Prefix reply with
This field can contain text to place before each line of the original text
when you reply to a mail. This allows you to see the differemce in the text
content.
EMail folders
Here you can change the name of the eMail folders in the Mail Centre.
You can also add new custom name folders.
|
|
|
|
EMail accounts
|
| |
The eMail accounts mode shows the accounts used for sending and receiving eMail.
|
|
|
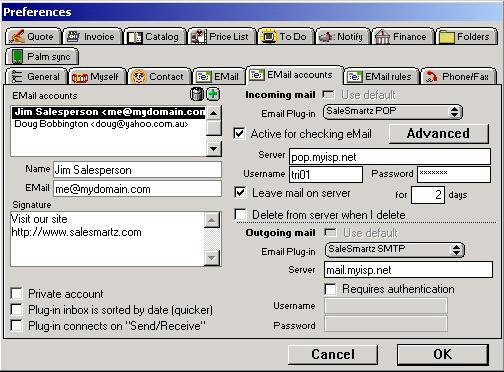
|
|
eMail accounts mode
|
| |
EMail accounts
This field contains a list of all eMail accounts.
These will appear in a popup menu for new eMails so you can set the "From" address of
your mails. Click on an account to edit it, or use the editing buttons in the
top right of this list to add and remove accounts.
Each account may have a different plugin for incoming and outgoing mail, or simply use the default account (shown in bold in the list).
Name
This can store your name or description of the address.
EMail
This stores the "From" eMail address.
Signature
This stores any signature text wich you want to place at the bottom of your
eMails. This can be your company text or website etc.
Private account
Makes sure sent and received eMails are stored in your own private folder in the Mail Center.
Other users can't access this folder.
Mail application Inbox is sorted by date (quicker)
Use this option if your external mail application has it's inbox sorted by
date. If it isn't sorted by date, some messages won't be imported if you use
this option. If you have this problem, don't use this option.
Plugin connects on "Send & Receive"
Some external plugins may support this option to connect to the mail server when synchronizing.
|
|
|
Incoming mail
|
|
| |
These settings are for receiving the eMail for the selected account.
Default
If this is not the default account (first in the list, in bold) then you
can check the "Default" option to use the default account plugin options.
EMail plug-in
Select the plugin to use for the incoming eMail for this account, if you don't use the default.
The SaleSmartz POP/IMAP plugins are recommended as they don't require an external application.
For the SaleSmartz plugins:
Server
This field contains the name of your POP/IMAP email server. Check with your ISP.
Username/Password
These fields contain the credentials to log in to your email server. Check with your ISP.
Leave mail on server for ...
Check this option if you want your eMail to remain on the server so other applications can access it.
You can define how long it is kept in the for-days field.
Delete from server when I delete
Check this option to remove mail from the server when you delete it from within SaleSmartz.
This won't happen until you empty your Deleted folder
|
|
|
Outgoing mail
|
|
| |
These settings are for sending eMail for the selected account.
Default
If this is not the default account (first in the list, in bold) then you
can check the "Default" option to use the default account plugin options.
EMail plug-in
Select the plugin to use for sending eMail for this account, if you don't use the default.
The SaleSmartz SMTP plugin are recommended as they don't require an external application.
For the SaleSmartz SMTP plugin:
Server
This field contains the name of your smtp email server. Check with your ISP.
Requires authentication.
Check this option if your outgoing server requires a username/password.
Username/Password
These fields contain the credentials to log in to your email server. Check with your ISP.
|
|
|
|
EMail rules
|
| |
The eMail rules mode shows the rules used to perform actions on eMails.
|
|
|
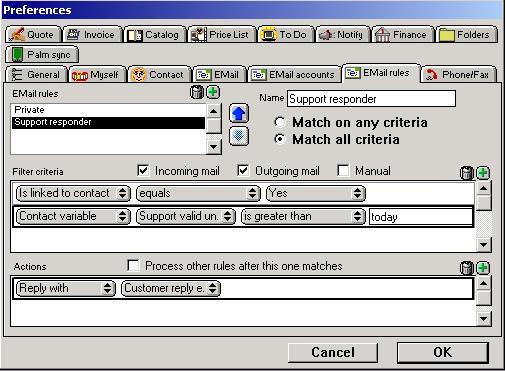
|
|
eMail rules mode
|
| |
EMail rules
This field contains a list of all eMail rules. Add new rules with the add button in the top right of this field.
Move up/down
The two arrows to the right of the rule list will change the order of the rules by
moving the selected rule up or down in the list.
Name
Enter your own name for the selected rule
Match on any criteria
This option will make all the criteria "OR" related so any matches will cause the
actions to be performed.
Match on all criteria
This option will make all the criteria "AND" related so all criteria must match to
cause the actions to be performed.
Incomimg mail
Check this option to apply the selected rule to all incoming mail.
Outgoing mail
Check this option to apply the selected rule to all mail sent.
Manual
Check this option to run the selected rule when the manual rul option is slected from the "Mail Center" menu.
Filter criteria
A list of criteria that filters eMails. Use the add and delete buttons in the top right to edit the list.
Use the popup menus to select different criteria.
Process other rules after this one matches
This option will allow other rules to process an eMail after the eMail matches this rule.
Actions
A list of action to perform on matching eMails. Use the add and delete buttons in the top right to edit the list.
Use the popup menus to select different actions.
|
|
|
|
Phone/Fax
|
| |
The Phone/Fax mode shows the settings for automatic phone dialling and caller display
(incoming call recognition).
|
|
|
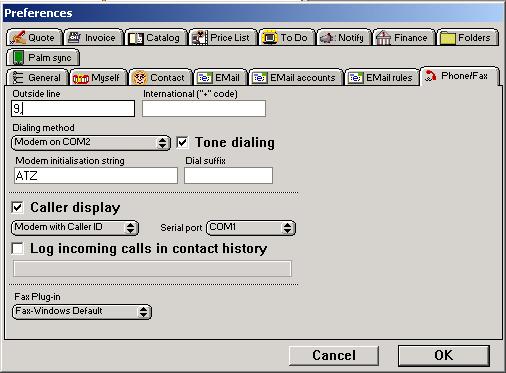
|
|
Phone mode
|
| |
Note: The speaker dialling method may not be available on Windows systems.
Outside line/International ("+" code)
These fields can be used if you require extra prefix codes for phone numbers.
When you put a "+" in front of a phone number, the international code
will be used as a dialling prefix for the phone number.
Dialling method
You can choose to dial using a modem, if you have one connected, or using the
speaker in your computer. If you use the speaker method then you should hold
the microphone of your phone to the speaker when dialling, you may need to adjust
the volume of the speaker using the popup menu to get better results.
Note: The speaker dialling method only works for phones with tone dialling capability.
If you choose the modem dialling method then you can choose the modem’s
port in the "Serial port" popup, and initialisation string.
The "Dial suffix" field is used if you wish to add a modem command
to the end of the dial command string.
Caller display
If you have an appropriate caller device connected to your computer, SaleSmartz
can be configured to display an incoming caller’s Contact file window as
the phone rings.
If you have plug-in files for Caller display devices, these plug-ins will appear
in the popup menu to the right of the "Caller display" button allowing
you to choose the settings defined in the plug-in file.
If you wish, the popup menus allow you to configure the serial port that the
caller device is connected to. The prefix and suffix fields define the strings
sent by the device to enclose the phone number.
Log incomng calls in contact history
This option is for caller display and will record all incoming call events
in the appropriate contact history.
Fax plugin
You can select the plugin for your fax software if it is installed.
This is used for mail merging and quote/invoice template printing.
|
|
|
|
Quote
|
| |
The Quote mode shows the settings for Quotes and template printing.
|
|
|
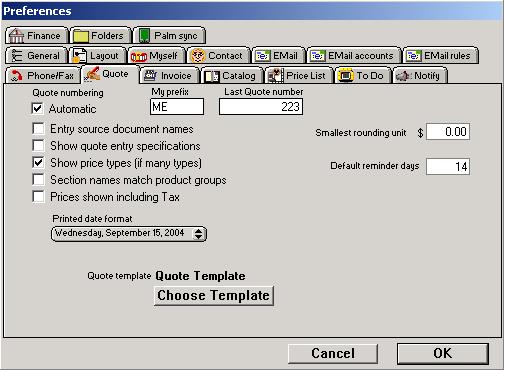
|
|
Quote mode
|
| |
Quote numbering
This option automatically creates quote numbers for new quotes. You can set
the prefix and starting point with the fields beside this option.
Entry source document names
This shows the source file (Price List or Catalogue) file name for each quote
entry object.
Show quote entry specifications
This option will automatically show specifications for all new quote entries
installed into quotes.
Show price types
If you have more than one price type, then this setting will show each quote
entry’s price type in the contents mode of Quotes.
Section names match product groups
This option will create a new section to match the name of the product group
that new products may have.
Prices shown include Sales tax
This option will show the quote entry prices in the quote, inclusive of sales
tax.
Printed date format
When a date field is printed from a Quote or Invoice, its format can be set
here. Date fields can be items such as today's date, due date or validity date.
Smallest rounding unit.
If you do not wish to show small currency units in quotes, you can set the
rounding value in this field. This field will contain the minimum unit for rounding
up or down.
Default reminder days
You can specifiy the default reminder days for new quotes here.
Default Quote template
New Quotes can have a Print template installed as they are created. A template
is chosen with the button "Choose template" below the template field.
|
|
|
|
Invoice
|
| |
The Invoice mode shows the settings for Invoices and Orders
|
|
|
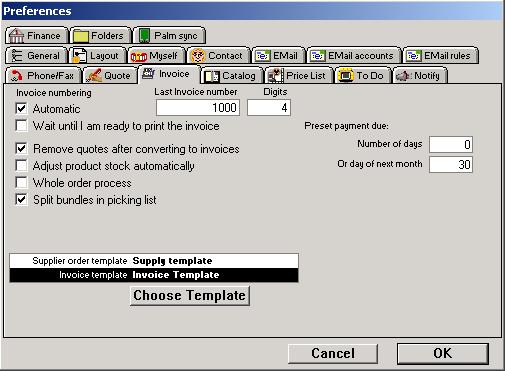
|
|
Invoice mode
|
| |
Invoice numbering
Automatic invoice numbering can be used to reference new invoices as they are
created. Check this option on if you wish to use this feature.
If you are using a network of SaleSmartz applications, be sure that each user
uses the same Shared properties document, stored on a server disk. The last
invoice number is stored in the properties document and is checked to provide
a unique invoice number.
Wait until I am ready to print the invoice
This option will set the invoice number when you print the invoice for the
first time instead of when you convert a quote to an invoice.
Remove quotes after converting to Invoices
Quotes can be converted to Invoices. The original Quote can be automatically
removed once converted, by checking this button.
Adjust product stock automatically
If you use the product stock option in price lists, this option will adjust
stock levels to account for products used in invoices/orders.
Whole order process
If you use more than the invoice document, then you can click this option on
so you can print and record other order-related documents.
Templates
Each step of the order process can have a preset template which will be installed
when an order/invoice is created. Each template is chosen with the button "Choose
template" below the template fields.
Preset payment due
Here you can choose to set the payment due date for new invoices.
Choose either the number of days after the invoice was created, or the day of the next
month if your payement terms are set this way.
|
|
|
|
Catalogue
|
| |
The Catalogue mode shows settings for Catalogues and an option for Quotes.
|
|
|
|
|
Catalogue mode
|
| |
Entry source document names
Catalogue entries will show the file name of its source document (Price List)
in its information field.
Include Sales tax in prices
If you check this option, prices shown in a catalogue will include sales tax.
Large format catalogue entries
Catalogues entries can have two different sizes. This check box sets the size
to large.
Object width/height
These fields allow you to define the size of large catalogue entries. The units
are pixels (screen dots).
Default Catalogue/Price List
This field contains the name of the application's default Catalogue or Price
List file if installed. This file is opened when you select "Open Catalogue/Price
List" in the "Windows" menu and also when you use the "Add"
popup menu in a quote. Click on the button "Choose file" to select
a new file.
Auto open source documents
Catalogues and Quotes have source documents which store prices and other information
for Products and Bundles. These source files can be automatically opened when
a Quote or Catalogue file is opened. To Do this, click on this check box. The
Source file will then be opened, but hidden (Visible only in the "Windows"
menu).
|
|
|
|
Price List
|
| |
The price list mode defines price types and Sales tax.
|
|
|
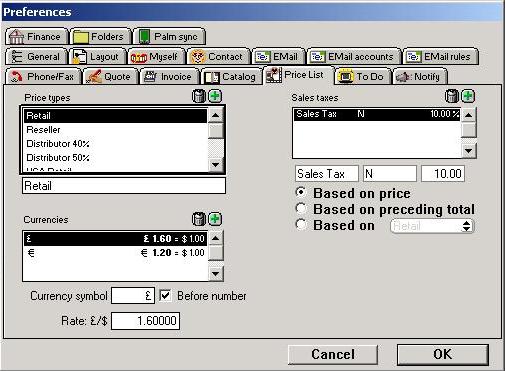
|
|
Price List mode
|
| |
Price types
Price types can be used to define different pricing levels e.g. retail and
wholesale. New types can be added by clicking in the price types field and selecting
"New price type" in the "Edit" menu. These price types appear
in price list and product information windows.
Sales tax
A list of all sales taxes is included in this field. These sales taxes can
be added by clicking in the Sales tax field and selecting "New sales tax"
in the "Edit" menu.
Sales taxes can be based on price types, but are usually based on the price
of products.
Currency
You can set up the currencies you may use, in this list. These can be attached
to your cost or sell prices if your products use different currencies from your
default.
|
|
|
|
To Do
|
| |
The To Do mode sets the preferences for To Do related windows.
|
|
|
|
|
To Do mode
|
| |
To Do List file name
The application's To Do List file name is recorded here.
Message Centre file name
If you have installed a Message Centre, its name is listed here. A new Message
Centre can be chosen by clicking on the "Choose Centre" button (See chapter "Time Manager (Calendar)").
Week start day
In the To Do Month window, days of the week are shown. The starting day of
each week can be chosen here.
Month memo times
Choosing this option will display the time for each To Do Memo listed in the
To Do Month window.
Day Times
The To Do day window has time guidelines in hours. These guidelines can be
set here.
Day start time
The To Do Day window starting hour guideline.
Day finish time
The end of the guideline hours.
Day interval (minutes)
The interval (in minutes) between each guideline hour in the To Do Day window.
Default memo time
A To Do memo created by dragging an object into the To Do Month window will
have a due date set as the destination day of the month. The default time of
that day can be set here. If you turn off the "Time related" button,
new memos will have no due time, just the day.
Default memo type
As mentioned above, a memo can be created by dragging objects such as Contacts/Quotes
on to one of the To Do windows. These created memos will then have the default
type set here.
Default duration (minutes)
You can set the default duration time for all new To Do Memos in this field.
Memo colours
The base colour of the To Do Memo windows can be set here. The Auto Text colour
will be used when an Auto To Do memo appears in a list. Click on a colour block
to open the colour editing dialogue.
Remote To Do List Colours
When you open a Message Centre or another user's To Do List file, their To
Do Memos will appear in different colours. This is to avoid confusion as to
where these memos come from.
|
|
|
|
Notify
|
| |
The notify mode sets the default actions for To Do Memos that become due. This
relates only to the memos that have a due date, i.e. "Date related".
|
|
|
|
|
Notify mode
|
| |
Flashing alert icons
Memos in the To Do List that are overdue will show an alert icon beside the
description field in the list window. They will also show the icon in the To
Do Memo window. If this check box is checked, these icons will flash to draw
your attention to them.
Advance warning time
A time can be set to warn in advance that a To Do reminder will be due. A reminding
action, the same as the notification action above will be done.
To Do warning sound
A sound can be played when a To Do Memo is due. The sound (or a no sound option)
can be chosen in this popup menu.
Notification action
The action taken to show the warning when the memo is due can be set here.
No warning
Due memos will be ignored. Only an alert icon will show that a memo is due.
Show To Do memo
The memo window will be opened when it becomes due.
Show warning window
A window will appear displaying information about the memo when it is due.
Warn when in another application
When a To Do reminder is due and you have the application running in the background
(i.e. while you are using another application), a warning can be sent to you
to show the reminder is due.
This warning action is in addition to whatever action is taken as set above
No warning
Nothing will be done to warn you about a reminder when you are using another
application.
Icon in menu (Macintosh only)
A beep will occur and then a flashing icon will appear in the application
menu to the right of the screen.
Show warning window
A window will appear displaying information about the memo when it is due.
On a Macintosh, a flashing icon will appear and the beep will also occur.
|
|
|
|
Finance
|
| |
The finance preferences mode allows the editing of finance rates used for Quote
and Invoice finance examples. Finance is selected in the Costs mode of a Quote.
If you offer the option for finance you can enter and update the current terms
and rates for finance in these fields.
|
|
|
|
|
Finance mode
|
| |
There are two fields in the finance mode. The top for the list of rental finance
rates, and the lower for the purchase finance rates.
Adding rates
To add a finance rate and term, click in the field you wish to use and select
"New rate" in the "Edit" menu. A new default rate will appear.
Type the term (in months) in the field below the list to the left and its associated
percentage rate in the field to the right.
Deleting rates
To remove a rate from either of the rate list fields, select the line you wish
to delete and select "Clear rate" in the "Edit" menu or
press the "Delete" key.
Editing rates
Rates can later be edited by selecting a line and typing values into the two
editing fields below the list.
|
|
|
|
Folders
|
| |
The folders mode provides settings for automatic saving of contacts and other
files.
|
|
|

|
|
Folders mode
|
| |
PC compatible file names (Macintosh only)
This option will add the 3 letter suffix to file names when you save files
for a macintosh. This suffix is needed for PCs to access the files. If you are
using a mixed network of Mac and PC then you should select this option.
Save new contacts as
These options allow you to choose the method of saving new Contacts.
Single Contact file
This option saves new contacts as single files on a disk. The "Choose
folder" button allows you to choose a folder to be used as the default
for saving new Contacts.
In a Contact Group file
This option saves new Contacts in a Contact Group chosen with the "Choose
file" button.
Default contact group file
This sets the default group where new contacts will be saved.
Save when closing contact windows, without asking me
This option saves new Contacts when you close the Contact window, without asking
to save.
Default merge file folder
This folder can be set to contain all new merge templates so you don’t
have to find the folder each time you save a merge file.
Save merged files here without asking me
This option can be used to automatically save all merged files without a "Save
file" dialogue.
Default merge document application (Macintosh only)
Word processor merge templates should be saved as "RTF’ format and
stored in the "Merge templates" folder inside the application’s
folder. If these merge templates have no application type then a default application
can be set in these preferences. This application will be launched with the
new merged file after it has been saved (See chapter "Mail Merging").
|
|
|
|
Palm
|
| |
The palm mode provides settings for synchronizing with Palm devices.
|
|
|
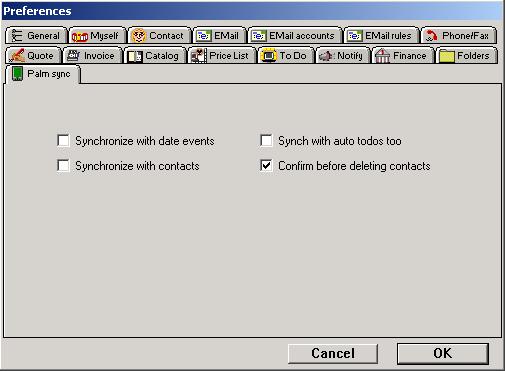
|
|
Palm mode
|
| |
Synchronize with date events
Check this option if you want to synchronize with date/calendar events
Synchronize with auto to dos too
This option includes the automatic (blue) to dos in the syncrhonization
Synchronize with contacts
Check this option if you want to synchronize with contact/addresses
Confirm before deleting contacts
This option will prompt you before a synchronization will delete any contacts in the SaleSmartz database.
|
|
|
|
Admin (Administrator only)
|
| |
The admin mode provides settings for multi user privileges.
|
|
|
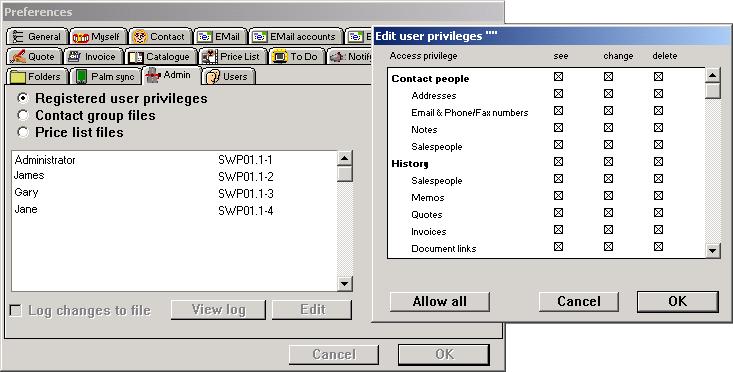
|
|
Admin mode
|
| |
There are three modes for editing privileges:
Registered user privileges
You can define what access certain users have to various areas of the application.
Click on the user and the "Edit" to edit their privileges, as shown in the window above.
Contact group files
You can define what users have what type of access to each contact group file.
Price list files
You can define what users have what type of access to each price list file.
Log changes to file
This option will log changes to a log file for future reference.
View log
This button will open a window with a list of saved logs.
|
|
|
|
Users (Administrator only)
|
| |
The users mode provides settings for user licences and passwords.
|
|
|
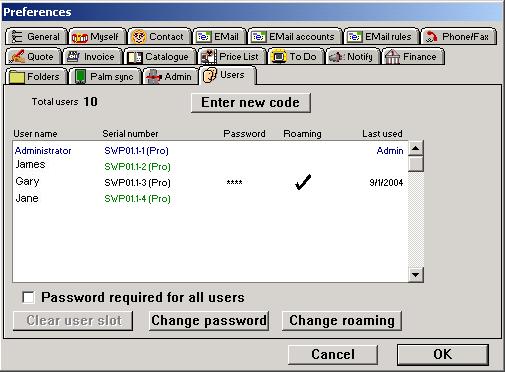
|
|
Users mode
|
| |
Total users
This field contains the total number of users you that your licence covers.
Enter new code
If you have added more users, you can enter the new code supplied by EuroSmartz by clicking on this button.
User list
This list shows all users and their status. The name of the users is set by each user in their own "Myself" preference.
Password required by all users
This option will require all users to set and enter a password at startup.
Clear user slot
This button will clear the user associated with the serial number so you can change the licence to another computer.
Change password
Clicking this button will allow you to set/change a password for a user.
Change roaming
This action will allow a user to log in from another computer and retain their preferences and To Do list.
|
|
©2005 EuroSmartz. All rights reserved. No unauthorised duplication or
distribution is permitted.